My first year growing watermelon, I cut one open three weeks too early because I got impatient watching it sit there looking huge and perfect. The inside was pale pink, watery, and barely sweet. I threw it on the compost pile and learned a lesson that every watermelon grower eventually learns the hard way.
Watermelon does not ripen after you pick it. Unlike a tomato or a peach that keeps sweetening on the kitchen counter, once a watermelon leaves the vine, that is exactly as sweet as it will ever get. So getting the timing right matters more with this crop than almost anything else I grow, and after that first bad melon, I built a whole system around never guessing again.
Why Timing Matters So Much With Watermelon
There is a whole category of produce that horticulturists call non-climacteric, meaning the sugar content locks in the moment the fruit leaves the plant. University of Minnesota Extension groups watermelon in that category, right alongside grapes and strawberries. That single fact is the reason every sign I am about to walk you through matters so much.
If I pick too early, I am stuck with a melon that will never get sweeter no matter how long it sits on my counter. If I wait too long, the flesh can turn mealy, hollow, or start to break down inside the rind. There is a window, and learning to spot it is really the whole skill.
The Five Signs I Always Check
The Ground Spot (Field Spot)
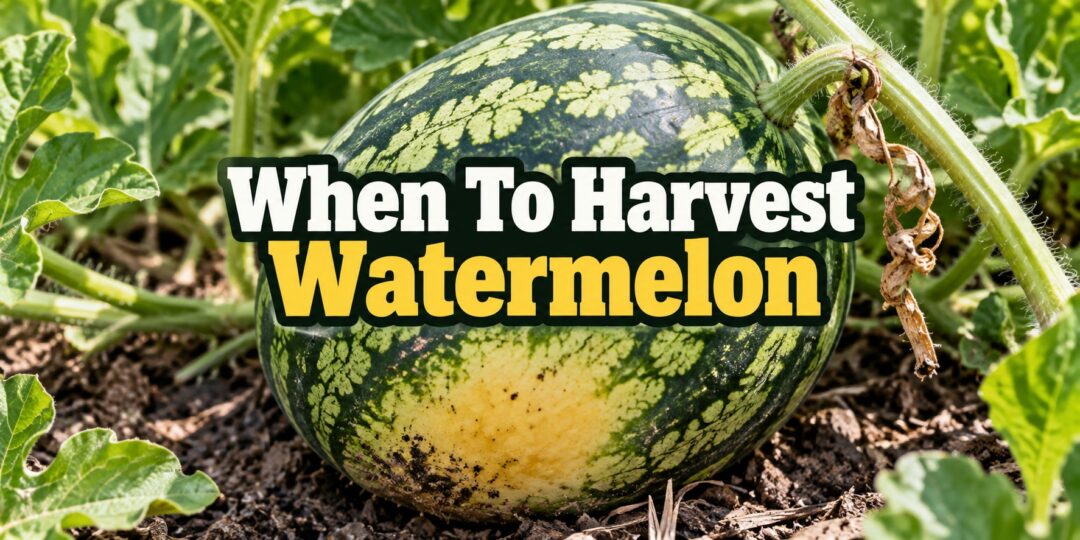
This is the single most reliable sign I use, and it is the first thing extension horticulturists point to as well. The ground spot is the patch on the underside of the melon where it has been resting on the soil all season, shielded from sunlight.
On striped varieties, that spot should turn a buttery or creamy yellow when the melon is ready. K-State Research and Extension notes that solid dark green melons usually deepen to a richer yellow, and lighter green varieties stay a lighter yellow. If that spot is still white or pale green, I know I need to wait, no matter how big or shiny the melon looks.
The Tendril
Every watermelon has a little curly pigtail tendril growing from the vine near where the fruit attaches. While the melon is still ripening, that tendril stays green and springy. Once it dries out and turns brown, I take it as a strong signal that the fruit is done developing.
A few varieties will brown their tendril a little early, sometimes a week or more before the melon is actually at peak ripeness, so I never rely on the tendril by itself. I always pair it with the ground spot check before I commit to cutting anything free.
The Thump Test
This is the test everyone knows, and also the one I trust the least on its own. I knock on the melon with my knuckles, listening for a deep, hollow, almost drum-like thud. An unripe melon tends to sound higher pitched or almost metallic.
The trouble is that the thump test varies a lot by variety, and it takes some experience to calibrate your ear to your own melon patch. I use it as a tiebreaker, not as my main evidence.
The Skin Finish (Shine vs. Dull)
As a watermelon ripens, the skin loses its glossy shine and takes on a duller, sometimes slightly rougher texture. If a melon still looks waxy and reflective in the sun, I usually give it more time.
On striped types, I also watch for the dark green bands separating and becoming more distinct as the fruit matures, especially near the blossom end. That contrast between light and dark stripes tends to sharpen right around the time the melon hits peak ripeness.
Weight and Size
Watermelon is roughly 92 percent water, so a ripe one should feel noticeably heavy for its size compared to others on the same vine. I like to pick up a few melons of similar size side by side, since the heaviest one in the group is usually the furthest along.
Size alone is a poor indicator on its own, since a watermelon can look full grown weeks before it is actually ripe. I only use weight as a comparison tool between melons I already suspect are close to ready.
Counting Days: Using Days to Maturity as a Backup
Every seed packet lists a days to maturity number, and it is worth writing on a calendar or garden journal the day you plant. Many standard watermelon varieties need around 85 days from seed to harvest, though some run shorter and some heirlooms stretch longer.
I count from the date of pollination when I can catch it, since that is really what the maturity clock is measuring, roughly five to six weeks from flower to ripe fruit. If I cannot track individual blooms, counting from my planting date gets me close enough to know when to start checking daily.
Variety Differences That Trip People Up
I have grown Crimson Sweet, Sugar Baby, and Charleston Gray in the same season, and each one ripens a little differently. Crimson Sweet’s stripes get more defined as it ripens, while Charleston Gray develops noticeable rib-like indentations along the rind near maturity.
If you are growing a variety that is new to you, I always recommend reading the seed packet description closely for its specific ripening cues before relying on general rules. What works perfectly for one variety can be misleading on another.
How I Actually Harvest
Once I am confident a melon is ready, I cut it free rather than pulling or twisting it off the vine. A sharp knife or pruning shears works best, leaving an inch or two of stem attached to the fruit.
Leaving a bit of stem helps protect the melon from decay entering at the cut point and makes it easier to carry without damaging the rind. I try to harvest in the morning after the dew has dried, since the fruit tends to be at its coolest and firmest then.
Common Mistakes I’ve Made (and See Others Make)
The biggest mistake is relying on just one sign, usually the thump test, and cutting based on that alone. I have learned to wait until at least two or three signs line up together before I commit.
The second biggest mistake is impatience. Watermelon vines can look done weeks before the fruit actually is, and it is tempting to cut early just to see. Every early cut I have ever made has been a disappointment, without exception.
What Happens If You Pick Too Early
An underripe watermelon has pale pink or almost white flesh instead of deep red, and it tastes watery with very little sweetness. Because watermelon does not ripen after harvest, there is no fixing this once it is cut from the vine.
The only real use for an early-picked melon is the rind. I still pickle the white part even when the fruit inside disappoints me, so at least nothing goes to waste.
Storing and Using Watermelon After Harvest
Once harvested, an uncut watermelon keeps well at room temperature for about a week, or longer in a cool spot like a root cellar or basement. For longer storage, the ideal range is around 50 to 59 degrees Fahrenheit with high humidity, which slows moisture loss without triggering chilling injury.
I never store whole watermelons near apples, bananas, or tomatoes, since those fruits give off ethylene gas that can speed up softening and shorten the melon’s shelf life. Once cut, I refrigerate the pieces and try to use them within a few days for the best texture.
My Simple Harvest Checklist
- Check the ground spot: it should be creamy yellow, not white or pale green.
- Check the tendril nearest the fruit: it should be brown and dried, not green.
- Thump it: listen for a deep, hollow sound rather than a high-pitched one.
- Look at the skin: it should be dull, not glossy.
- Compare weight: the ripest melon on the vine usually feels heaviest for its size.
- Count your days: cross-check against your variety’s days to maturity.
- Cut, don’t pull: leave an inch or two of stem attached.
What About Seedless Watermelons?
Seedless varieties follow the same ripeness signs as seeded ones, since the ground spot, tendril, and thump test all still apply. The one twist is that seedless plants need a seeded variety growing nearby as a pollinator, and fruit set can be a little less predictable as a result.
I have found seedless melons sometimes hold their glossy shine a bit longer than seeded varieties, which makes the ground spot and tendril even more important to check. When in doubt on a seedless vine, I lean harder on those two signs rather than the skin finish alone.
Common Questions About Watermelon Harvest
Can I Ripen a Watermelon After Picking It?
No, and this trips up a lot of new gardeners who are used to tomatoes or peaches finishing on the counter. Once a watermelon is off the vine, its sugar content is locked in for good. The only thing that changes after harvest is texture, and that only gets worse over time, not better.
How Many Watermelons Will One Plant Produce?
In my experience, a single healthy vine usually ripens two to four full-size melons over a season, sometimes more with smaller icebox types. Because pollination happens over several weeks rather than all at once, I end up checking the patch regularly rather than harvesting everything on one day.
What If Frost Is Coming Before My Melons Are Ripe?
If an early frost is forecast and a melon is close but not quite there, I still pick it rather than lose it to cold damage. It will not be as sweet as a vine-ripened melon, but it is better than nothing, and the rind is still perfectly good for pickling either way.
Old Wives’ Tales I’ve Learned to Ignore
I have heard every trick in the book over the years: pressing on the belly until it feels soft, looking for a curled tail, even squeezing the melon to listen for a creak. None of these hold up as reliably as the ground spot and tendril, and pressing on a melon can bruise it before you even cut it open.
The social media version of watermelon picking loves a single flashy trick, but real reliability comes from stacking two or three signs together. That is the approach every extension source I trust actually recommends, and it is the one that has stopped disappointing me in my own garden.
🌱 Your Grandparents Didn’t Need an App to Know When the Harvest Was Ready
Knowing when to pick a watermelon might seem like a small skill.
But knowing how to read a plant, the color of the ground spot, the condition of the tendril, the texture of the rind, and the subtle signs that tell you a crop is finally ready, is part of a much bigger kind of knowledge.
It’s the knowledge of how to provide for yourself.
For generations, people learned these lessons through experience. They knew when to plant, when to harvest, how to preserve what the garden produced, how to repair what broke, and how to make ordinary resources stretch much further.
Many of those skills slowly disappeared as modern life made it easier to simply buy a replacement, hire someone, or drive to the store.
The Lost Skills of Independence was created to bring practical self-reliance back.
Inside, you’ll discover old-fashioned, hands-on knowledge designed to help you grow, preserve, make, repair, improvise, and become less dependent on systems outside your control.
And these aren’t skills that only matter during some dramatic survival scenario.
They’re useful when your garden produces more food than you can eat.
They’re useful when something breaks and you’d rather repair it than replace it.
They’re useful when grocery prices rise.
They’re useful when the power goes out or supplies become difficult to find.
And they’re useful every ordinary day you decide you’d rather know how to do something yourself.
Because true self-sufficiency isn’t about owning every possible tool or stockpiling enough supplies for every possible problem.
It’s about having the knowledge to look at what you already have and knowing exactly what to do with it.
Today it might be recognizing the perfect moment to harvest a watermelon.
Tomorrow it might be preserving your harvest, producing more of your own food, fixing something around the homestead, or rediscovering a skill you never realized you’d lost.
🌱 Every practical skill you learn makes you a little harder to make dependent.
👉 Discover The Lost Skills of Independence and start bringing the practical knowledge of previous generations back into your home and homestead.
GET THE LOST SKILLS OF INDEPENDENCE HERE!
Final Thoughts
Watermelon rewards patience more than almost anything else I grow, and it punishes impatience just as reliably. I never rely on a single sign anymore; I wait until the ground spot, the tendril, and at least one more indicator all agree before I cut a melon free.
Get that timing right, and you will taste the difference immediately. It is worth the wait every single time, and once you have done it correctly a season or two, you will never go back to guessing.
You may also like: 
Join Our Homesteading Facebook Group!
Why Do Amish Women Remove Their Teeth? (Video)
9 Fruits You Can Grow from Cuttings
The Secret Trick That Cuts Fruit Canning Time in Half
How To Pickle Watermelon Rind The Amish Way