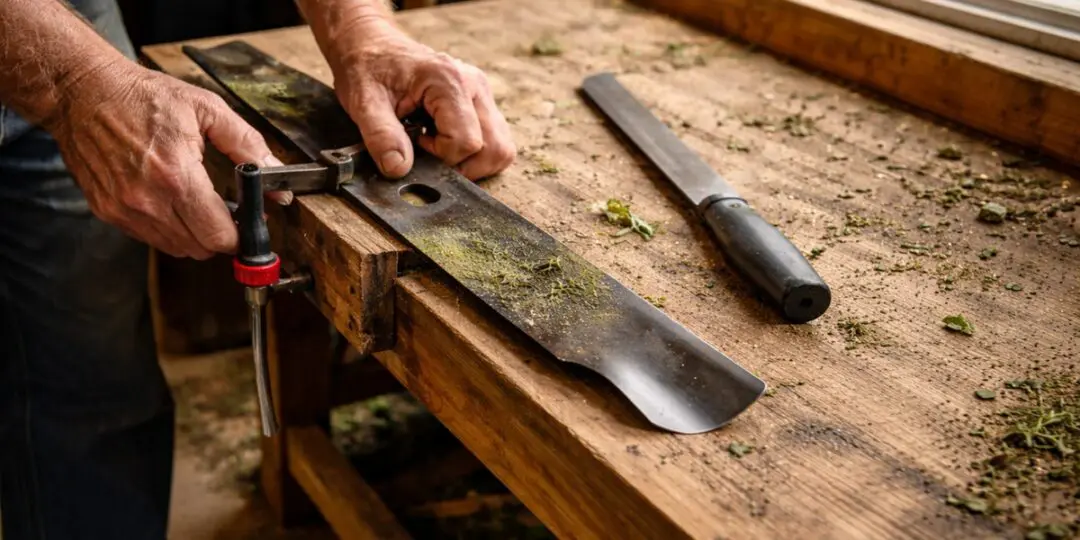
A dull lawn mower blade does not cut grass cleanly. Instead, it tears and shreds each blade of grass, leaving ragged brown tips that invite disease and weaken your lawn over time. The fix is straightforward: remove the blade, sharpen it, and put it back. This guide walks you through the entire process in plain language, whether you plan to use a hand file or an angle grinder.
Most homeowners should sharpen their mower blade two to three times per season, or whenever they notice the lawn looking rough and brownish after mowing. According to Purdue University Extension, a sharp blade is one of the most important factors in maintaining a healthy lawn because clean cuts allow grass to recover quickly and resist stress.
What You Will Need
Gather these items before you begin:
- Work gloves (heavy leather or cut-resistant)
- Safety glasses
- Wrench or socket set (to remove the blade bolt)
- Blade removal block or a piece of wood to wedge the blade in place
- Flat metal file (10-inch bastard-cut is a good choice for hand sharpening)
- Angle grinder with a sharpening disc (optional, faster for heavy nicks)
- Blade balancer or a nail in the wall (to check balance after sharpening)
- Marker or paint pen (to mark the bottom of the blade before removal)
- A clean, flat surface to work on
You do not need an expensive kit. A basic flat file is enough to get a working edge on most residential mower blades.
Safety Before You Start
Working around a mower blade carries real risks. The Occupational Safety and Health Administration notes that rotating and sharp equipment are among the leading causes of serious hand injuries. Follow these precautions every single time:
- Disconnect the spark plug wire. Pull the rubber boot off the spark plug before you do anything else. This prevents the engine from accidentally starting while you are working underneath the deck.
- Drain the fuel or tip the mower correctly. If you need to tilt the mower on its side, tip it with the air filter facing up to avoid oil flooding the carburetor. Alternatively, run the tank dry before starting.
- Wear gloves throughout. A blade edge that looks dull can still cut deeply. Never grab the blade with bare hands.
- Work on a stable surface. A driveway or garage floor is better than soft ground that lets the mower shift.
Step 1: Disconnect the Spark Plug
Locate the spark plug on the side of the engine. It looks like a small cylinder with a thick rubber wire attached. Pull the rubber boot straight off. Set it aside where it will not accidentally fall back onto the plug. This single step makes the entire process safe.
Step 2: Mark the Blade Before Removing It
Use a marker to draw an arrow or a simple line on the bottom face of the blade, the side that faces the ground during normal operation. This matters because reinstalling a blade upside down means the cutting edge faces the wrong direction and your mower will not cut at all.
Step 3: Remove the Blade
Tip the mower carefully on its side with the air filter facing up. Wedge a short piece of 2×4 or a blade removal block between the blade and the inside of the deck to keep the blade from spinning while you work.
Use a socket wrench to loosen the center bolt. Most bolts turn counterclockwise to loosen, though some older mowers use reverse-thread bolts that loosen clockwise. Check your mower’s manual if the bolt feels like it is tightening as you turn it the normal way.
Once the bolt is loose, remove it completely and pull the blade off the shaft. Keep the bolt and any washers together so nothing gets lost.
Step 4: Inspect the Blade
Before sharpening, take a close look at the blade. Minor dulling and light nicks are normal and easy to fix. However, some blades are not worth sharpening:
- Deep cracks or bends in the blade
- Metal that is worn so thin it cannot hold an edge
- Large chunks missing from the cutting edge
A cracked or bent blade is a safety hazard. Replace it rather than sharpen it. New replacement blades are inexpensive and widely available for most common mower models.
Step 5: Sharpen the Blade
There are two practical methods depending on the tools you have and how much time you want to spend.
Method A: Hand File
Secure the blade in a vise or clamp it firmly to your workbench. Hold the file at roughly the same angle as the existing bevel, which is usually around 40 to 45 degrees. Run the file across the cutting edge using long, smooth strokes, always pushing the file forward rather than dragging it back. You want to remove metal evenly along the full length of the cutting edge.
After every 10 to 15 strokes, check your progress. You are aiming for an edge that reflects light evenly, without shiny flat spots that indicate dull areas. This method takes about 10 to 15 minutes per blade and gives good control, especially for lighter sharpening jobs.
Method B: Angle Grinder
An angle grinder with a metal grinding disc works faster and handles heavier nicks more easily. Clamp the blade in a vise. Hold the grinder at the same 40 to 45-degree bevel angle and move it steadily along the edge without pressing too hard. Let the tool do the work.
Grinders remove metal quickly, so check your progress often. Overheating the blade causes the metal to turn blue and lose its temper, which means it will not hold an edge. If the blade starts getting hot, stop and let it cool before continuing.
The National Institute for Occupational Safety and Health recommends always wearing safety glasses when operating grinders or similar tools because metal particles travel at high speed and can cause serious eye injuries.
How Sharp Is Sharp Enough?
A lawn mower blade does not need to be razor sharp like a kitchen knife. You are aiming for an edge similar to a butter knife, sharp enough to cut cleanly through grass but not so thin it chips easily on small rocks or debris. If you can feel the edge catch lightly on your thumbnail without slipping, the sharpness is about right.
Step 6: Check the Blade Balance
This step is critical and often skipped. An unbalanced blade causes the mower to vibrate heavily, which damages the engine bearings and crankshaft over time. If you removed more metal from one end of the blade than the other, the blade will wobble.
To check balance, hang the blade by its center hole on a nail in the wall or on a dedicated blade balancer. The blade should hang horizontally. If one side dips, that side is heavier. File a small amount of metal from the heavier end, on the flat back of the blade near the tip, until both sides hang level.
A blade balancer costs just a few dollars at any hardware store and makes this check very quick. It is worth having one on hand.
Step 7: Reinstall the Blade
Check your marker arrow to confirm which side of the blade faces down. Slide the blade back onto the shaft with the cutting edges pointing in the direction the blade rotates and the marked bottom side facing down toward the ground.
Replace any washers in the same order you removed them. Thread the bolt by hand first to avoid cross-threading, then tighten with your socket wrench. Most mower blade bolts call for 35 to 50 foot-pounds of torque, but hand-tight plus a firm quarter turn is sufficient if you do not have a torque wrench. The bolt needs to be snug but not cranked so hard that you cannot remove it next time.
Set the mower back on all four wheels. Reconnect the spark plug wire.
Step 8: Test the Mower
Start the mower and listen for unusual vibrations. A properly balanced, correctly installed blade runs smoothly. Then mow a small patch of grass and look at the cut. Clean, even cuts with no torn or brown tips mean the sharpening worked. If the lawn still looks ragged, the blade may need another pass with the file, or the blade itself may be worn enough to replace.
How Often Should You Sharpen the Blade?
Sharpening frequency depends on how often you mow and what your lawn contains. A general rule of thumb:
- Once at the start of the season, before your first mow
- Again after every 20 to 25 hours of mowing
- Any time you notice the lawn looking brown and frayed after cutting
- Immediately after you run over rocks, tree roots, or other hard debris
University of Maryland Extension lawn care guidance recommends checking blade sharpness at each seasonal transition, particularly in spring when mowing resumes after winter and grass is growing at its fastest.
How to Know When to Replace Instead of Sharpen
There comes a point where sharpening is no longer enough. Replace the blade when you notice any of these conditions:
- The blade has cracks, even hairline ones
- The blade is visibly bent and will not straighten without breaking
- The metal has worn so thin along the cutting edge that you are sharpening bare air
- The center hole is worn oval and does not fit the shaft snugly
Most standard residential mower blades are inexpensive to replace. Running a bad blade to save a few dollars is not worth the engine damage caused by vibration or the risk of a piece of metal separating at speed.
Common Mistakes to Avoid
- Skipping the spark plug step. Never work under a mower with the plug connected.
- Not marking the blade before removal. Reinstalling it upside down is an easy mistake that leaves you mowing with the flat back of the blade.
- Sharpening at the wrong angle. Filing too steep removes the bevel and creates a blunt edge. Filing too shallow creates a thin edge that chips quickly.
- Ignoring balance. Even a blade that cuts well will damage your mower if one side is noticeably heavier than the other.
- Overheating with a grinder. Blue discoloration on the metal means you have drawn the temper and weakened that section of the blade.
Build Skills That Actually Make You Independent
Sharpening your mower blade is more than routine maintenance — it is part of a larger mindset: learning how to maintain your own tools, solve problems without relying on expensive services, and keep your property productive year after year.
That philosophy sits at the core of The Amish Ways, a practical guide built around proven self-reliance skills that prioritize function over convenience. The Amish have maintained farms, workshops, and households for generations using simple systems that reduce dependency on outside supply chains and constant spending.
Inside The Amish Ways, you will discover practical methods for maintaining tools, producing food efficiently, preserving harvests, and managing a homestead with fewer inputs and fewer complications. The focus is not nostalgia — it is durability, practicality, and long-term resilience.
Whether you are maintaining lawn equipment, building raised beds, improving soil naturally, or learning traditional repair skills, the principles remain the same: invest in knowledge once and benefit from it for decades.
If the goal is a property that works for you instead of constantly demanding money and replacement parts, The Amish Ways provides a clear roadmap based on methods that have already stood the test of time.
Learn the traditional systems that still outperform modern shortcuts!
Final Thoughts
Sharpening a lawn mower blade takes less than 30 minutes once you have done it a couple of times, and the results are immediately visible in how clean and healthy your lawn looks afterward. The tools are minimal, the process is simple, and the difference between a sharp blade and a dull one is significant enough that most lawn problems trace back to blade condition. Get into the habit of checking sharpness at the start of every season and after any heavy-use period, and your lawn will stay in much better shape with far less effort.
If you want to go further with self-sufficient property care, take a look at our guides on maintaining small engine tools and keeping garden equipment in working order through every season.
You may also like: 
Spring Maintenance for Lawn Mowers, Chainsaws, and More
Why Do Amish Never Use “Normal Butter”? (Video)
The Best Cordless Lawn Mowers for Self-Sufficient Living
What We Learned After Our First Year of Total Self-Sufficiency
8 Things Our Grandparents Did Better Than Us
Raised Bed Gardening: The Complete Guide to Building, Filling, and Growing


