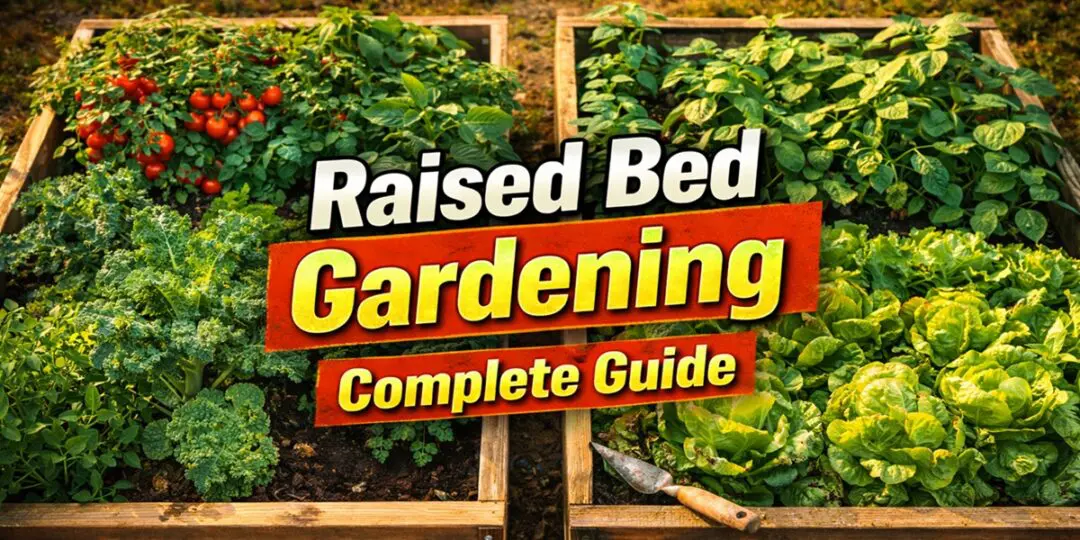
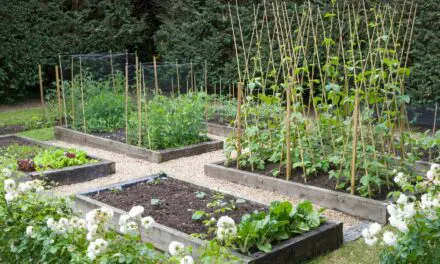
Raised bed gardening is one of the most practical decisions a homesteader or serious backyard grower can make. The reasons experienced growers keep coming back to raised beds are not aesthetic. They are functional. Better drainage, warmer soil, dramatically reduced weed pressure, easier amendment, and more food from less space are outcomes that show up in the harvest, not just in magazine photographs.
This guide covers everything that actually matters: why raised beds outperform in-ground growing in most homestead situations, how to size and position them correctly, what materials to build with and which to avoid, how to fill them with soil that produces from day one, and how to manage them through the seasons so they keep getting better every year.
There are no shortcuts worth knowing that are not in here. There is also nothing in here that requires specialized skills or significant money. Raised bed gardening is among the most accessible ways to produce serious quantities of food, and it scales from a single 4-by-8 bed to a full-scale market garden using the same principles.
Why Raised Beds Outperform In-Ground Planting
Before getting into the how, it helps to be clear about the why. Most gardening content treats raised beds as a preference. They are actually a productivity decision, and understanding the reasons behind the advantages makes you a better builder and manager of them.
Soil Control
The single biggest advantage of a raised bed is that you decide what goes in it. In-ground growing means working with whatever your native soil happens to be: its texture, its drainage characteristics, its pH, its mineral balance, its history of pesticide or herbicide application. In a raised bed, you build the soil from scratch. You know exactly what is in it. You can optimize it for whatever you are growing and amend it precisely when it needs something.
Native soil in most suburban and rural properties is not ideal growing medium. It may be compacted from decades of foot traffic or machinery, depleted of organic matter, poorly draining, overly acidic or alkaline, or contaminated from previous land use. A raised bed eliminates all of these problems by replacing native soil with a purpose-built growing mix.
Drainage and Root Environment
Raised beds drain faster than flat in-ground beds because gravity works in your favor. Excess water moves down and out rather than pooling around roots. This matters enormously for vegetables, which almost universally perform poorly in waterlogged conditions. Root rot, fungal disease, and oxygen-starved roots are dramatically less common in well-built raised beds than in-ground.
The improved drainage also means raised bed soil warms up faster in spring. Soil temperature drives germination and early growth rates, and a raised bed can run 8 to 10 degrees Fahrenheit warmer than the surrounding ground in early spring. This translates directly into earlier planting dates and earlier harvests.
Weed Suppression
A raised bed filled with weed-free purchased or composted growing medium starts with a clean slate. Weed seeds that blow in from outside are easier to catch and remove when they germinate, because you know exactly what you planted and anything else is a weed. Compared to in-ground beds where dormant weed seeds can be present throughout the entire soil profile, raised beds are significantly less work to keep clean over time.
Using cardboard or landscape fabric as a base layer when building the bed eliminates the ground-level weed seed bank from the start. That initial investment pays dividends for years.
Accessibility and Ergonomics
A raised bed at 12 inches of depth puts the work surface closer to hand level, reducing bending. At 24 inches or higher, a raised bed can be worked entirely from a seated position, which matters for anyone with back problems or mobility limitations. The defined edges of a raised bed also mean you never walk on and compact the growing area, which is one of the most damaging things you can do to soil structure in an in-ground garden.
Productivity Per Square Foot
Raised beds consistently out-yield in-ground planting on a per-square-foot basis. The looser, richer soil allows closer plant spacing than traditional row planting, because plants in raised beds do not need the extra row spacing that accommodates tractor or tiller access. Research from the University of California Cooperative Extension found that intensive raised bed plantings can produce two to four times the yield of traditional row gardens in the same footprint. More information on intensive planting methods here!
Sizing and Positioning Your Raised Beds
Width: The Most Important Dimension
Width is the dimension most beginners get wrong. The standard recommendation of 4 feet wide exists for a specific reason: most adults can comfortably reach to the center of a 4-foot bed from either side without stepping into it. If your bed will only be accessible from one side, drop the width to 2 to 2.5 feet. Never build a raised bed so wide that you have to step into it to reach the center. Every footfall compacts the soil you worked to build.
If you are working with children or have limited reach, a 3-foot width is more practical than 4. The lost growing area is minor compared to the convenience of being able to reach every plant without strain.
Length: Flexible Within Reason
Length is largely a matter of available space and material efficiency. Eight feet is the most common length because standard lumber comes in 8-foot boards, minimizing waste. Twelve-foot beds work well. Sixteen-foot beds are manageable but start to feel like a long walk around when you need to access the other side. Beyond 16 feet, consider splitting into two beds with a path between them.
One practical consideration: very long beds with no cross-bracing have a tendency to bow outward over time from soil pressure. Build in a cross-brace or two at every 8 feet of length, or use corner connectors and mid-span stakes to keep the sides straight.
Depth: Matching the Bed to What You Grow
Depth determines what you can grow and how much of your native soil the roots can access.
A 6-inch bed is the minimum useful depth. It works for shallow-rooted crops like lettuce, spinach, radishes, and most herbs. It is also the minimum depth to get meaningful insulation from the native soil below.
A 12-inch bed is the most versatile standard depth. It accommodates the majority of vegetables, including tomatoes, peppers, cucumbers, beans, and most root vegetables. This is the depth to default to if you are building a general-purpose growing bed.
An 18-to-24-inch bed is what you want for deep-rooted crops like parsnips, long carrots, and some varieties of beets and sweet potatoes. At this depth, the bed is also essentially self-contained and fully independent of native soil quality below.
Beds above 24 inches become expensive to fill without access to bulk material and are typically reserved for situations where the native ground cannot be used at all, such as over concrete, contaminated soil, or solid rock.
Positioning for Sun
Vegetables need sun. Most fruiting crops, including tomatoes, peppers, cucumbers, squash, and beans, require a minimum of 6 hours of direct sunlight per day and perform best with 8 hours or more. Leafy greens and root vegetables tolerate partial shade and can produce well with 4 to 6 hours.
Spend a full day observing your intended bed locations before building. Note when shade falls from trees, buildings, and fences. South-facing locations in the Northern Hemisphere receive the most light through the day. Avoid positioning beds where they will be shaded by taller structures to the south.
Orient rectangular beds north to south if the longer dimension runs more than 6 feet, so that tall plants on the north end of the bed do not shade shorter plants to the south. This matters most once you have multiple beds in close proximity.
Spacing Between Beds
Paths between beds need to be wide enough to work comfortably. A minimum of 18 inches allows a person to walk through and kneel to work. Twenty-four inches is more comfortable for daily use. If you plan to move a wheelbarrow through, 36 inches is the practical minimum.
Mulch or gravel paths between beds prevent weeds from establishing in the aisles and reduce the mud that comes with rain in bare-soil paths. Wood chips are a practical, low-cost option that also break down over time and enrich the surrounding soil.
Materials for Building Raised Beds
The material you build with affects cost, longevity, appearance, and in some cases food safety. Here is an honest assessment of the main options.
Untreated Lumber
Untreated Douglas fir, pine, cedar, or hemlock are all workable. The main issue with untreated soft lumber is rot. In contact with moist soil, untreated pine and fir will begin breaking down within 3 to 5 years. In wet climates, sooner. This is not necessarily a problem if you are comfortable rebuilding every few years or if you prefer to cycle materials back into compost, but it means the initial investment in wood and hardware needs repeating.
Cedar and Redwood
Cedar and redwood contain natural oils that resist rot and insect damage. A well-built cedar raised bed in average conditions will last 10 to 20 years without treatment. This makes cedar the preferred wood for most serious homesteaders despite its higher upfront cost. The investment over a decade makes economic sense compared to replacing cheap lumber every 3 to 4 years.
Look for rough-sawn cedar boards at lumber yards rather than the planed boards at big-box stores. Rough-sawn is thicker, more structural, and significantly cheaper per board foot. A 2-by-6 rough-sawn cedar board performs better and costs less than a finished equivalent at a retail lumber store.
Pressure-Treated Lumber
Modern pressure-treated lumber uses copper-based preservatives (ACQ or CA) rather than the chromated copper arsenate (CCA) that was banned from residential use in 2004. The current formulations are considered safe for food garden use by the USDA and most extension services, with research suggesting minimal copper migration into soil and even less into plants.
If you choose pressure-treated lumber, use boards rated for ground contact (marked UC4B or UC4C) and line the interior walls with a food-safe liner if you want an additional barrier between the treated wood and the growing medium. The USDA’s Agricultural Research Service addresses pressure-treated wood safety for raised beds here.
Avoid railroad ties, old creosote-treated wood, and any painted or stained lumber of unknown origin. These can leach compounds into soil that you do not want in your food.
Galvanized Steel
Corrugated galvanized steel raised beds have become popular for good reasons. They are extremely durable, typically lasting 20 or more years, resistant to rot and pests, and relatively inexpensive compared to cedar for equivalent volume. The zinc coating on galvanized steel is food-safe at normal garden pH levels, and the USDA considers galvanized steel appropriate for food garden use.
The main practical consideration with metal beds is thermal mass. Metal heats up faster than wood in spring, which is an advantage for early planting, but in very hot climates or in direct intense sun, metal beds can get hot enough at the walls to stress plant roots near the edges. A wood or foam liner on the interior walls mitigates this in regions where summer heat is extreme.
Concrete Block and Brick
Mortared or dry-stacked concrete block and brick make extremely durable raised beds that will outlast most other materials. They are ideal for permanent installations and work well for irregular shapes or terraced beds on slopes. The thermal mass of masonry also moderates soil temperature swings, which benefits root crops and heat-sensitive plants in hot climates.
The main downside is labor and permanence. A mortared masonry raised bed is a real construction project. A dry-stacked block bed is more forgiving but needs a level, stable base to hold its shape over time.
Materials to Avoid
Avoid using old tires as raised bed walls. Tires leach a range of compounds including zinc, benzene derivatives, and other petroleum-based chemicals into soil over time. Despite their popularity in some DIY gardening communities, tires are not appropriate for food production.
Avoid treated wood products that predate the 2004 CCA ban, identifiable by a greenish tint. If you are salvaging lumber and cannot confirm its treatment history, do not use it for a food garden bed.
How to Fill a Raised Bed: Getting the Soil Right
The soil mix in a raised bed is what everything else depends on. A well-built bed with poor fill will underperform indefinitely. A simple box with excellent growing medium will produce abundantly from the first season.
The Mel’s Mix Standard
The most widely tested and validated raised bed soil mix comes from Mel Bartholomew’s square foot gardening system: one third compost, one third vermiculite or perlite, and one third peat moss or coconut coir by volume. This combination produces a light, well-draining, moisture-retentive growing medium that works for virtually every vegetable crop.
The compost provides biology, nutrients, and organic matter. The vermiculite or perlite provides drainage and prevents compaction. The peat or coir holds moisture without becoming waterlogged. None of the three components alone produces the same results as the combination.
For a 4-by-8 by 12-inch bed, you need approximately 32 cubic feet of total fill, or roughly 1.2 cubic yards. Most bulk suppliers sell compost and soil amendments by the cubic yard, which is the most economical way to fill multiple beds.
Building a Budget Mix
The Mel’s mix formula is excellent but can be expensive if you need to fill many beds. A more economical approach that still outperforms native soil:
- 60 percent quality topsoil (purchased in bulk, not bagged)
- 30 percent mature compost (homemade or purchased in bulk)
- 10 percent perlite or coarse sand for drainage
This mix performs well and costs significantly less per cubic yard than the premium formula. The key is starting with actual topsoil rather than cheap fill dirt, and using enough compost to provide biology and nutrients. If you have access to aged wood chips or leaf mold, these can substitute for or supplement part of the compost fraction.
The Lasagna Method for New Beds
If you are building several beds at once and want to reduce the volume of purchased fill material, the lasagna or sheet mulch method is worth knowing. Instead of filling the entire bed with purchased mix from day one, you layer organic materials that will break down over time:
- Base layer: Cardboard or thick newspaper directly on the ground, overlapping edges by at least 6 inches to prevent weeds from growing through gaps. Wet it thoroughly.
- Bulk organic layer: Straw, wood chips, leaves, garden waste, or any carbon-rich material packed in 6 to 8 inches deep.
- Nitrogen layer: Kitchen scraps, fresh grass clippings, coffee grounds, or manure layered over the carbon. Aim for a rough 3:1 ratio of carbon to nitrogen by volume.
- Compost layer: 2 to 3 inches of finished compost on top.
- Planting layer: 4 to 6 inches of finished growing mix on top of the compost, which is what your seeds and transplants actually go into.
The lower layers break down over the first season, generating heat as they decompose and adding significant organic matter to the bed from below. By year two, the bed has settled and the decomposed organic material has become part of the growing medium. Plant tall transplants in year one rather than direct-seeding, since the settling and decomposition can disrupt shallow-sown seeds.
The University of Missouri Extension provides solid guidance on raised bed soil formulas and the lasagna method here.
Topping Up and Amending Each Season
Raised bed soil settles and breaks down over time. Expect to add 1 to 2 inches of compost to the surface of each bed each spring. This is not a problem. It is the system working correctly. Decomposing organic matter feeds the soil biology, which feeds your plants. Annual topping with compost maintains the fertility and structure that made the bed productive in the first year.
After 3 to 4 years of heavy production, do a more thorough amendment with additional perlite if the bed has compacted, a pH test to check if lime or sulfur adjustments are needed, and a soil test if yields have declined. The National Gardening Association provides a free soil amendment guide at garden.org that covers common deficiency symptoms and corrections.
Weed and Pest Management in Raised Beds
Weed Prevention at the Start
The single most effective weed management strategy is to start clean. Line the bottom of every new bed with cardboard before filling, overlapping all edges generously. This smothers any existing vegetation and prevents rhizomatous weeds like grass and bindweed from growing up from below. The cardboard breaks down within 1 to 2 seasons and becomes part of the growing medium, so it does not need to be removed.
In beds where perennial weeds like quackgrass are a serious problem, a layer of hardware cloth at the base before the cardboard provides a more durable barrier while still allowing drainage and earthworm access.
Mulching to Maintain Clean Beds
Once plants are established, mulching the soil surface in raised beds significantly reduces the germination of wind-blown weed seeds and conserves moisture. Straw, shredded leaves, or wood chips work well as surface mulch. Keep mulch pulled back slightly from plant stems to prevent moisture-related crown rot.
Pull weeds when they are small and before they set seed. In a well-managed raised bed, the weed load is a fraction of what an in-ground garden requires, but it does not manage itself. A weekly 10-minute walkthrough to pull anything that has germinated prevents the problem from ever becoming significant.
Pest Barriers
Raised beds make physical pest barriers much easier to deploy than in-ground growing. A simple hoop structure made from PVC or wire bent over the bed and covered with row cover fabric excludes flying insects including cabbage moths, cucumber beetles, and aphid colonies without any chemical input. The hoops can be made to fit the bed exactly and stored flat during periods when the bed does not need cover.
For burrowing pests like gophers and voles, hardware cloth stapled to the bottom of the bed frame before filling provides permanent protection. Use hardware cloth with a mesh size of half an inch or smaller. Chicken wire is not sufficient for gophers, which can push through it.
The Integrated Pest Management program at the University of California provides crop-specific pest identification and management guidance.
Watering Raised Beds
Raised beds dry out faster than in-ground gardens because of their improved drainage and elevated position. In hot weather, a raised bed may need water every day. In cool, cloudy weather, every 2 to 3 days may be sufficient. Check soil moisture by pushing a finger 2 inches into the soil. If it feels dry at that depth, water.
Drip Irrigation for Efficiency
Drip irrigation is the most efficient watering method for raised beds and the one that consistently produces the best results. Drip lines deliver water directly to the root zone, bypassing foliage and reducing the moisture on leaf surfaces that encourages fungal disease. Water use is significantly lower than overhead watering, which matters during dry summers when water access may be limited.
A basic drip system for a 4-by-8 bed costs around twenty to thirty dollars in components and can be set up in an afternoon. Connect it to a timer and your watering becomes fully automated, which matters enormously during the busy parts of the growing season when manual watering may get skipped.
Mulching to Reduce Watering Frequency
A 2 to 3 inch layer of mulch on the soil surface in a raised bed can cut watering frequency by 30 to 50 percent in hot weather by dramatically reducing evaporative moisture loss from the soil surface. Straw is the standard raised bed mulch. It is cheap, easy to apply, decomposes into compost at the end of the season, and does not introduce weed seeds if you are using clean seed-free straw rather than hay.
Crop Planning and Rotation in Raised Beds
Intensive Planting Spacing
In a raised bed, you plant more densely than traditional row gardening because you are not leaving space for tractor rows or hand cultivation equipment. Plants are spaced so that their leaves just touch at maturity, creating a living mulch that shades the soil, suppresses weeds, and retains moisture. This intensive spacing is what produces the two to four times yield advantage over in-ground row planting.
Use the spacing recommendations on seed packets as a starting point and then adjust down by about 25 percent for raised bed planting. Lettuce that the seed packet says to space 8 inches apart can be planted 6 inches apart in a well-amended raised bed. Carrots that suggest 3-inch spacing can go at 2 inches. The richer, looser growing medium of a raised bed supports closer spacing than compacted in-ground soil.
Succession Planting
Raised beds reward succession planting because you can see and manage each bed precisely. Rather than planting all your lettuce at once and having more than you can use for two weeks before it bolts, plant a small quantity every two to three weeks through spring and again in fall. The same principle applies to radishes, carrots, beets, spinach, and most greens.
When a spring crop finishes, pull it immediately and replant the space with a warm-season crop. When the warm-season crop winds down in fall, replant with a cool-season cover crop or a fall vegetable. A well-managed raised bed can be in production for 9 to 10 months of the year in most US climates.
Crop Rotation
Rotating crop families between beds each season reduces the buildup of soil-borne pathogens and insects that overwinter in the soil waiting for the same host plant to return. The four main rotation groups to think about are nightshades (tomatoes, peppers, eggplant, potatoes), brassicas (cabbage, kale, broccoli, radishes), alliums (onions, garlic, leeks), and legumes (beans, peas). Move each group to a different bed each year so that no family is in the same bed two years running.
With only two or three beds, perfect rotation is not always possible. Do the best you can and focus particularly on keeping nightshades out of the same bed in consecutive years, as tomato diseases including early blight and verticillium wilt build up quickly in soil where tomatoes have grown repeatedly.
Extending the Season with Raised Beds
One of the underused advantages of raised beds is how easily they accept season extension structures. Because the beds have defined edges, fitting covers, hoops, and frames is straightforward in a way that covering an irregular in-ground garden is not.
Row Cover and Low Tunnels
Lightweight row cover fabric draped over hoops adds 4 to 6 degrees Fahrenheit of frost protection and can extend your growing season by 3 to 4 weeks in both spring and fall. Hoops made from half-inch PVC or 9-gauge wire bent to fit the bed width can be stored flat and deployed in minutes. Clip the fabric to the hoops or hold it down with sandbags or soil along the edges.
Heavier row cover provides more frost protection but reduces light transmission, which matters for crops actively trying to grow and photosynthesize. Use light cover for spring and fall, and heavier cover only for frost protection of dormant or cold-tolerant plants.
Cold Frames
A cold frame is a permanent or semi-permanent structure fitted over a raised bed with a transparent lid, typically an old window, a sheet of polycarbonate, or clear plastic over a frame. Cold frames create a microclimate that can be 10 to 20 degrees warmer than the outside air, making it possible to grow lettuce, spinach, kale, and cold-tolerant herbs through winter in most US climate zones.
A raised bed with a well-fitted cold frame lid is the simplest and cheapest form of greenhouse available. Build the frame from scrap lumber sized to fit the bed exactly, hinge the lid for easy venting on warm days, and you have year-round growing capability in a setup that costs under twenty dollars in materials.
Thermal Mass and Frost Protection
Jugs or containers of water placed inside a cold frame or under row cover absorb heat during the day and release it slowly overnight, providing passive frost protection. Dark-colored containers absorb more solar heat than light ones. This low-tech technique is standard in market gardening and requires no electricity or additional investment beyond a few repurposed water jugs.
Maintaining Raised Beds for the Long Term
A raised bed built and managed correctly gets more productive every year, not less. The soil biology establishes and deepens. Organic matter accumulates. Drainage improves as earthworms and other soil organisms do their work. Here is what long-term maintenance actually looks like.
Annual Compost Addition
Every spring, add 1 to 2 inches of finished compost to the surface of each bed before planting. Do not till it in. Lay it on the surface and let earthworms and soil organisms work it down. Tilling destroys soil structure and fungal networks that took a full season to establish. Top-dressing is the right approach once a bed is established.
Cover Cropping
In beds that will sit empty through winter or during a fallow period, plant a cover crop rather than leaving bare soil. Winter rye, crimson clover, hairy vetch, and buckwheat are all practical cover crop options for raised beds. Cover crops prevent erosion, suppress winter weeds, fix nitrogen in the case of leguminous species, and add organic matter when turned under in spring.
The USDA Natural Resources Conservation Service provides a cover crop selection tool and planting guidance at this link.
Checking and Repairing the Structure
Inspect bed walls each spring before the growing season. Look for boards that have begun to rot at soil contact points, fasteners that have corroded, and corners that have shifted. Catching structural issues early means a simple repair rather than a full rebuild. A bowed side wall can be reinforced with an exterior stake and a lag bolt. A rotted board can be replaced without dismantling the entire bed if you catch it before the board fails completely.
Soil Testing
Test your raised bed soil every 3 to 4 years. pH drift and nutrient imbalances develop gradually and are easy to correct if caught before they cause visible decline. Most state university extension services offer low-cost soil testing, typically for under twenty dollars per sample. Send samples from each bed separately since their histories and amendments will differ.
Find your nearest cooperative extension soil testing lab through the National Institute of Food and Agriculture directory.
Common Raised Bed Mistakes and How to Avoid Them
Most raised bed failures are predictable and preventable.
- Building too narrow or too deep before you know your soil needs: Start with a standard 4-by-8 by 12-inch bed before investing in specialty sizing. Prove the system works in your space before committing to a large build.
- Using cheap fill material: Fill dirt sold cheaply in bulk is not the same as topsoil. Fill dirt is what you use under pavement. Topsoil has organic matter, biology, and texture. Using fill dirt in a raised bed produces a compacted, sterile box that grows nothing well.
- Skipping the base layer: Building directly on established lawn without first laying cardboard or fabric guarantees that grass rhizomes will penetrate the bed from below within the first season.
- Overwatering: Raised beds drain well but can still be overwatered. Consistent overwatering drives oxygen out of the root zone, encourages root rot, and leaches nutrients faster than plants can use them. Check moisture before watering rather than watering on a fixed schedule.
- Not accounting for settlement: Freshly filled beds settle by 10 to 20 percent as organic matter decomposes and the mix compresses. Fill beds slightly above the rim at installation, expecting them to settle to the correct level by mid-season. If you fill flush with the top, you will be adding more material within weeks.
- Tilling established beds: Once a raised bed is established and the soil biology is working, tilling damages the fungal networks, disrupts earthworm habitat, and brings buried weed seeds to the surface. Use a broadfork or simply top-dress with compost instead.
Learn the Proven Garden Systems That Keep Producing for Generations
Raised beds give you control over soil, drainage, spacing, and productivity. But if your goal is real food independence, the kind that keeps producing year after year with minimal outside inputs, the principles behind traditional self-reliant growing systems matter just as much as the beds themselves.
That is exactly where The Amish Ways stands apart.
The Amish have been producing abundant food on small plots for centuries without relying on modern supply chains, synthetic inputs, or expensive equipment. Their methods prioritize soil health, smart layout design, seasonal timing, seed saving, and practical systems that work reliably year after year.
The same principles that make raised beds so effective, soil control, efficient spacing, and consistent yields, are deeply aligned with Amish gardening philosophy. Their approach focuses on building fertility naturally, reducing dependency on outside inputs, and designing gardens that become more productive over time.
Inside The Amish Ways, you will learn:
- Time-tested soil building strategies that improve yields without synthetic fertilizers
- Practical garden layout methods that maximize output from limited space
- Natural ways to manage pests and plant health without chemical reliance
- Seed saving practices that reduce long-term dependency on store-bought seeds
- Traditional food growing systems designed for resilience, not convenience
- Preservation and storage methods that extend harvests through the entire year
- Simple homestead skills that compound into long-term self-sufficiency
Raised beds are one of the easiest entry points into serious food production, but the real advantage comes when the system behind them is designed to keep producing regardless of economic instability, supply chain disruptions, or rising food costs.
The Amish approach has stood the test of generations because it is built around independence, simplicity, and efficiency, the same qualities that make raised bed gardening such a powerful tool for modern homesteaders.
If you are investing time and effort into building productive garden beds, it makes sense to apply the same proven principles that have sustained self-reliant communities for hundreds of years.
The Investment That Pays for Itself
A raised bed built from decent cedar boards and filled with quality growing medium costs somewhere between fifty and two hundred dollars depending on size and fill source. That same bed, properly managed, produces food for a decade or more. The soil gets better every year. The pest and weed management gets easier as the system matures and you learn it.
There is no more practical investment in food self-sufficiency available to most homesteaders than a set of well-built, well-filled raised beds. The yield per dollar, per square foot, and per hour of management time outperforms almost any other food production system at the residential scale.
Build the first one. Fill it right. Grow something in it this season. Every subsequent bed becomes easier to justify and easier to build because you already know the return on the investment.
You may also like:
Join Our Official WhatsApp Channel For More Homesteading Tips And Tricks
The Silent Stockpile Killer. Do You Have It In Your Pantry? (Video)
Bucket Gardening: How to Grow Your Own Food Anywhere
Vertical Gardening for Self-Sufficient Living


