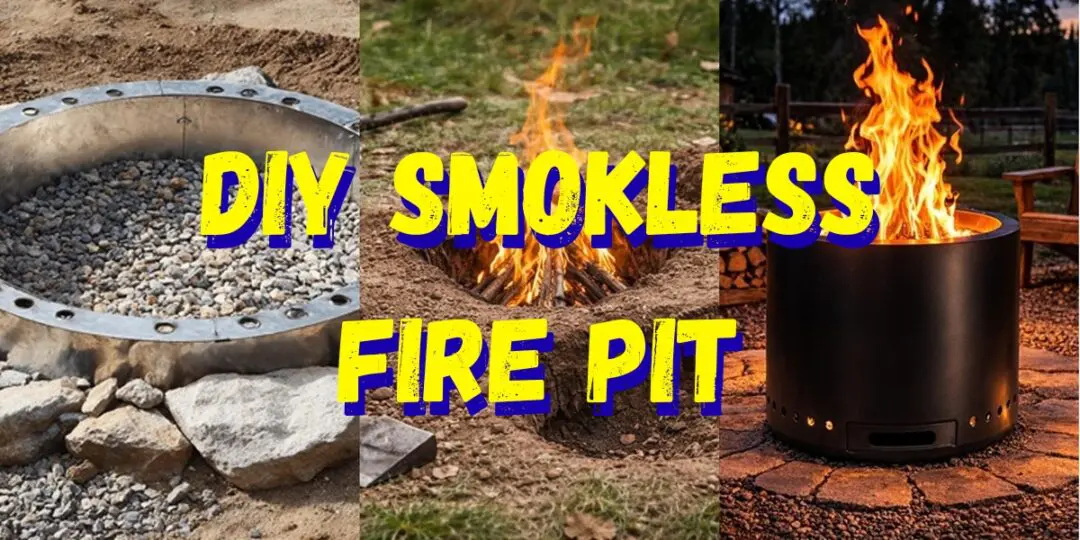
If you have ever sat around a backyard fire pit and spent more time moving your chair away from the smoke than actually enjoying the fire, you already understand the problem. Conventional fire pits smoke. They smoke when the wind shifts, they smoke when the wood is not perfectly dry, and they smoke in ways that follow you no matter where you sit.
A smokeless fire pit solves this. Not by magic, but by physics. When you understand why fires produce smoke and design your pit to work against that process, you get a fire that burns hotter, cleaner, and more efficiently than anything you can buy at a big box store for three hundred dollars.
This guide walks you through the science, the design options, and the complete step-by-step build process for a DIY smokeless fire pit you can construct over a weekend using materials available at any hardware store or salvage yard.
Why Fires Produce Smoke and How a Smokeless Design Fixes It
Before you dig a single shovelhole or cut a single piece of steel, understanding the mechanism behind smoke production will make every decision in this build make more sense.
Smoke is the product of incomplete combustion. When wood burns, it releases gases, water vapor, and unburned carbon particles. If those byproducts do not get hot enough to fully combust, they escape as visible smoke. The two main reasons this happens in a conventional fire pit are insufficient oxygen supply to the base of the fire and insufficient heat to sustain complete combustion of the released gases.
A smokeless fire pit design attacks both problems simultaneously using a concept called secondary combustion. Here is how it works.
The pit is built with two walls, an inner wall and an outer wall, with a gap between them. Air enters through holes at the base of the outer wall, travels up through the gap between the walls, and is preheated by the fire burning inside as it rises. This preheated air is then injected back into the fire at the top of the inner wall, directly into the rising column of hot gases and unburned particles. Because this secondary air is already hot when it enters, it ignites those unburned gases rather than cooling them the way cold ground-level air would. The result is a second combustion event near the top of the fire that burns off the particles that would otherwise escape as smoke.
This is the same principle used by high-end commercial smokeless fire pits like Solo Stove, which retail for two hundred to five hundred dollars. You are going to build the same thing for a fraction of that cost.
Choosing Your Design: Three DIY Smokeless Fire Pit Options
There is no single right way to build a smokeless fire pit. The best design for you depends on your budget, your available materials, your skill level, and whether you want a permanent installation or something you can move. Here are the three most practical options for homesteaders and self-sufficient builders.
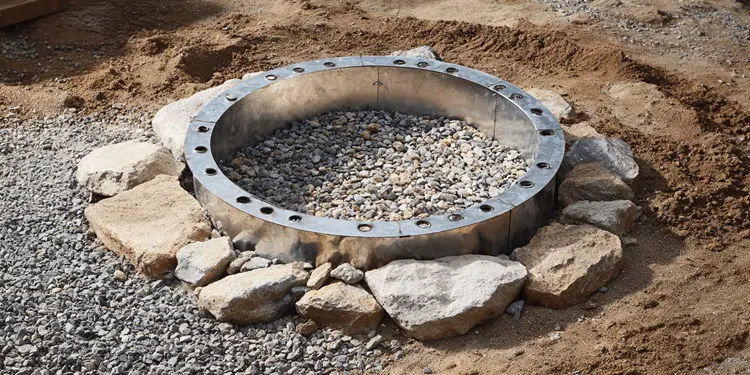
Option 1: The Double-Wall Steel Drum Pit
This is the most popular DIY smokeless fire pit build and the one that most closely replicates the commercial Solo Stove design. It uses two steel drums or buckets of different diameters nested inside each other with a gap between them. It is portable, relatively quick to build, and produces excellent smokeless results when built correctly.
Best for: Builders who want a portable unit, those with basic metalworking tools, and anyone who wants the closest replication of commercial smokeless pit performance.
Option 2: The In-Ground Dakota Hole Pit
The Dakota hole is a traditional survival fire technique used by Native Americans and later adopted by military and survival communities. It involves two connected holes dug into the ground: one for the fire and one as an air intake tunnel. The tunnel feeds a steady underground airflow to the base of the fire, creating highly efficient combustion with minimal smoke. It is the simplest build on this list, requires no purchased materials, and is nearly invisible, making it ideal for low-profile homestead use.
Best for: Builders who want zero material cost, those in rural settings where digging is practical, and anyone focused on function over aesthetics.
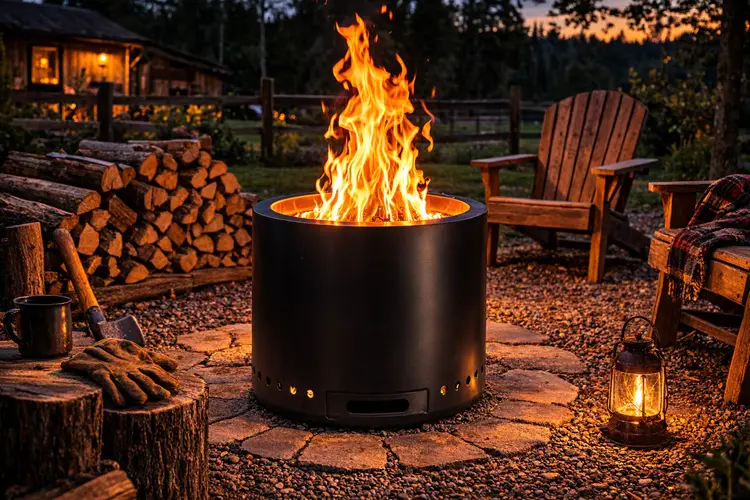
Option 3: The Permanent Stone and Steel Ring Pit
This is the most aesthetically satisfying build and the most durable. It combines a stone or brick outer wall with a steel inner ring, creating a permanent backyard installation that looks custom-built and lasts decades. It requires more time and materials than the other options but produces a fire pit that becomes a genuine centerpiece of a homestead outdoor space.
Best for: Permanent homestead installations, builders comfortable with basic masonry, and anyone who wants a fire pit that is both functional and visually impressive.
What You Will Need
The materials list below covers all three builds. Choose the section relevant to your chosen design.
Option 1: Double-Wall Steel Drum Pit
Two steel drums or buckets with a diameter difference of at least 3 to 4 inches (a 17-inch inner drum inside a 20 to 22-inch outer drum works well), a drill with metal drill bits, a hole saw attachment sized at 3/4 inch to 1 inch, an angle grinder or metal cutting disc, work gloves and eye protection, high-temperature spray paint (optional, for finish), three small steel bolts or metal spacers to maintain the gap between drums, and metal legs or a base ring to elevate the unit off the ground.
Option 2: Dakota Hole Pit
A shovel or spade, a pointed digging stick for the tunnel section, and optionally a length of PVC pipe to line the air intake tunnel and prevent collapse in loose soil. That is the complete materials list.
Option 3: Permanent Stone and Steel Ring Pit
A steel ring or cylinder of 24 to 36 inches in diameter (a section of steel culvert pipe works excellently), enough fieldstone, flagstone, or fire brick to build a circular outer wall approximately 6 inches larger in diameter than your steel ring, construction adhesive or fire-rated mortar, a drill with metal drill bits, a level, landscape fabric and gravel for the base, and a shovel for excavation.
 Step-by-Step Build: Option 1 (Double-Wall Steel Drum Pit)
Step 1: Prepare Your Drums
Clean both drums thoroughly and remove any coatings or residue that could produce toxic fumes when heated. If your drums previously held any chemical product, do not use them for this build. Food-grade steel drums are the safest choice.
Step 2: Drill the Base Intake Holes
In the outer drum, drill a ring of holes around the base, approximately 1 inch up from the bottom edge. Use a 3/4-inch drill bit and space the holes evenly around the circumference, approximately 1 to 2 inches apart. These are the primary air intake holes that feed the gap between the walls.
Step 3: Drill the Secondary Combustion Holes
In the inner drum, drill a ring of holes around the top edge, approximately 1 inch down from the top rim. Use the same 3/4-inch bit and the same spacing. These are the critical holes that inject preheated air into the top of the fire to trigger secondary combustion. This ring of holes is what makes the design work.
Step 4: Create the Air Gap
The inner drum must sit centered inside the outer drum with a consistent gap between the walls. Use three small steel bolts or metal spacers welded or bolted through the outer drum wall at equal intervals to hold the inner drum in place with the correct gap maintained. The gap should be consistent all the way around, approximately 1.5 to 2 inches.
Step 5: Create the Base
The assembly needs to sit elevated off the ground to allow air to enter the base intake holes freely. Weld or bolt three short metal legs to the base of the outer drum, or fabricate a simple ring stand from steel bar stock. The unit needs at least 2 inches of clearance beneath it.
Step 6: Cut the Bottom Out of the Inner Drum
Using an angle grinder or metal cutting disc, cut the bottom completely out of the inner drum. This is where ash will fall through and airflow will enter from below. Leave the bottom of the outer drum intact as it will collect ash and protect the ground beneath.
Step 7: Finish and Test
Wire brush both drums to remove any loose material, apply high-temperature paint if desired, and allow to fully cure before the first fire. Build a small test fire using dry hardwood only and observe the airflow and combustion pattern. You should see the fire draw strongly, burn hot and tall, and produce minimal smoke once it reaches operating temperature.
 Step-by-Step Build: Option 2 (Dakota Hole Pit)
Step 1: Choose Your Location
Select a spot with firm, stable soil. Avoid sandy or very loose soil as the tunnel walls may collapse. The site should be clear of roots, dry grass, and overhanging vegetation.
Step 2: Dig the Fire Hole
Dig a vertical hole approximately 12 inches in diameter and 12 inches deep. Slightly widen the base of the hole so it is broader at the bottom than the top, creating a chamber shape. This widening improves airflow circulation at the base of the fire.
Step 3: Dig the Air Intake Tunnel
Approximately 12 inches away from the edge of your fire hole, dig a second smaller hole about 6 inches in diameter. Then dig a connecting tunnel between the two holes at an angle, entering the base of the fire hole near the bottom. The tunnel should slope slightly downward toward the fire hole so that natural airflow draws toward the fire.
Step 4: Line the Tunnel (Optional)
In loose soil, insert a length of PVC pipe through the tunnel to prevent collapse. In firm clay or packed soil, the tunnel walls will hold without lining.
Step 5: Test the Draft
Before lighting a fire, hold a piece of dry grass or a small piece of paper near the air intake hole. You should feel or see air being drawn downward into the tunnel toward the fire chamber. This draft effect is what makes the Dakota hole work.
Step 6: Build and Light Your Fire
Build a small fire in the main chamber using dry tinder and small wood. The tunnel will feed a steady supply of preheated ground-level air directly to the base of the fire, producing very efficient combustion with minimal smoke.
 Step-by-Step Build: Option 3 (Permanent Stone and Steel Ring Pit)
Step 1: Mark and Excavate
Mark a circle approximately 6 feet in diameter for the total installation footprint. Excavate 6 to 8 inches deep across the entire circle. This depth accommodates your gravel drainage base and keeps the fire pit from sitting proud of the surrounding ground in a way that looks unfinished.
Step 2: Lay the Gravel Base
Fill the excavated area with 4 to 6 inches of compacted gravel. This provides drainage, prevents grass and weeds from growing up through the pit, and creates a stable base for your stone work. Use a tamper to compact the gravel firmly before proceeding.
Step 3: Position the Steel Ring
Place your steel culvert section or fabricated steel ring in the center of the gravel base. This inner ring should be 24 to 36 inches in diameter depending on your preferred fire size. Drill a ring of 3/4-inch holes approximately 1 inch from the bottom edge of the steel ring, spaced 1 to 2 inches apart, for base airflow. Drill a second ring of holes approximately 1 inch from the top edge for secondary combustion air injection.
Step 4: Build the Outer Stone Wall
Using fieldstone, flagstone, or fire brick, build a circular outer wall around the steel ring, maintaining a consistent 3 to 4-inch gap between the stone wall and the steel ring. This gap is your air channel. Use fire-rated mortar or construction adhesive between stones for a permanent installation. Check level as you build each course. The outer wall should rise to approximately the same height as your steel inner ring, typically 12 to 18 inches above grade.
Step 5: Cap the Gap
The top of the gap between the stone outer wall and the steel inner ring should be mostly enclosed except for the secondary combustion holes in the steel ring. Use flat capstones or steel plate segments across the top of the gap to direct the preheated air through the holes rather than allowing it to escape freely upward.
Step 6: Finish the Surround
Fill the area between your stone outer wall and the edge of your excavated circle with compacted gravel, decomposed granite, or flagstone pavers to create a clean, functional surround. Add a ring of larger stones or a steel edging strip to define the perimeter.
Step 7: First Fire Cure
Build a small first fire to allow any mortar to fully cure and to burn off any residue from the steel ring. Keep this first fire modest in size and allow the structure to cool completely before building a full-sized fire.
The Best Wood for a Smokeless Fire Pit
Even the best-designed smokeless fire pit will produce smoke if you burn the wrong wood. Wood moisture content is the single biggest factor in smoke production after pit design.
Always burn seasoned hardwood with a moisture content below 20 percent. A simple wood moisture meter costs under fifteen dollars and takes the guesswork out of this entirely. Oak, hickory, ash, and maple are ideal choices. They burn hot, long, and clean when properly seasoned.
Never burn green or freshly cut wood in a smokeless pit. The high moisture content produces enormous amounts of smoke that no design can fully compensate for. Never burn treated lumber, painted wood, plywood, or composite materials, as these produce toxic fumes that are genuinely dangerous to inhale regardless of combustion efficiency.
Split your firewood rather than burning rounds. Split wood has more exposed surface area, seasons faster, and ignites more easily, all of which contribute to cleaner combustion.
Store your firewood elevated off the ground and covered on top but open on the sides to allow airflow. Properly stored wood in a dry climate will reach appropriate moisture content within 6 to 12 months of splitting.
Troubleshooting: Why Your Smokeless Fire Pit Is Still Smoking
If your completed pit is still producing significant smoke, work through this checklist before assuming a design problem.
The most common cause by far is wet or green wood. Test your wood with a moisture meter before blaming the design.
The second most common cause is insufficient hole size or number in the secondary combustion ring. If the preheated air injected at the top is not enough volume to trigger secondary combustion, unburned gases escape. Add more holes or enlarge existing ones.
A fire that is too small will not generate enough heat to sustain secondary combustion. Smokeless fire pit designs work best with a fire of sufficient size to heat the air column between the walls adequately. A handful of small sticks will smoke. A proper fire built up to operating temperature will not.
Blocked base intake holes prevent the air channel from pressurizing correctly. Check that the holes at the base of your outer wall are clear of ash, debris, and soil contact.
Wind from a consistent direction can disrupt the combustion pattern. A temporary windbreak on the upwind side of the pit, even a few stacked pieces of firewood, can stabilize performance in exposed locations.
Safety Considerations for Your DIY Smokeless Fire Pit
A smokeless fire pit burns significantly hotter than a conventional open fire pit because of the increased combustion efficiency. This is a feature, but it also means the surfaces of the pit reach extreme temperatures during use.
Never touch the steel components during or immediately after a fire. The inner ring and outer drum of a double-wall design can reach temperatures that cause severe burns on contact.
Maintain a clear perimeter of at least 10 feet from any structure, fence, overhanging tree, or dry vegetation. The cleaner, taller flame of a smokeless design throws more radiant heat than a conventional pit.
Never leave a fire unattended. Keep a bucket of water or a garden hose within reach during every fire. Ensure the fire is completely extinguished before leaving the area, not just visually dark but cool to the touch at the rim.
Check local regulations before building any permanent fire pit installation. Many counties and municipalities have setback requirements, permit requirements for permanent structures, and seasonal burn restrictions. Your local cooperative extension office or county planning department can provide specific guidance for your area.
Enhancing Your DIY Smokeless Fire Pit
Once your basic pit is functioning well, there are several practical upgrades worth considering.
A cooking grate fitted to the top of your inner ring turns your smokeless fire pit into a serious outdoor cooking station. The clean, hot, consistent heat of a secondary combustion fire is excellent for grilling, and the absence of smoke means your food does not pick up acrid off-flavors.
A spark screen sized to fit over the top of your pit reduces ember scatter, which is particularly valuable in dry conditions or when the pit is surrounded by dry grass or wood chips.
A custom steel lid allows you to safely extinguish a fire by cutting off oxygen, eliminating the need to douse with water and then deal with a pit full of wet ash. It also keeps rain and debris out of the pit between uses.
A dedicated ash tool and ash bucket make cleanup significantly easier. The clean combustion of a smokeless pit produces far less ash than a conventional fire, but what ash remains should be collected and can be used in the garden as a potassium-rich soil amendment.
Final Thoughts
Building your own smokeless fire pit is one of the most satisfying weekend projects a homesteader can take on. It costs a fraction of commercial alternatives, teaches you something real about combustion and airflow, and produces a result you built with your own hands that will last for years.
The double-wall drum build can be completed in a single afternoon with basic tools. The Dakota hole can be dug in twenty minutes with a shovel. The permanent stone and steel installation is a weekend project that will become a centerpiece of your outdoor space for decades.
Whichever option you choose, start with dry wood, build your fire up to proper operating temperature, and let the physics do the work. Once you have sat next to a properly functioning smokeless fire pit on a still evening, you will never go back to a conventional open pit again.
The Knowledge That Built Fires Like This Is Disappearing
The Dakota fire hole is a perfect example of something modern culture has almost completely forgotten.
For thousands of years, people lived without gas grills, propane heaters, or factory-made fire pits. They knew how to build fires that burned hotter, cleaner, and more efficiently using nothing but the land around them.
They knew how to cook, stay warm, purify water, preserve food, build shelter, and survive using simple skills passed down from one generation to the next.
But most of that knowledge has quietly disappeared.
Today, the average person depends almost entirely on modern systems: electricity, supermarkets, fuel deliveries, and manufactured gear. If those systems stop working, even temporarily, most people would have no idea how to replace them with practical skills.
That’s exactly why resources like The Lost Ways have become so popular among people who care about real self-sufficiency.
The book is a massive collection of forgotten survival knowledge gathered from early American pioneers, frontiersmen, Native Americans, and the generations that lived long before modern infrastructure existed.
Inside, you’ll discover skills that were once considered basic knowledge for surviving and thriving without modern conveniences, including:
- How early settlers built hidden cooking fires that produced almost no smoke
- Traditional methods for preserving meat and food without refrigeration
- Forgotten root cellars and underground food storage techniques
- Natural ways to purify water when filters and chemicals are unavailable
- Simple tools and structures that helped families survive harsh winters
- Old-world recipes and preparation methods that allowed food to last for months or even years
These were not “survival tricks.”
They were the everyday skills that kept entire communities alive before modern technology existed.
And in many ways, they are just as relevant today as they were centuries ago.
Because the more self-sufficient you become, the less dependent you are on systems that can fail without warning.
If learning practical skills like the Dakota fire hole interests you, you will likely find The Lost Ways fascinating.
You can learn more about it here:
👉 Discover the forgotten survival knowledge inside The Lost Ways!
Because sometimes the most powerful preparedness strategies are not new innovations at all.
They are simply the old skills we forgot to pass down.
You may also like:
How to Start a Fire with a Sharpie Marker
How To Build The Oven That Cooks Without Fire, Fuel, Smell, Or Smoke (Video)
How to Cook a Full Meal Without Gas, Electricity, or Fire
How to Make a Dakota Fire Hole That Burns Without Smoke
How to Make Firebricks (fire logs) and Wood Stove Logs for Free


