Building your own smokehouse is the same as making barbecue – all you have to do is turn modest, everyday ingredients into something incredibly satisfying.
Smokers are made in lots of different ways, but today I’ll be sharing two with you. The first one is easier to make, and will need very little of your precious time to complete. However, you need a specific location for it and extra space for digging.
The second one is more refined and “better looking”. It is made with higher attention to detail. This model is great for any small backyard spaces, it doesn’t require digging, and you can move it around.
Let’s dive into how I built these smokehouses.
Tools And Material Needed For A Basic DIY Smokehouse
- Empty Barrel, Steel Mesh
- Iron rods, Iron hooks, Iron sheet
- Grinder, Shovel, Firewood
Building Your Basic Smokehouse
This will be very easy if you follow this eight simple steps:
Step 1. Choose Your Location
Because you are going to dig a hole, it is best you locate your smokehouse in your backyard.
Find that perfect spot and dig a knee-deep hole.
Step 2. Carve Out The Bottom Part Of Your Barrel
The second step I took was to take the barrel and carve out the bottom part with a grinder. This will allow heat and smoke through, when smoking the meat.
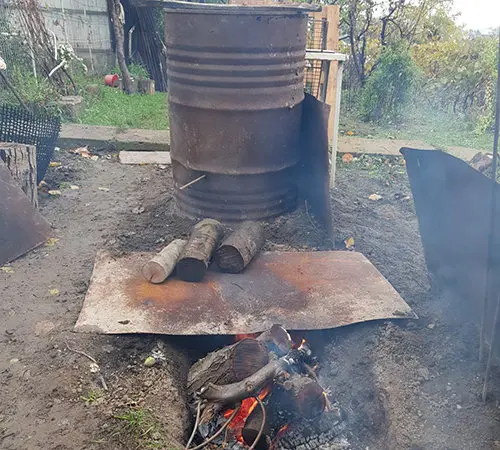
Step 3. Put The Firewood Into The Hole
Organize the firewood appropriately in the hole.
Make sure you also throw in some flammable content like paper and small twigs to simplify starting your fire, which will be the next step you take.
Related: How To Make A Self Feeding Fire
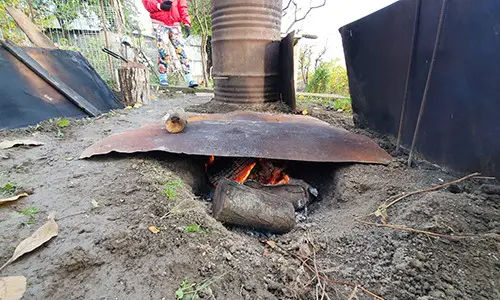
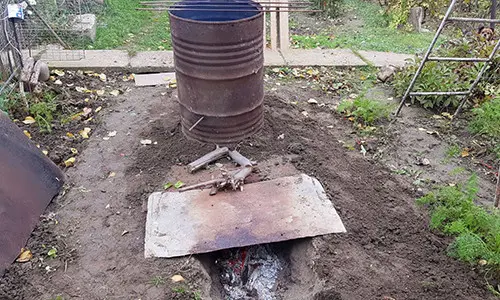
Step 4. Cover The Hole With Steel Mesh
I got some steel mesh and covered the hole as well. Ensure that your structure and the top part of the hole is strong enough to handle the weight of the barrel.
Step 5. Place The Barrel On The Top Of The Hole
Place the barrel over the top of the hole, where the steel mesh ends, so that you can channel the heat and smoke straight to your meat. Then when it is into position, cover the base with some dirt, so all of the smoke will enter the barrel.
Also I placed a small mesh at the bottom of the barrel, if the meat will somehow fall from its place, it will not fall on dirt and fire.
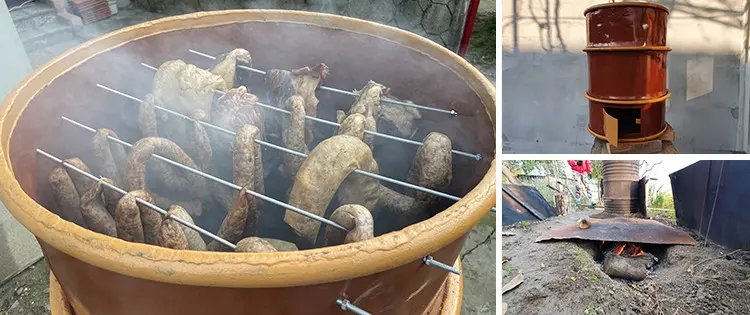
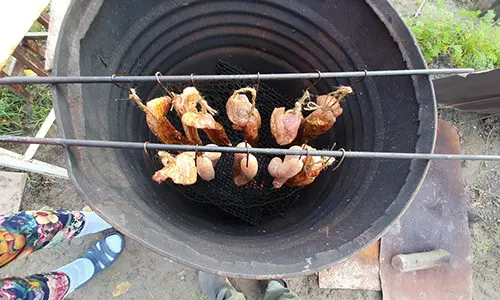
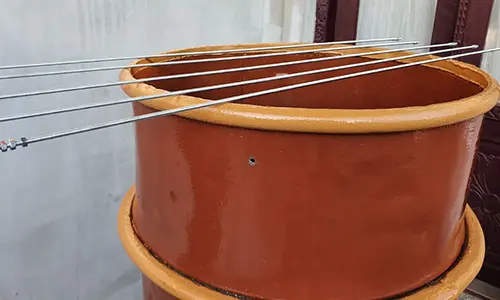
Step 6. Place The Iron Rods On The Barrel
The next step I took was to take the three iron rods and placed them on top of the barrel.
These rods will be used to hang the meat that you will be smoking.
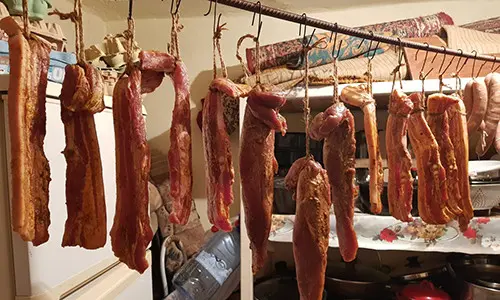
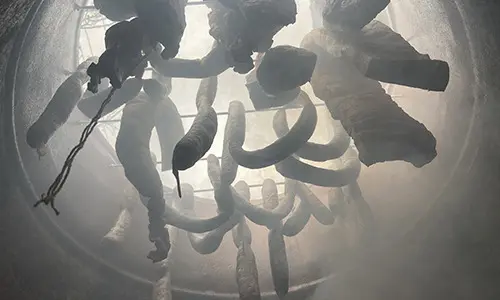
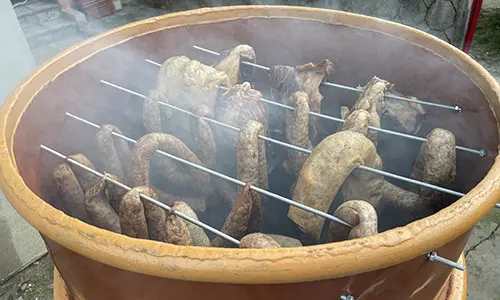
Step 7. Hang The Meat
It’s now time to hang the meat. Take the iron hooks, hook the meat on them, and hang them on the iron rods.
Step 8. The Meat Will Be Ready
Depending on whether you are smoking your meat to eat it or preserve it, the time for it to be ready will vary. This also depends on the type and size of your meat.
One big advantage of this basic smokehouse is that smoke goes slowly to your meat (through the hole) which allows you to leave it alone, and do whatever you want whilst it gets ready. This basic DIY smoker is really easy to make, plus you don’t need to invest a lot of time into it.
The second type of smokehouse that we will be getting into is a bit different. This one is more customized and needs more time to build.
Tools And Materials Needed For A Custom DIY Smokehouse
- Empty barrel, 5 iron rods
- Small hinges, 4 small screws
- Electric drill, Grinder
- Spray or Paint, Firewood
Building Your Custom Smokehouse
If you are looking to impress your friends when they come over for a visit, then this second custom DIY smokehouse will do the job. It is portable, fancy, but most importantly, it gets the job done. Follow me as I share how I created my own.
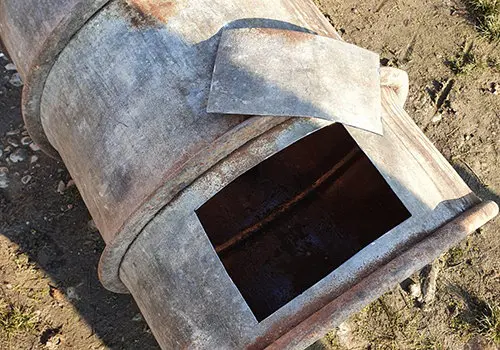
Step 1. Make An Opening On The Lower Third Of Your Barrel
The first thing I did was to make a rectangular opening on the lower third of the barrel using a grinder. This should be big enough to fit your wood.
I then took the square metal plate that I carved out and put it back in along with two small hinges, making a door. This door will be used to put in, or reduce the firewood.
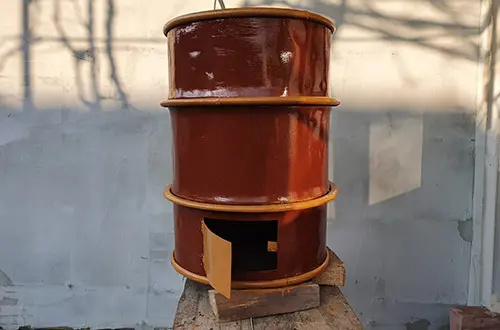
Step 2. Paint The Barrel
It’s now time to spray paint the outer part of the barrel with any color that you like.
Place the barrel on an elevated plane and start painting.
Step 3. Leave The Barrel To Dry
We are now done creating and designing our smokehouse – place it in a sunny area so that the paint can dry up quicker.
Step 4. Drill And Pluck In The Iron Rods
The next step is to drill 5 holes on the upper third of the barrel then pluck in the five iron rods.
Step 5. Start Smoking
Open the door of your barrel and put in some firewood and start the fire.
Make sure you hang the meat only after the fire stops blazing so that it doesn’t get burned. Enjoy!
DIY smoking has been around since the beginning of time. This is mainly because of the nostalgic memories it creates after eating those deliciously prepared meals.
If you don’t have a smokehouse yet, what are you waiting for? Follow the above instructions and make your own.
Let us know which smokehouse from these two do you like and why?
You may also like:
 10 Cooking Herbs You Should Grow In Your Garden
What Happens If You Smoke Garlic (Video)
How To Build A Small Storage Shed From Pallets
9 Old Recipes Every True Homesteader Should Know
8 Easy Projects You Shouldn’t Miss From Your Backyard


