Long summer days are on the way. Here is a simple project, inexpensive and easy to assemble, that will dry your fresh vegetables and other fresh produce: DIY solar dehydrator.
The principle is simple: air travels over solar-heated plates and then through a chamber, where the produce is placed on shelves made of expanded metal, that allows the air to pass through.
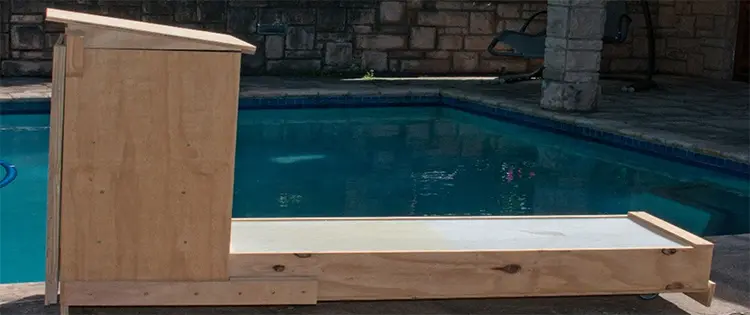
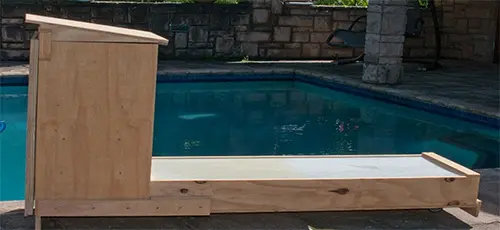
The dehydrator consists of two chambers: horizontal and vertical. The horizontal one heats up the air moving through it.
The vertical chamber stores the produce and allows the warm air to rise and flow out through the top of the chamber. The whole project is designed to make use of only one sheet of half-inch plywood. So, all the sizes are determined by the size of the sheet.
The length of the horizontal warming section is half the length of the sheet, and the vertical sections are all provided for by the rest of the sheet.
In this example, we used Perspex that came from an old shower door, but any transparent material will be fine to use. Basically, all you want is for the transparent sheet to allow the sunlight through and channel the air up to the vertical chamber.
It is a good idea to have the dehydrator on wheels, so you can move it around with ease. This is particularly important if you use ceramic tiles to warm the air.
Related: The 10-Dollar Jerky Maker
Type Of Produce
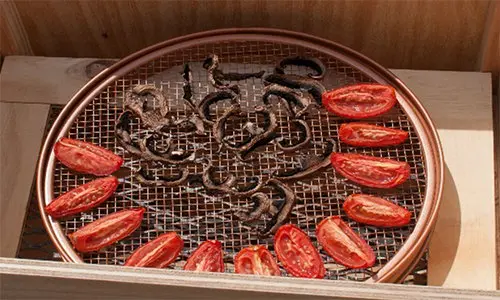
All types of deciduous fruit can be dried in the dehydrator, although there is no reason why citrus could not be also dried in a similar fashion.
I use my dehydrator for mushrooms and tomatoes primarily. The mushrooms are dried and then placed in a liquidizer, which reduces them to a powder. They do a great job of enhancing the flavor of any mushroom dish.
Tools Needed For The Solar Dehydrator
Some basic woodworking tools are required. The essential ones are:
- Saw (a power saw will speed things up, but a crosscut hand saw will also do).
- Drill (cordless drill makes things easier and can also be used to drive screws home).
- Square, Measuring tape, and a Screwdriver
- Appropriate drill bits (check to match the screws).
And if you have a table saw, then things will be very much easier, but you can get away with the essential list.
Equipment Required For This DIY Project
- One sheet of half-inch plywood.
- Sheet of clear Perspex or glass to suit.
- Three wheels for moving it around.
- Four pieces of open mesh for the shelves.
- Aluminum foil painted black (ceramic tiles painted black will be an added advantage).
- Two hinges for the door. And door clip to keep the door closed. Also, a door handle if required.
- Screws to assemble. A small bottle of glue. Double-sided tape.
- Black paint. Paintbrush.
And if you are going to keep the dehydrator outside, where it will be exposed to rain, then you will need some wood sealer or paint, to preserve the wood.
The Build Of The Dehydrator

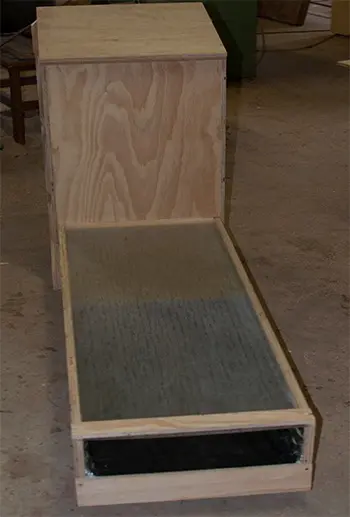
To make things simple we will be making two boxes. One for the heating section and one for the produce storage area.
The Heating Sectio
To make the heating section you will need to cut the base and then the two sides. The two sides and the base should be equal to half the width of the full sheet of plywood.
As a guide you want the sides to be around four inches wide. In total, the base and the sides should take up about a quarter of the full sheet.

If you have access to a table saw I would suggest you cut two slots on each side piece to accommodate the Perspex. It is easier to do this before you assemble the sides and base. If you don’t have a table saw it isn’t a problem, you can simply screw the Perspex to the top of the sides.
If you can cut the slots for the Perspex, you can slide it out as required.
Related: Recipes I Made From The Lost Super Foods Book: Canned Hamburger Meat
The base and the two sides are joined together with screws and a little bead of glue. If you are going to screw the Perspex to the top of the sides drill the holes for the screws but only fit four screws to secure the Perspex because it will have to be removed to fit the aluminum heating section.
Remember to use flat head screws and allow for a loose fit in the Perspex to avoid cracking the Perspex when you fit the screws.
Now is a good time to attach one of the wheels to the middle of one end of the box.
 With the sides assembled, it’s time to lay a couple of sheets of heavy aluminum foil in the base of the heating box. I used a roll of heavy-duty aluminum foil and stuck it down with double-sided tape. I fitted the aluminum up the sides of the box and trimmed it at the slot.
Related: How I Lived With No Fridge And No Heat For The Last 5 Years
When the aluminum was all in place, the top layer was given two coats of blackboard paint.
I had some spare ceramic tiles just over twelve-inch square which I also painted black, and placed inside the heating box for a little extra heat generation.
If you have a couple of tiles spare paint them black but only lay them in the box when you have placed the hydrator in its final position, as they add a fair bit of weight.
When you have finished painting the aluminum, fit the Perspex back on top of the box.
And that is our heating box done.
The Build Of The Storage Box
 Start with the base and now you need to work off the size of the heat box, as the heat box is going to slide into the storage box.
Cut the base one and a quarter inches wider than the base of the heat box.
Drill holes in the base and screw the sides onto the base.
Check that the heat box will fit between the sides and the base of the storage box.
Cut the front piece of the storage box to allow for the air to pass from the heat box into the storage box.
Related: Are You A DIY-er?
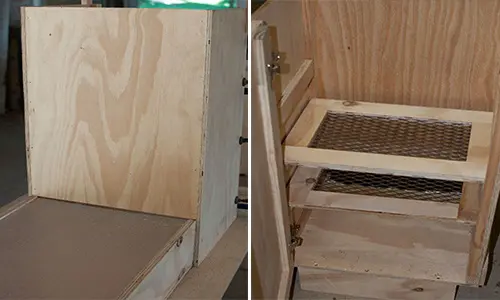
The Shelves
You can fit the guides for the shelves. Now it would also be a good time to make them.
The shelves can be made from any material that allows a free flow of air. I used expanded metal but feel free to use whatever you see fit as long as the air can pass through it easily.
The Last Few Steps
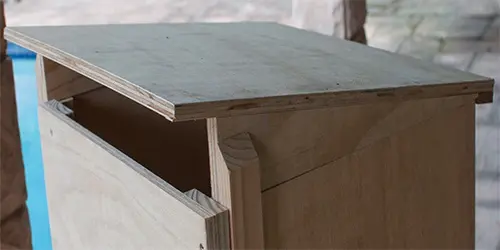
For the roof you will need two pieces of plywood cut into wedges.
This is to ensure that the warm air can escape and in doing so a draft is created that draws more warm air up through the storage box.
I would suggest the wider side should be approximately three to four inches wide and tapering down to about one inch at the smaller end.
The easiest way to do this is to cut a rectangle with the longer sides the size of your storage box sides and the shorter sides about three to four inches. Now mark a diagonal and cut along the line. You will end up with two wedge shaped pieces for your roof sides.
Cut the roof section so that when you attach the sides to it, they will rest on the top of the storage box sides.
I fitted two small pieces of wood on either side of the storage box to keep the roof section in place. Now fit the two wheels to the base.
And finally, you will need to make a door and using two hinges, fit the door either opening to the left or right. Your preference.
I chose to fit the heat box to the storage box, but you can keep them separate and slide the heat box into the storage box when you want to use the dehydrator. This will save you storage space but if you would like to join the two boxes together this can be easily done by fitting a piece of plywood on either side of the storage bow and screwing it to the heat box as shown below.
Drying Times
Place your dehydrator in a north-to-south position so that the heat box will be in the sun for the day. It is important to understand that the ambient humidity is going to influence the drying time.
Some items are anhydrous and will reabsorb moisture overnight, (mushrooms will do this) so it is important to remove them from the drier as evening approaches and place them in a sealed container for the night.
The produce will reduce in size quite significantly as they dehydrate so the trays can be well stocked for drying.
You may also like:
 How To Build A Small Storage Shed From Pallets
What Happens When You Keep Your Meat in Salt For 1 Month (Video)
The Ultimate Guide To Composting


This article reminds me I need to get to work on a solar dehydrator & solar oven! Thank you –