
How would it be to grow a whole season of food out of one big pot just by watering maybe twice a week, feeding it almost never, and barely pulling a weed? Sounds too good? If you don’t believe it’s possible, I get it.
Most of the time, container gardening doesn’t work how you expect it to work and the harvest is not even worth mentioning.
But hear me out, this is different. By the end of this article, you will know how to build one container that works like a tiny ecosystem, where every plant has a job and the plants feed and protect each other.
It costs very little, it fits on a patio or a balcony, and once it is planted, it mostly takes care of itself.
If you ever wanted a real piece of self-sufficiency that doesn’t require an acre of land, this is the best place to start.
What “Permaculture in a Box” Really Means 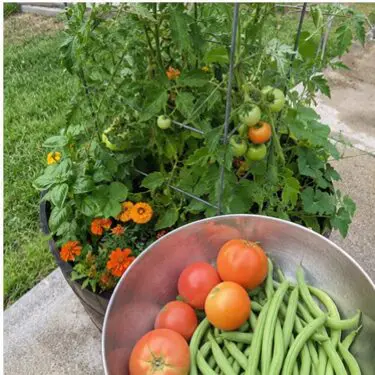
Let me start with this, because the word permaculture scares people off. It sounds fancy, but it isn’t.
Here’s the simple version. In a normal pot, you grow one thing. Maybe a tomato. Maybe some lettuce. That one plant eats up all the nutrients in the soil, so you water it all the time, and the second bugs show up, you grab a spray bottle. That’s how it usually works.
Permaculture flips that around. Instead of one plant, you grow a little team of plants that help each other. One feeds the soil. One keeps the bugs away. One brings in the bees. And one spreads out low and covers the dirt, so it stays cool and damp and weeds can’t move in.
People call this little team a guild. It’s just a fancy word for a group of plants that work together. Each one has a job. Put them together and the whole pot starts acting like a patch of healthy ground out in nature.
That’s the whole idea. You stop worrying about one needy plant and start running a little system that mostly runs itself.
Why Even Bother With This?
I know it sounds like more work than one tomato in a pot. But it isn’t. It’s actually less work. For this article, I will use a tomato plant as my example since this was my first DIY permaculture in a box project.
When I switched my pots over to this, I went from watering every single day to maybe twice a week. My feeding dropped to a handful of compost now and then. And the pot gave me more food, not less, even though I was doing less. The plants are covering for each other, so all the chores you’d normally be stuck doing kind of disappear. The plants are taking care of them in the background.
There’s one more thing, and it matters when you’re into self-sufficiency. A guild keeps on giving. You pull a few beans, snip some herbs, cut a little lettuce, and it all comes in at different times all season. Even if you have one pot, the food keeps coming in steady.
How Is This Different From Companion Planting?
Many of you might say, but wait, isn’t this just companion planting with another name? I thought the same thing when I first heard about it and now I want to make things clear.
This is not really companion planting, but we can say they’re cousins.
Companion planting is about pairs. You put basil next to your tomato because it helps the flavor, or marigolds by your beans because they keep certain bugs off. It’s one plant doing one favor for another, and that’s a good thing to know.
But what we’re doing here with this project goes a step further. Instead of a few helpful pairs, you’re building a whole little crew where every plant has a job and they all lean on each other at once.
The whole idea is to build an independent system that takes care of itself while also offering you a bountiful harvest. You can see companion planting as a tool we use in the kit of permaculture.
This is also why knowing which pairs do what and how to match them is so important here. In this article, I’ll give you one basic combo you can use for great results, but there are so much more out there.
For example, the Amish have been using companion planting for hundreds of years. And what I find the most interesting about their approach is that for them, companion planting isn’t just a way of securing a better harvest. They also use it as a way of natural prevention in case of emergency.
The way they build their gardens is tailored to protect their property from floods, fire, and full-blown blackouts. This makes total sense when you think about how long they managed to live without relying on the system.
If you are interested in this practice and want to find out more about it, you can read more here.
👉 See how the Amish make their property disaster-proof using companion planting
What You Need (You Probably Already Have Half of It)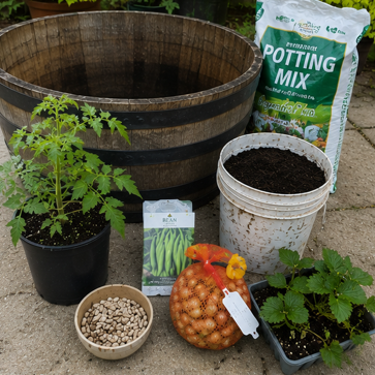
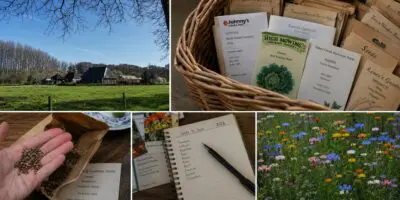
Hopefully, you don’t need much. Here’s the whole shopping list. I’ll also leave you some links to make things easier if you want to start building this.
- A big pot with holes in the bottom
- A bag of good potting mix
- A few handfuls of compost
- Your plants and seeds
- A bag of mulch (straw or dry leaves work fine)
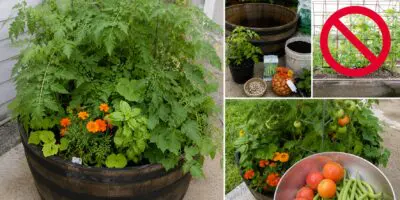
The pot itself matters most, so start there. Get a big pot. Why? A big pot dries out slower and gives the roots room to grow. Go for one that’s at least 18 to 24 inches across and about that deep.
A half whiskey barrel is perfect and cheap. A 20-gallon grow bag works great too.
Alabama Cooperative Extension says one tomato alone needs at least five gallons of soil, and since it’s permaculture, you’re feeding a whole crew here, so don’t go any smaller.
And please don’t forget, whatever you pick has to have holes in the bottom. Soggy roots are the worst thing that could happen and would destroy the whole system.
The 5 Plants That Make It Work
Here’s where a lot of guides mess up. They give you a list of eight plants and a pot that fits four, and everything ends up choking each other out. So I’m going to give you a setup that actually fits one barrel or a 20-gallon pot, and I’ll tell you exactly how many of each.
Think of it like one main plant in the middle and a little crew around it. There are five jobs to fill, but you don’t need a separate plant for every job. Some of them do two jobs at once.
The main plant: one tomato. This is the star of the pot and your biggest harvest. Pick a “bush” or “determinate” tomato, not the big climbing kind. Here’s what that means: a bush tomato grows to a certain size and then stops. The climbing kind, called “indeterminate,” just keeps growing and sprawling all summer and takes over. The seed packet or the little tag in the plant pot will tell you which one it is. You want the bush kind. Put it right in the middle. A pepper plant works just as well if you’d rather grow that. You can choose any vegetable you want. 
For feeding the soil: three or four bush beans. Beans do something pretty cool. Their roots pull nitrogen out of the air and put it into the soil. Nitrogen is the best fertilizer out there, so the beans are basically making free plant food that your tomato gets to share. Plant three or four bean seeds into the soil in a loose ring, somewhere between the tomato and the edge of the pot. And you get to eat the beans too, not just the main plant.
For keeping bugs away: a small clump of chives, or three or four onion sets. An onion set is just a tiny dried baby onion you push into the dirt. I like to use this approach as it’s easier than starting from seed.
Onions and chives both smell strong, and that smell helps keep aphids off your tomato. Plant them between the tomato and the rim, on the opposite side from the beans.
For the bees (and tricking bugs): two or three nasturtiums, or a couple of borage plants. Nasturtium is a clever choice because it attracts the bees while also pulling aphids onto itself and away from your tomato. Borage brings the bees in strong, and you can even eat the leaves. Either one is great. Plant a couple near the edge where they can hang over the side.
For covering the dirt: three or four strawberry plants around the rim. These spread out low and cover the soil. This keeps the moisture in and chokes out weeds. Plus you get berries. Space them out around the outer edge, about six inches apart. If you’d rather have a herb down there than fruit, creeping thyme works too.
And that’s a full, balanced pot. Everything fits, the pot feeds itself, and nothing’s fighting to survive.
One plant to keep OUT of the pot: comfrey. You’ll hear people online call comfrey the miracle plant for this kind of thing. And it’s true that the leaves make good free mulch.
But comfrey is a bully. Once it feels safe in a pot, its roots take over everything. So grow it in its own separate pot next to your box instead. When you want to feed your plants, just snip a few comfrey leaves and lay them on top of the soil.
If you plan to upgrade your container and use other plants for your permaculture box, you can always go with medicinal herbs. For example, chamomile is known to be one of the strongest pest control plants. It keeps the bad bugs out, but it also brings in the good bugs such as the pollinators. Then there’s chicory that acts almost the same as comfrey. It fertilizes the soil, pulling nutrients from deep down with its taproot.
The advantage that comes from medicinal herbs is that you can also use them to take care of your health.
Chamomile is perfect in a tea before going to bed if you want to sleep without tossing and turning, and chicory is amazing for digestion after a heavy meal.
This is why you might want to choose these herbs instead of borage or comfrey. This is the best path if you want to take full advantage of this project and use everything it gives you.
Find out more info about these herbs and also some high-quality non-GMO seeds if you want to start growing them yourself.
How to Build Your Box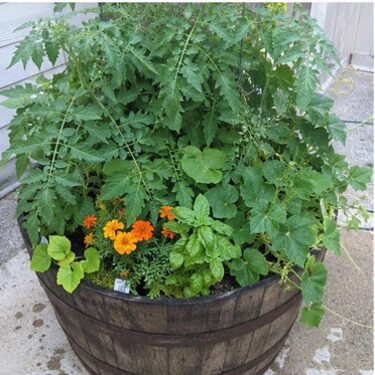
One afternoon is more than enough for this project. Once you have the materials, it takes just a few hours.
First, get the pot ready. Put a thin layer of small rocks or broken pot pieces over the drainage holes so they don’t clog up. Then fill the pot with your potting mix and compost, leaving a couple of inches of space at the top. Don’t press it down hard. The roots need little air pockets to breathe.
Plant the tomato first. Put it right in the center. Dig a hole as deep as the root ball, set the plant in, and press the soil gently around it. Tomatoes actually like being planted a little deep, so it’s fine if the lowest leaves end up close to the dirt.
Add the crew around it. Work your way out from the middle. Push the bean seeds in on one side, about an inch deep. Put the chives or onions on the other side. Tuck the nasturtium or borage near the edge. Keep everything about a hand’s width away from the tomato stem so nothing crowds it early.
Edge it with strawberries. Strawberries usually come as “crowns,” which is just a little bundle of roots with a bud on top and no leaves yet. Tuck them around the outer rim, about six inches apart, with that bud sitting right at soil level. Plant it too deep and it rots. Leave it too high and it dries out.
Water it well. Give the whole pot a slow, deep soak so the soil settles in around all the roots. If any spots sink down, add a little more soil.
Cover the top with mulch. Spread two or three inches of straw or dry leaves over the soil. Just keep it pulled back an inch from the stems. This is the step most people skip, and it’s the one that saves you the most watering. The mulch keeps the soil cool, holds the water in, and slowly breaks down into food for your plants.
And that’s it. Your pot is built, and your little system is up and running.
How to Keep It Alive Without Babysitting It
For the first couple of weeks, while the plants are settling in, keep an eye on them. Water whenever the top inch of soil feels dry. Young plants need steady water if you want them to grow strong and healthy.
After that, the pot starts taking care of itself. The strawberries and mulch hold the moisture in, so you can water deep but a lot less often. I just stick a finger in the soil. If it’s dry past my first knuckle, I water. If not, I leave it alone. Most of the summer, that comes out to about twice a week, though a hot spell might push it to every other day.
For feeding, just lay a few cut comfrey leaves on the soil every few weeks, or scratch in a handful of compost. The beans are doing their job and feed the soil the whole time, so you won’t need much more than that.
Pinch off the dead flowers from the nasturtium and borage to keep the bees coming back. And pick your beans and strawberries often, because the more you pick, the more the plants give you. Other than that, just let it do its thing.
The Best Water to Use on Your Box
Rainwater is the best thing you can give this pot, hands down. It’s soft, it’s free, and it’s got none of the chlorine or salt that builds up in your soil over time. Tap water, though, carries chlorine and salts that slowly poison your soil. If you can keep it out of the box, your plants will thank you.
Now, I don’t say your plants won’t grow when watered with tap water, but this is not good in the long run and since this box is designed to keep growing year after year, tap water can become its worst enemy after a few harvests.
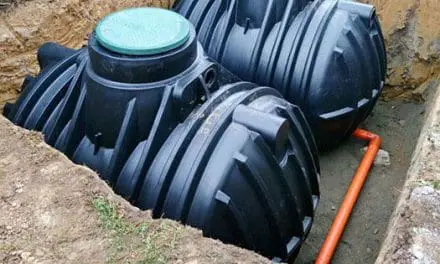
So, if you want rainwater, the easiest way to get it is by using a rainwater catchment system. Also, a good idea is to have a way to store water long term. You can’t keep rainwater forever in a simple barrel.
If you want to build a dual system that catches rainwater and then transfers it into a tank for long-term storage, you can find full instructions with pictures and a list of materials here.
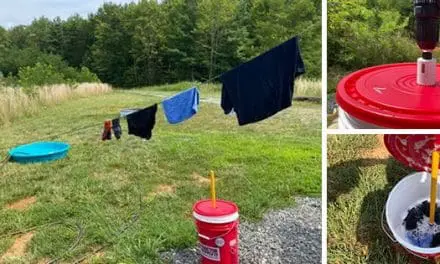
Or, if you still want to use tap water, you can improve it by using a filter.
👉 See how to build a fully operational DIY sand and charcoal water filter
How to Get Three Harvests From One Pot
One of the best parts of a guild is that it doesn’t stop after one harvest. With a few little nudges here and there, that same pot can feed you three times over: a first round of beans, then a second, plus strawberries, and a batch of greens in the fall. Here’s how you keep it rolling.
When your bush beans are done in midsummer, don’t pull the whole plant out. Snip it off at the soil line and leave the roots in the ground. Those roots are full of the nitrogen the beans pulled down, so leaving them in keeps feeding the soil. Then poke a few fresh bean seeds into the gap for round two.
When the strawberries start sending out runners (those long stems that crawl out looking to root), pin a couple down to grow new plants and snip the rest off. Otherwise you’ll end up with strawberries taking over everything. And in late summer, tuck a few lettuce or spinach seeds into the shady side of the pot, where the tomato gives them a little cover from the heat. They’ll give you greens later in the fall.
This pot is alive and if you keep swapping plants in and out as the seasons change, it keeps growing and giving you harvest.
5 Mistakes That Can Destroy the Whole Thing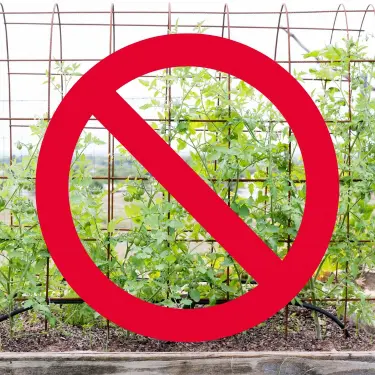
I’d rather tell you where folks mess up than pretend this is foolproof. Here are the mistakes I see the most, including a few I made myself.
Cramming in too many plants. This is the big one. A guild isn’t about stuffing in as many plants as you can. If your pot’s on the smaller side, just drop a plant or two. A tomato, a few beans, and one ground cover is plenty.
My first pot had the beans packed in way too tight, and they came up thin and crowded. I had to pull half of them out. Give the plants room to breathe.
Letting comfrey in the pot. I said it before, but I’ll say it again, because people do it anyway. Keep comfrey in its own pot. In the box, it takes over everything.
Watering on a set schedule. A pot in the shade and a pot sitting in the sun need totally different amounts of water. Don’t water by the calendar. Test the dirt and let it tell you what it needs.
Skipping the mulch. A pot with bare soil dries out fast and grows weeds, and then folks wonder why this is so much work. Just don’t leave the mulch off.
Picking the wrong tomato. This is why I steered you toward a bush tomato earlier. The big climbing kind will shade out everything under it and turn your pot into a mini tomato jungle. Keep the middle plant small so the rest of the crew gets the sunlight it needs.
Final Thoughts
The whole point here is to let the plants do the heavy lifting for you. Set it up right at the start, and the pot spends the rest of the season looking after itself while you mostly just harvest. I believe this is a pretty good trade for just a few hours of work.
And the thing I like the most is that you don’t need land for this. You don’t need money or expensive gear. All you need are a few basic materials and patience while it all comes together.
My box sits right by the back steps, where I walk past it every morning. Some days I water it. Most days I just look. Right now the strawberries have crept clear over the edge of the barrel and are hanging down the side, and there are three green tomatoes up near the top getting close.
I hope you’ll try this project too and see how rewarding it can be.
You may also like: 
Join Our Homesteading WhatsApp Community!
These Chicken Mistakes Cost YOU Hundreds! (Video)
NEVER Throw Away These Items! (Do This Instead)
9 Practical Toilet Paper Alternatives for Emergencies and Off-Grid Living
I Tanned a Hide With Nothing but Eggs and Animal Brain


