
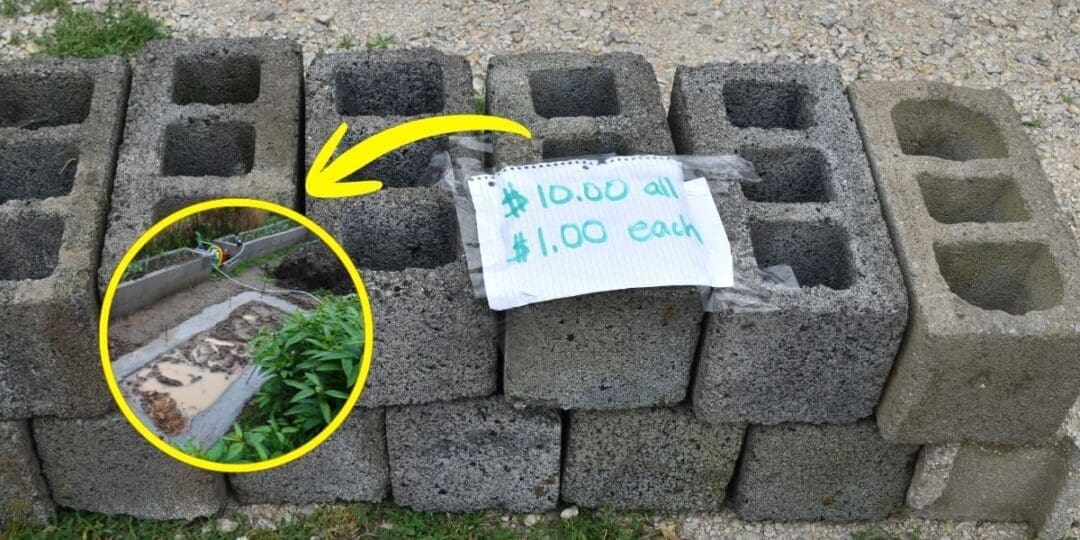
Cinder blocks might be some of the most useful construction items that people waste thinking they are trash. The truth is that cinder blocks are free building materials you can use to improve your homestead. They can solve some expensive problems without needing to use power tools. In other words, they can make your problems disappear for free.
You can use cinder blocks in ways that cut costs, extend growing seasons, and handle jobs most folks are hiring out or buying equipment for. Yes, this is all possible, so stop ignoring those free block piles you stumble upon on Craigslist or Facebook.
Here are some projects you can try for yourself to see how this unexpected material can improve your homestead.
Rocket Stove
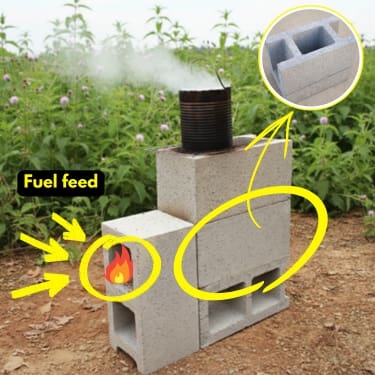
A rocket stove made from cinder blocks heats water and cooks food perfectly while burning less wood than an open fire.
Building instructions: Put one block on end with the holes facing the sides. Place another block horizontally against it with the holes up, but be careful because this one is a joint control block that will allow you to create your fuel feed.
The hole of the joint control block will be connected to another vertical block, just like in the photo.
The L-shape forces air through the fuel chamber and up the chimney, creating a strong draft that burns wood hot and clean. Small twigs and sticks provide enough heat to boil water in 10-15 minutes.
When you are done using it, you can disassemble the rocket stove with zero effort and stack the blocks wherever you want.
This design isn’t just backyard engineering, as clean-burn rocket stove principles have been studied for years by organizations like the Aprovecho Research Center, showing significantly improved fuel efficiency compared to open fires.
Raised Bed Foundations
Most of us want raised beds in our gardens, and the go-to material to build them is wood. Unfortunately, wooden raised beds have a well-known problem: after a while, they start rotting.
This is why cinder block raised beds are so much better. And besides getting you rid of this problem, using cinder blocks will also give you a few extra advantages, such as:
- Earlier spring planting (they help the soil warm up faster);
- Later fall harvests (blocks keep the plants warm just like a greenhouse by releasing stored heat at night);
- Extra planting space in the block holes.
To build them, start by laying blocks directly on the ground in a rectangle the size you want your garden beds to be. Use the blocks as the bottom layer, then build wooden sides on top if you want more height, or just fill directly into the block frame for a low raised bed.
The blocks raise everything high enough to prevent water from sitting against the wooden sides. This extends the life of any lumber you use for the wooden sides. Even untreated wood lasts years longer when the first 8 inches are concrete instead of soil contact.
Don’t waste space and fill the block holes with soil and plant herbs or flowers in them. Thyme, oregano, and marigolds all do well in these spaces.
Now, you can also plant medicinal herbs in these raised beds, the kind that can replace trips to the pharmacy. This Medicinal Garden Kit gives you seeds for 10 powerful healing herbs handpicked by herbalist Nicole Apelian. It includes everything from chicory for natural pain relief to echinacea for immune support, plus a complete guide showing you exactly how to turn these plants into tinctures, salves, and remedies. Click here to get your seed kit and the complete guide.
Livestock Shelter Walls
Using cinder blocks to build a shelter for your livestock is probably one of the best projects you can start. The main advantage is that you will be able to build structures in hours instead of days. Also, since concrete has thermal mass, it will moderate temperature swings, staying cooler in the summer and holding some warmth in the winter.

For larger livestock (goats, sheep, pigs, calves): Stack blocks 4-6 feet high in a U-shape with the open side facing away from prevailing winds. Lay a roof across the top, such as corrugated metal, old barn tin, or heavy tarps; all work. You’ve created a windbreak and rain shelter in a few hours.
For smaller animals (chickens, rabbits): Stack blocks 2-3 feet high as a partial wall that protects against wind and predators while still allowing ventilation. Attach wire fencing to the block walls using masonry anchors or by running wire through the block holes.
You can also use blocks to create temporary partitions in your barn when you need to separate animals. Stack them quickly to divide space, then remove them when the barrier isn’t needed anymore. They’re heavy enough that most animals won’t knock them over, but light enough that one person can build and disassemble them as needed.
Root Cellar Storage Bins
Cinder blocks make excellent storage bins for root vegetables such as potatoes and carrots since they need cool, dark, dry conditions. The concrete stays cool, the holes provide airflow, and you can build the bins exactly the size you need.
Stack blocks three or four high in whatever way fits your basement or shed. You can go with a simple rectangle, an L-shape, or separate bins side by side. Leave the holes open for ventilation. Line the bottom with hardware cloth or wood slats to keep vegetables off the ground and allow air circulation underneath.
Store different vegetables in separate sections. This matters because some produce gases that speed up ripening in others, leading to early food spoilage. For example, always keep your onions away from your potatoes, and both of them will last longer.
The cinder block bins keep the temperature stable because concrete will absorb the cold from your cellar, cooling your vegetables. This also matters in late winter when you’re trying to keep storage crops from sprouting too early.
The Problem Most People Don’t See Coming
Storage bins are useful, but here’s what catches most homesteaders off guard: knowing what to store isn’t the same as knowing where to store it safely. A basement corner works until you realize your entire food supply is vulnerable to flooding, contamination, or worse, being in plain sight during a crisis when looters come looking.
How This Gets Dangerous Fast
Root vegetables in bins solve the short-term problem. But what happens when you need long-term food security that goes beyond a few months? What if you need a space that keeps food preserved for years, stays hidden, and doubles as an emergency shelter? Most people figure this out too late, after their basement floods or when they realize they have nowhere truly secure to retreat during an emergency.
This Is How to Save Your Homestead
When disaster hits, building a proper root cellar can save you, and Tom Griffith’s Easy Cellar system is one of the most trusted resources. Here you can find a complete step-by-step plan for constructing an underground root cellar that maintains perfect temperature and humidity year-round, stores food for years, and serves as a fallout shelter if things go sideways. Griffith is a retired building inspector who worked on nuclear facilities, and his plans show you exactly how to build a multi-purpose shelter even if you’ve never done construction before. The guide covers everything from site selection to ventilation systems, and it costs less than a month’s grocery bill while protecting years’ worth of food storage.

Herb Dryer Tower
Drying herbs properly is possible with good airflow without direct sunlight. Cinder blocks create this setup naturally. The hollow cores act as vertical air channels that pull moisture away from the hanging herbs while also keeping them in the shade.
To build this, stack blocks vertically in a corner of your shed, barn, or covered porch, anywhere with shade and some air movement. Go 4-6 blocks high, depending on how much you’re harvesting. Thread wooden dowels, metal rods, or even sturdy branches through the block holes at different heights. These become your hanging rails.
Tie the herb bundles with twine and hang them from the rods. The vertical stack creates a chimney effect where warm air rises through the cores, pulling moisture up and out. Cooler air enters from below, creating continuous circulation without fans or electricity.
Space bundles so they’re not touching. You want air reaching every part of every bundle. Depending on humidity and herb type, most things are fully dry in 5-10 days. Basil and mint dry fastest. Thick-stemmed herbs like oregano take longer.
Outdoor Furnace
Cinder blocks create a stable, fire-resistant work surface for outdoor metal work, large-scale rendering, or any project involving serious heat.
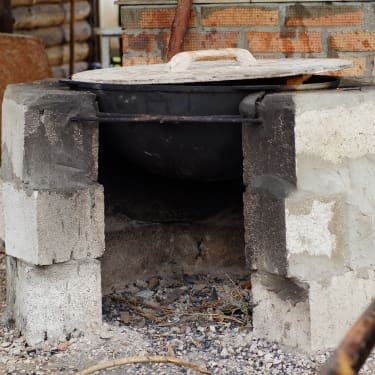
Practical applications:
- Large-scale rendering (lard, tallow);
- Forge work or metal melting;
- Scalding station during butchering;
- Outdoor canning with large pots.
Basic construction: Build a rectangular or square work surface by laying blocks in rows, stacked 2-3 high. Fill the center with firebrick or sand for additional heat protection, or leave it as an air gap. Set your forge, foundry, or large cooking pot on top.
After use, let everything cool completely. You can disassemble it if needed or leave it standing as a permanent outdoor work station.
Greenhouse Heater
Cinder blocks painted black and stacked inside a greenhouse absorb solar heat during the day and release it at night, reducing temperature swings that stress plants. A wall of blocks can raise overnight temperatures by 5-10 degrees in a smaller greenhouse.
Stack blocks along the north wall of your greenhouse where they’ll catch southern sun exposure all day. Paint them flat black, as this increases heat absorption significantly. You can fill the holes with water in sealed bottles or leave them open. Water is a better heat storage medium than concrete, so if you use the bottles, you increase the temperature that is stored in the blocks.
Related: Why You Should Can Dandelions Growing in Your Backyard
This method is perfect for someone who wants to be self-sufficient because it uses no electricity, no fuel, and no moving parts. Be careful and position blocks where they won’t shade plants during the peak growing season.
Here’s What You Need to Remember
They’re cheap, they’re available, and best of all, they’re perfect to use when you want to create a setup that you can disassemble and rebuild later. For example, you can build something, use it for a season or a decade, then disassemble and build something else. Cinder blocks don’t rot, rust, or need maintenance. They handle weight, weather, and fire. And they require no special skills to work with.
Most homestead problems need easy and functional solutions, and these blocks do just that. So next time you find a pile of cinder blocks, or you have some remaining from another project, save them and stack them. They might come in handy later.
You may also like: 
9 Skills Every Homesteader Must Have To Outlive A Crisis
How to Make Your Own SHTF Medicinal Garden (Video)
7 DIY Stoves You Can Build In A Crisis
8 Off-Grid Projects I Regret Building on My Property
Ingenious Uses of Tallow You Never Thought Of (Except Eating!)




















The instructions for the Rocket stove don’t match the picture!
Thank you for pointing this out, Walt. We updated the article so everything matches up now. Appreciate you letting us know!
Rocket Stove: The build instructions are impossible. This must be an April Fool’s Day joke!