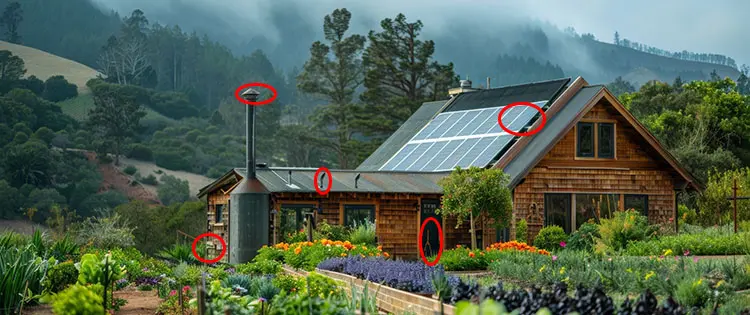
Living off-grid looks straightforward until you are standing in a flooded root cellar at midnight in January, or lying awake listening to a ram pump clacking through your bedroom window for the fourth hour straight. The mistakes that cost the most are rarely the complicated ones. They are the ones that seemed perfectly reasonable at the time, the cheap shortcut that turns expensive, the well-intentioned placement that ignores basic physics, the equipment that works fine until the first hard winter. This is a collection of those mistakes, learned the hard way, so you can avoid paying for the same education twice.
Bad Batteries 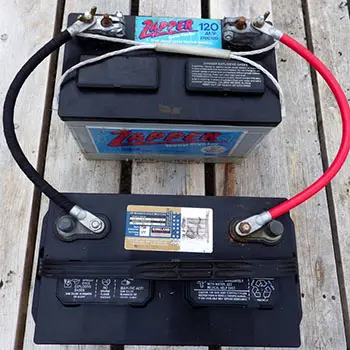
If you are storing power from solar panels, wind turbines, or hydro generators, the battery bank you choose will determine how much of your time goes toward actual off-grid living versus maintaining your power system.
Lead-acid batteries are cheap upfront, typically $100 to $200 per battery, and that price is genuinely tempting when you are pricing out a system for the first time. But the real cost comes later. They require regular maintenance: checking electrolyte levels, equalizing charges, cleaning terminals, and monitoring for sulfation. They give off hydrogen gas during charging, which means your battery storage area needs dedicated ventilation to prevent a potentially dangerous accumulation of fumes. They do not handle deep discharge well. Drain a lead-acid battery below 50 percent of its capacity regularly and you will shorten its lifespan significantly. In practice, a lead-acid bank that is rated for 500 amp-hours might only give you 200 to 250 usable amp-hours before damage accumulates.
Lithium iron phosphate batteries, often called LiFePO4, are the right choice for a permanent off-grid installation. They are safe, stable, require essentially no maintenance, tolerate deep discharge down to 80 or even 90 percent of capacity without damage, and last two to four times longer than comparable lead-acid banks. A quality LiFePO4 battery will typically run $400 to $800 per kilowatt-hour of capacity, versus roughly $150 to $250 per kilowatt-hour for lead-acid. That gap closes fast once you factor in replacement cycles and the time cost of maintenance.
For a small cabin system, a 10 kilowatt-hour LiFePO4 bank from a reputable manufacturer like Battle Born, Renogy, or EG4 will serve you reliably for a decade or more with almost no intervention. The U.S. Department of Energy’s Office of Electricity has published comparative research on battery storage technologies confirming that lithium iron phosphate chemistry offers the best combination of cycle life, safety, and usable capacity for residential and off-grid applications.
Buy the right batteries slowly if you have to. It is a better outcome than buying the wrong ones twice.
Relentless Ram Pump: One of the Projects I Regret Building
A ram pump is an elegant piece of engineering. No electricity required, no fuel, no moving parts beyond the two valves inside the pump body. You place it in a flowing water source, the current drives a diaphragm back and forth, and the hydraulic action pushes a portion of that water uphill to wherever you need it. On paper, it is exactly the kind of low-tech, self-sufficient solution off-grid living is built around.
The part nobody tells you until you have already installed one is the noise. A functioning ram pump produces a rhythmic clacking sound, sometimes described as a heartbeat, sometimes less charitably. At distance and during the day, it is easy to ignore. Within a few hundred feet of a sleeping area, with windows open in summer, it becomes a different story entirely. The sound carries surprisingly well across open ground and through window screens.
Related: How To Make A Water Pump In Your Backyard
The fix, if you are committed to keeping the pump, is distance and terrain. A ram pump should ideally be installed at least 300 to 500 feet from any structure used for sleeping, with topography or dense vegetation between the pump and the building providing natural sound buffering. A small insulated housing built around the pump helps further. If your spring or creek is closer than that to your cabin, weigh the convenience of the water source against the noise reality before you commit.
The other practical issue is seasonality. Ram pumps stop working when the water source freezes, which in northern climates means you need a backup water strategy for three to five months of the year regardless. If you are going to need a well and hand pump for winter anyway, it is worth asking whether the ram pump is adding enough value in the warmer months to justify the installation and the noise trade-off. In my case, the answer turned out to be no, but that calculation will differ depending on your site.
Super Thin Solar Panels 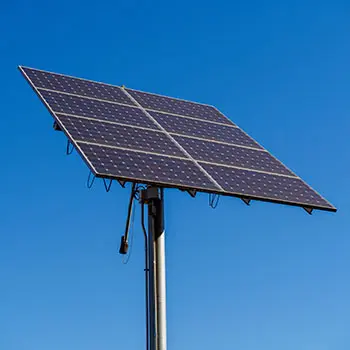
Solar panels are not all built to the same standard, and the price difference between a quality panel and a cheap one is not arbitrary. It reflects real differences in materials, construction, and the ability to survive years of outdoor exposure.
The thin-film rollable panels I bought were attractive for a few reasons: low cost, flexible installation, and the ability to cover irregular surfaces. What they could not do was survive a real winter. The laminate layers separate when temperatures cycle repeatedly between freezing and thawing. Any physical impact, a falling branch, a heavy snow load, a hailstone, causes cracking that degrades output immediately. After one season, the panels I had paid to cover two roof surfaces were producing a fraction of their rated output, and within eighteen months they were producing almost nothing.
For outdoor, permanent installation, you want rigid monocrystalline or polycrystalline panels from an established manufacturer. Look for panels with an IP68 weatherproofing rating, tempered glass fronts at least 3.2mm thick, and aluminum frames with sealed junction boxes. More importantly, look for panels that have passed IEC 61215 and IEC 61730 certification testing, which are the international standards for photovoltaic module design qualification and safety. These tests include mechanical load testing, hail impact testing, and thermal cycling, meaning you know the panel has been verified to survive the conditions that destroyed my flexible panels. The National Renewable Energy Laboratory maintains a useful database of certified and tested PV modules.
Reputable manufacturers whose panels consistently pass these certifications include LG, SunPower, Panasonic, REC Group, and Jinko Solar. Buying from any of these costs more upfront. It costs less over a ten-year period by a significant margin.
If I had known earlier, I wouldn’t have wasted money on these fragile panels. What I really needed for reliable, 24/7 power was this Modular Backyard Power Plant.
How Puddles in the Root Cellar Became One of the Projects I Regret Building
My first root cellar was in the perfect location -or so I thought. I was just a bit beyond the back door to the kitchen and I figured even in winter it would be an easy few steps to get down into the cellar.
Unfortunately, the spot I picked was a collection point for water.
The mistake was skipping a basic site assessment before breaking ground. A proper root cellar location requires four things working in your favor simultaneously. First, the site needs to be on elevated or sloping ground so water drains away from the structure rather than toward it. Second, the soil should be well-draining, ideally sandy loam or gravelly soil rather than heavy clay, which holds water and keeps the floor perpetually saturated. Third, the site should have natural shade or north-facing orientation to keep temperatures stable without fighting solar gain. Fourth, and most practically, dig a test hole at least two feet deep at your intended location in spring or after heavy rain. If that hole fills with water within 24 hours, find a different spot. If it drains within a few hours, the drainage is adequate. That test costs nothing and takes ten minutes. Skipping it cost me an entire season of spoiled food and rusted equipment.
The USDA Natural Resources Conservation Service soil survey is a free tool that lets you look up the drainage characteristics of the soil at your specific location before you dig anything, and it takes about five minutes to use. For any significant excavation project, it is worth checking.
You want a moist and open dirt floor in a root cellar, but my floor was usually a 6-inch puddle from wall to wall. The amount of moisture caused fungus and rot to happen quickly and any metal in canning jars quickly rusted.
I now use the basement under the cabin for my root cellar. Fortunately, I don’t have those water puddling problems.
While my new basement root cellar has solved some issues, I wanted an even more reliable option—something that didn’t require constant monitoring. That’s when I found the Easy Cellar. This system makes it easy to store food securely, without worrying about moisture, pests, or unpredictable weather. It’s a great solution for anyone who wants a hassle-free, long-term food storage method that just works.
The Noisiest Windmill 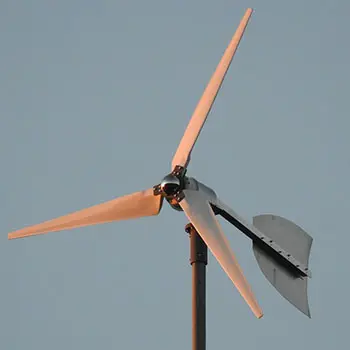
The bluff overlooking the river valley had a consistent breeze year-round, and it seemed like an obvious opportunity to supplement my solar setup on overcast days. What I did not research adequately was the noise profile of the turbine I was buying, and that oversight made the next several months noticeably less pleasant.
Small wind turbines vary enormously in noise output depending on blade design, bearing quality, and generator construction. Cheap turbines typically use simple two-blade or three-blade designs with poorly balanced rotors that generate significant mechanical vibration in addition to aerodynamic noise. The combined sound output, a constant whirring and irregular whapping as the blades passed the tower, was in the 55 to 65 decibel range at close distance, roughly equivalent to a running dishwasher, except constant and outdoors. Quality small wind turbines from manufacturers like Bergey Windpower, Southwest Windpower, or Primus Wind Power use more carefully engineered blade profiles and better bearing assemblies that keep operational noise below 45 decibels at a distance of 60 meters, which is the threshold most people find tolerable at a residential site.
The practical guidance: budget at least $1,500 to $3,000 for a small turbine from a manufacturer that publishes verified noise data. If a turbine’s marketing materials do not include a noise curve or decibel specification, treat that as a warning sign and move on. Placement matters as much as the turbine itself. The American Wind Energy Association recommends a minimum setback of at least 300 feet between a small turbine and any occupied structure, and ideally positioning the turbine upwind of the prevailing wind direction relative to your cabin. Find small wind turbine sitting guidelines here!
A good turbine in the right location genuinely supplements a solar system on cloudy days and pays for itself over time. A cheap one in the wrong location supplements your stress levels instead.
Gas Generators
A gas generator has a legitimate place in an off-grid setup, but that place is specific: emergency backup and short-duration high-draw tasks like running power tools during construction or charging a depleted battery bank during an extended stretch of bad weather. It is not a primary power source, and running the numbers makes clear why.
A mid-sized generator running at 50 percent load burns roughly 0.5 to 0.75 gallons of gasoline per hour. At current fuel prices, that is $1.50 to $2.50 per hour of runtime. Run it for six hours a day, which is a conservative estimate for anyone trying to power a cabin primarily from generator power, and you are spending $9 to $15 per day on fuel alone, or $270 to $450 per month. Over a year, that is $3,200 to $5,400 in fuel costs, not counting maintenance, oil changes, and the inevitable carburetor work that gas generators require when stored between uses. The cost of a properly sized solar and lithium battery system that eliminates that expense typically pays back within three to five years even at the higher end of installation cost.
Where generators do make unambiguous sense: as a backup for the two or three times per year when your primary system cannot keep up, for running high-draw tools during a build or repair project, and as a transitional power source while a permanent renewable system is being assembled and installed. For these purposes, a 3,500 to 5,000 watt inverter generator from Honda, Yamaha, or Generac is a sound investment. Inverter generators are significantly quieter and more fuel-efficient at partial load than conventional generators, which matters both for your sanity and your fuel budget.
Store gasoline with a quality fuel stabilizer and rotate it every three to six months. The U.S. Fire Administration generator safety guidelines recommend storing fuel in approved containers away from living areas and never running a generator indoors or in an attached garage, guidance that matters particularly in off-grid setups where the temptation to run one in a sheltered space during bad weather is real.
Rain Barrels in Winter: Projects I Regret Building and How to Avoid Them
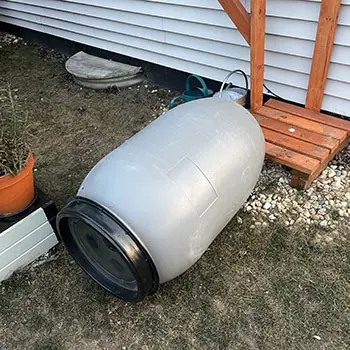
Rain barrels are one of the highest-value, lowest-cost additions to a homestead water system for three seasons of the year. The fourth season, in any climate that drops below freezing consistently, requires a specific winterization plan or they become a liability rather than an asset.
Water expands by roughly nine percent when it freezes. In a sealed or partially sealed barrel, that expansion has nowhere to go except outward, which means cracked barrel walls, blown fittings, and in a barrel sitting on a stand, enough deformation at the base to make the whole setup tip. I lost two barrels to this before I took it seriously.
The winterization checklist that has worked reliably since: drain barrels completely before the first hard freeze is forecast, not after the first freeze has already happened. Remove and store any flexible downspout diverters inside so the plastic does not crack in cold storage. Turn barrels upside down so any residual moisture drains out and snowmelt cannot accumulate inside. If your barrels are plumbed together, drain and disconnect the linking hoses and store them as well. Block the downspout inputs with a cap or plug so spring rain does not fill a barrel you have not yet reinstalled and inspected.
For winter water collection, snow and ice can be melted effectively with a woodstove or even body heat in a well-insulated container brought inside. A clean metal trash can with a lid makes a functional collection vessel for snow. Pack it densely before bringing it in, because snow volume-to-water yield is roughly ten to one, meaning you need to collect a significant volume of snow to produce meaningful water. The EPA WaterSense rainwater harvesting guide includes useful guidance on seasonal maintenance of collection systems across different climate zones.
If taking care of your water stockpile sounds like too much work, you can always try this DIY backpack-sized water generator.
Why My Gravity-Fed Pellet Stove Is One of the Projects I Regret Building
Pellet stoves are impressively efficient for their size, extracting a lot of heat from a small volume of fuel. The standard electrically powered versions use an auger motor to move pellets from the hopper to the firebox on a controlled schedule, and a circuit board to regulate the feed rate and thermostat. They work consistently because the feed mechanism is powered and therefore reliable.
The gravity-fed version eliminates the electrical dependency by replacing the auger with a sloped channel that moves pellets to the firebox by gravity alone. In theory, this is an elegant off-grid solution. In practice, the system is sensitive to two variables that are difficult to control in a real-world cabin environment: pellet moisture content and pellet size consistency.
Pellets that have absorbed any moisture, even from humidity in the storage area, swell slightly and no longer move freely down the gravity channel. They bridge across the channel opening and block the flow. The result is exactly what my friend described: waking at two in the morning to a stove that has gone cold, finding a compacted mass of swollen pellets jammed in the feed channel, and fishing them out with a wire in the dark.
The solution is not a different stove. It is pellet storage discipline. Pellets must be stored in a completely dry environment, ideally in sealed plastic bags or airtight bins rather than open bags. Even humidity from a damp basement or garage will degrade pellet quality over a season. Buy pellets in smaller quantities and cycle through them faster rather than storing a full winter’s supply in a space that experiences humidity fluctuation. The Pellet Fuels Institute publishes grading standards for pellet fuel quality and moisture content that are worth understanding before you buy in bulk. [
Even with perfect pellet storage, gravity-fed stoves have a narrower operational tolerance than auger-fed models. If your off-grid power system is reliable enough to run a small auger motor, the conventional electrically powered pellet stove will give you far fewer cold nights.
What These Mistakes Actually Cost: A Rough Accounting
It is useful to put real numbers to the lessons above, because the cost of getting off-grid wrong is not just inconvenience. It is money spent twice.
- Lead-acid battery bank that needed replacement: two sets of 8 batteries over four years before switching to lithium, approximately $1,400 in wasted expenditure plus the ongoing maintenance time.
- Thin-film solar panels: two roof surfaces covered at roughly $600 total, producing near-zero output within eighteen months. The rigid monocrystalline panels that replaced them cost $900 and are still running without issue seven years later.
- Ram pump installation and associated trenching and plumbing: approximately $400 in materials and a full weekend of labor, ultimately removed and replaced with a $320 hand pump that has required zero maintenance.
- Cheap windmill: $280 for the turbine, currently sitting in a shed. A quality replacement from a reputable manufacturer will cost $1,800 to $2,500 when I eventually get to it.
- Two cracked rain barrels at roughly $80 each: $160 that a ten-minute winterization routine would have prevented entirely.
The flooded root cellar represented a full season of food loss, a conservative estimate of $400 to $600 in spoiled produce and rusted equipment, plus the time cost of excavating a second cellar in a better location.
Total estimated cost of the mistakes covered in this article: somewhere between $3,000 and $4,000, not counting labor. None of it was inevitable. Most of it came down to skipping the research phase and assuming that cheaper or simpler was good enough. It almost never is, and off-grid, the consequences of that assumption are more immediate and more expensive than in a grid-connected home where there is always a fallback.
Do Your Homework Before You Break Ground
Every mistake in this article followed the same pattern: a solution that seemed reasonable, not enough research before committing, and a cost paid in money, time, or sleep that was entirely preventable.
Off-grid living rewards people who think in systems. A rain barrel is not just a barrel; it is a seasonal water management system that behaves differently in July than it does in January. A root cellar is not just a hole in the ground; it is a controlled environment that requires the right soil, the right drainage, and the right orientation to function. A solar setup is not just panels and batteries; it is a matched system where every component needs to be sized and specified relative to every other component. Treat any part of it as an isolated purchase decision and you will eventually pay for that thinking.
The practical steps before any significant off-grid project: spend at least a week researching the specific solution you are considering, not just the concept. Read product reviews from people who have run that equipment through at least two winters. Find forums and communities where off-gridders discuss what has failed for them, not just what works. Where authority guidance exists, consult it. The National Renewable Energy Laboratory’s resource library covers solar, wind, and energy storage with more rigorous detail than most commercial sources. Your local agricultural extension office is a genuinely underused resource for root cellars, water management, and site assessment specific to your climate and soil.
The best off-grid setups are not the ones with the most equipment. They are the ones where every system works reliably without constant attention, because their owner took the time to get them right the first time. That time investment happens at a desk before it happens in a trench, and it is always the cheaper option.
You may also like: 
DIY Greenhouse (With Step-By-Step Pictures)
How to Collect Clean, Drinkable Water from Plants (Video)
Small Survival Projects You Are Missing On Your Property
25 Crops You Can Grow In Buckets All Year Round
Power Outage: How To Survive The First 7 Days
Why Growing Bees Is Easier Than You Think


