You did the same chores today that you did yesterday. Feed, water, eggs, garden, then back inside. By the time you sat down, you were tired, but no single job seemed to explain it.
A lot of the time, it isn’t the work that wears you out.
It’s the walking between jobs. I counted my steps one normal morning and was surprised by how many were just backtracking. Out for one thing, back for another, then across the same patch of grass again before breakfast.
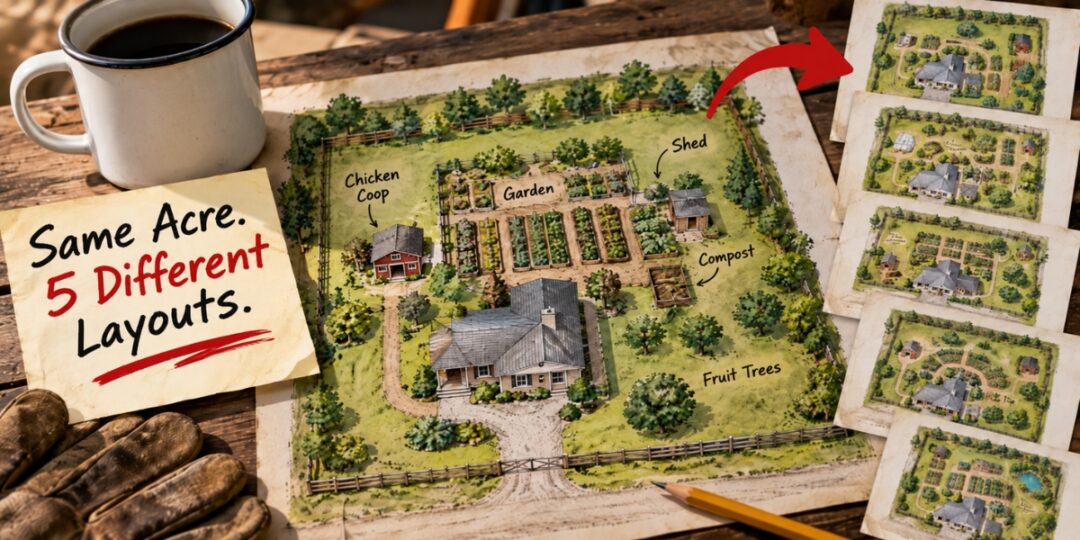
That’s what these five layouts are meant to fix. Each map uses the same acre so you can compare them. Choose whatever suits your land.
Let’s Get Started
Picture one acre that’s about 250 feet wide and 175 feet deep. There’s a road along the front, a gravel drive coming in, and the house sits in the front third. Behind it is open ground, with a fence around the outside and a few trees along the back. The land slopes slightly toward the road.
I decided to use this standard size so I can shape all the projects based on it. One acre is enough for every layout here. If you have more land, the same shapes scale up just fine. The same in case you have less land.
And just to be clear, these are five separate options. You don’t need to somehow squeeze all five ideas into one acre.
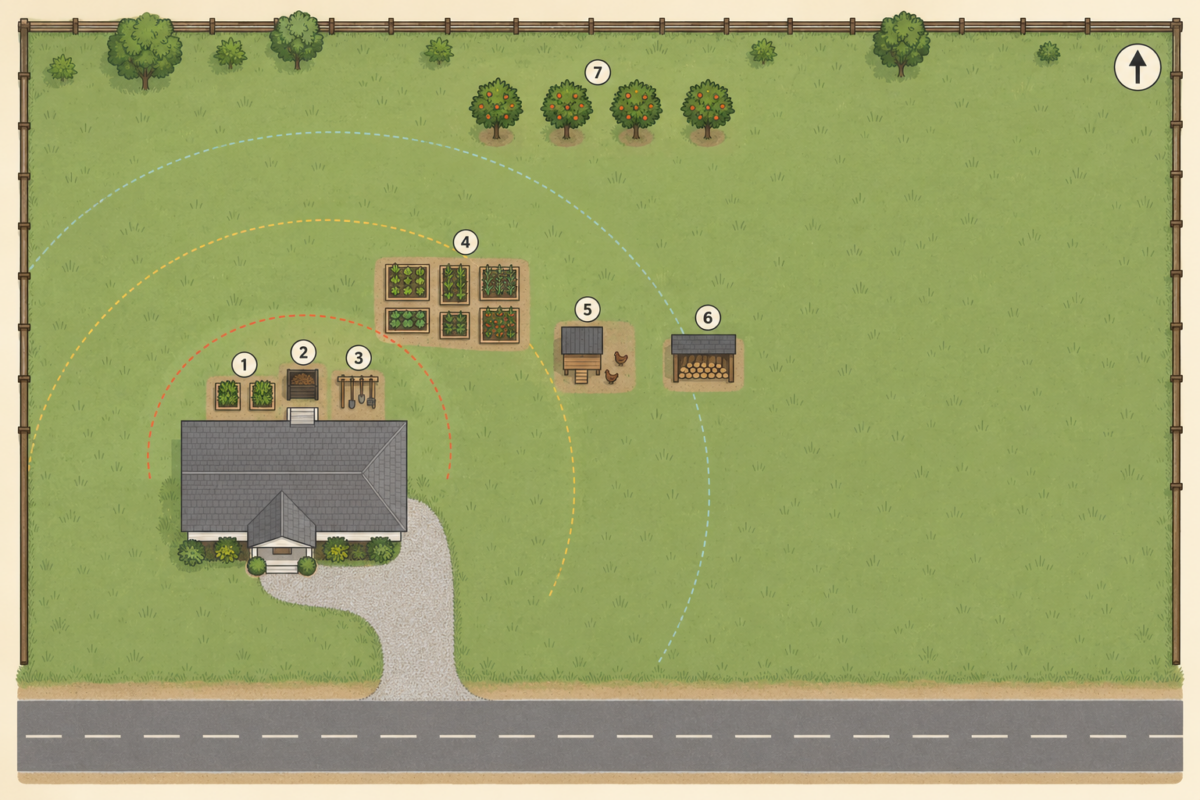
1 Herb and salad beds · 2 Compost bin · 3 Tool and bucket rack · 4 Main vegetable garden · 5 Chicken coop · 6 Woodshed · 7 Fruit trees and open ground
Layout 1: The Twenty Step Rule
For the first layout, picture three rings starting at your back door, not in the middle of the property.
Inside 20 steps – Herbs, salad greens, compost, tools, and a spigot.
From 20 to 60 steps – The garden, the coop, the woodshed.
Past 60 steps – Fruit trees and open ground, which on one acre means the back fence.
The idea comes from permaculture design, where things are placed based on how often you need to visit them. The step counts are my own yardstick, not some official rule, but they’re easy enough to pace out in your own yard.
Here’s the test I like.
If it’s raining sideways and you’re halfway through making supper when you realize you need a handful of parsley, are you really going to pull on boots and a coat and walk across the property for it?
Maybe. But there’s a good chance you’ll say forget it.
Of course, convenience can’t be the only thing deciding where everything goes. Sun and drainage are still the biggest factors. Don’t drag the garden into the shade of the house just to save yourself a few steps.
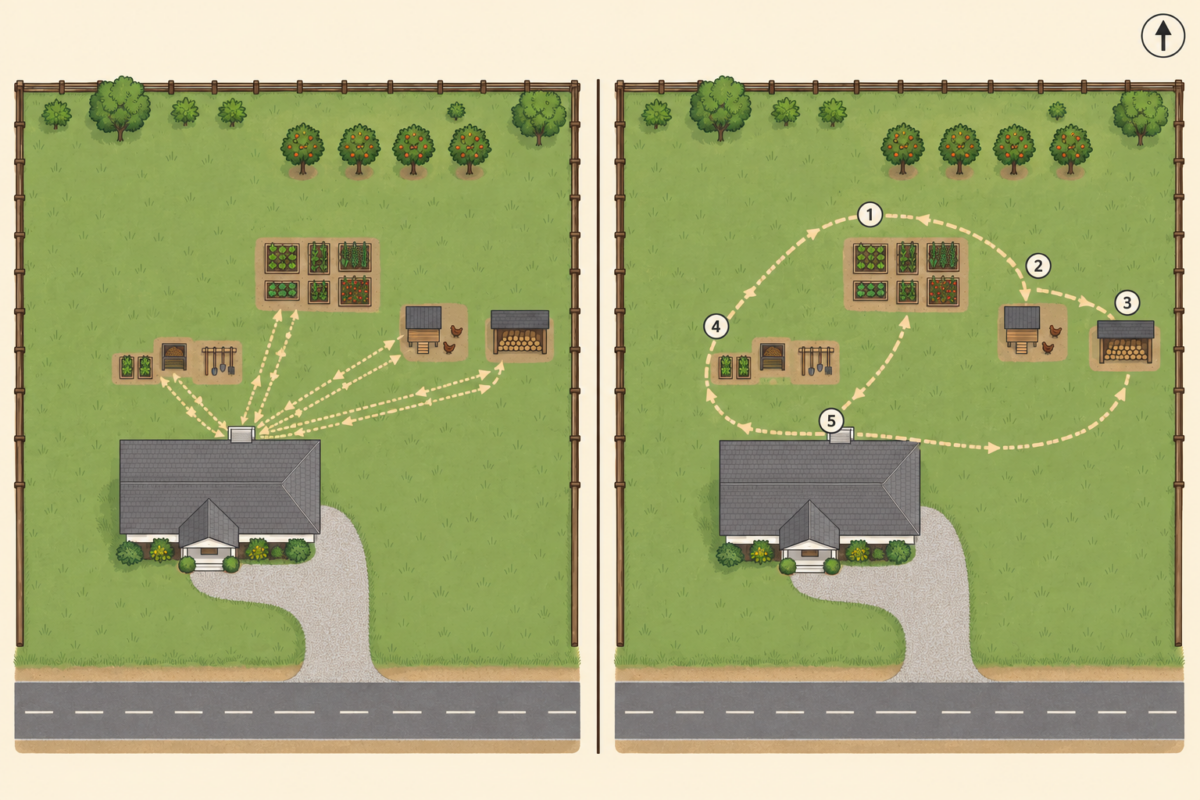
1 Garden · 2 Feed and bucket station · 3 Coop · 4 Compost · 5 Back to the door
Layout 2: The One Lap Morning
Now think about how you actually move around during chores.
For a lot of us, the route looks like a star. Out to the coop and back. Out to the garden and back. Out to the shed and back. By the end of the morning, you’ve walked the same ground so many times you could probably do it with your eyes closed.
A loop will change all of that. You leave the back door, pass each stop in order, and end up back at the house without doubling back.
It’s a small change, but you notice it when your hands are full.
A few other details make the loop work much better.
Hang your gates to swing the way you’re walking – If a gate opens toward you every time, you’re going to be setting down buckets just to get through it. That gets old fast.
Keep buckets, scoops, and hand tools at the stop where you use them – Nothing is more annoying than getting all the way to the coop and realizing the scoop is back at the shed.
Store feed in one dry, rodent-proof container – Don’t scatter feed around at every stop. Set up the route so you pass the container instead. Scattered feed is more likely to get damp and attract mice.
Mouse problems are one of those things almost every homestead deals with sooner or later. Feed, grain, warm sheds, barns… mice have plenty of reasons to move in.
So it pays to be ready before they become a real problem.
A good trap is still one of the simplest ways to deal with them. But you don’t actually have to spend money on one. There are lots of homemade traps that work surprisingly well and can be built from basic materials you probably already have.
Some are so simple you’ll wonder why anyone buys traps at all!
Take a look here before the mice find your pantry first →
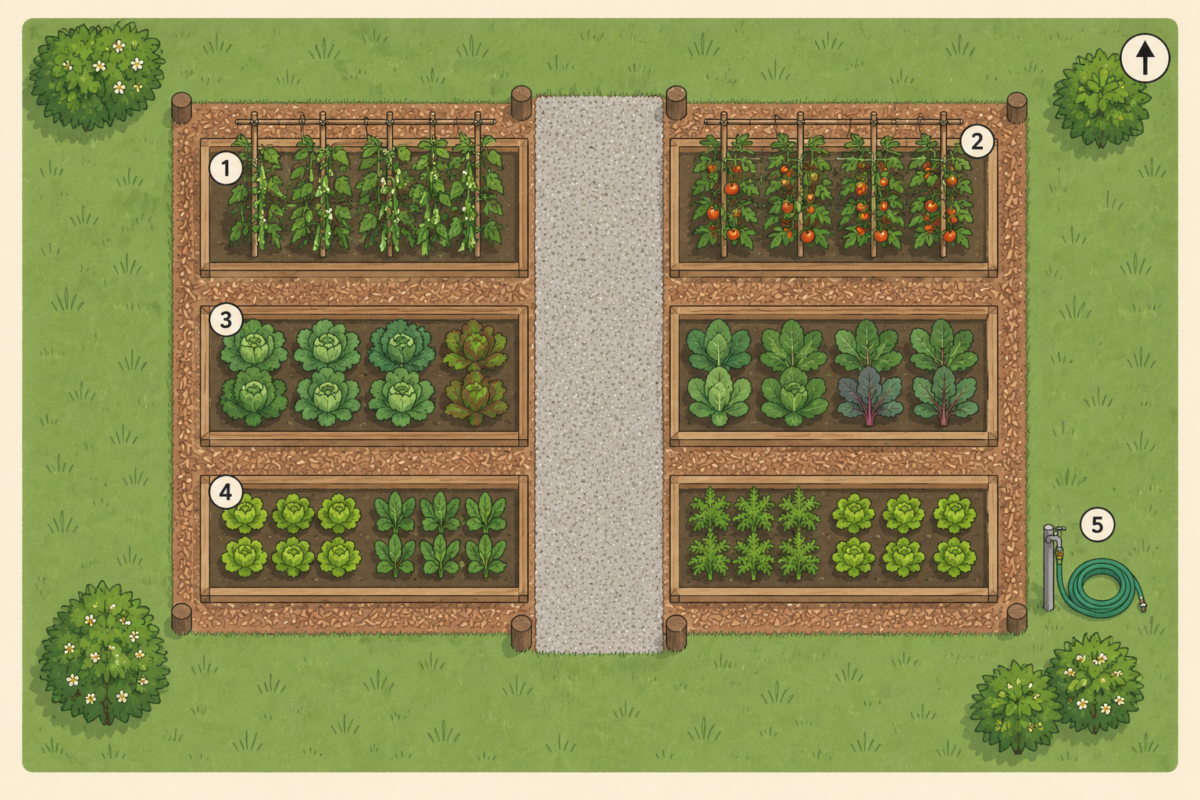
1 Beds four feet wide · 2 Paths 18 to 24 inches, mulched · 3 Center lane three feet for the wheelbarrow · 4 Tall crops on the north side · 5 A faucet at the garden
Layout 3: The Four Foot Garden
On one acre, the garden is by far the most time-consuming thing you can take care of. And the way you build your garden beds can actually help you save some precious time. Also, it can help your back hurt less.
Bed width is the number that matters here.
Raised beds should be kept 3 to 4 feet wide so you can reach the center without stepping into them. Do the planting and harvesting from the paths, and once a bed is built, don’t walk on it.
The average grown person reaches about two feet. Go much wider and sooner or later you’ll find yourself kneeling into the bed to reach the middle, packing down the soil you worked to keep loose.
For six beds, I’d keep the layout simple.
Make each bed four feet deep and ten feet long. Run them east to west so the long side faces the midday sun, and put your tallest crops on the north side so they don’t shade everything behind them. Arrange the beds in two columns of three.
Leave 18 to 24 inches between the beds and mulch those paths with wood chips. Down the center, between the two columns, leave a wider lane of about three feet.
That’s your wheelbarrow lane.
It might sound like a little too much work, but you’ll be thankful when you no longer need to spread across the garden beds, crush the plants, and hurt your back.
And if you like the idea of making the garden easier on your body, there’s another old method worth knowing about.
It’s called square-foot gardening, and it’s especially useful when you don’t want to spend half the day walking, bending, weeding, and reaching across big beds.
You work with a much smaller, more organized growing space, so everything is easier to reach and easier to keep under control. For older gardeners, that can mean less unnecessary strain and a garden that doesn’t feel like such a chore to keep up with.
You can still grow a surprising amount of food, just in a smarter space.
Want to see how it works?
Here’s the full step-by-step setup →
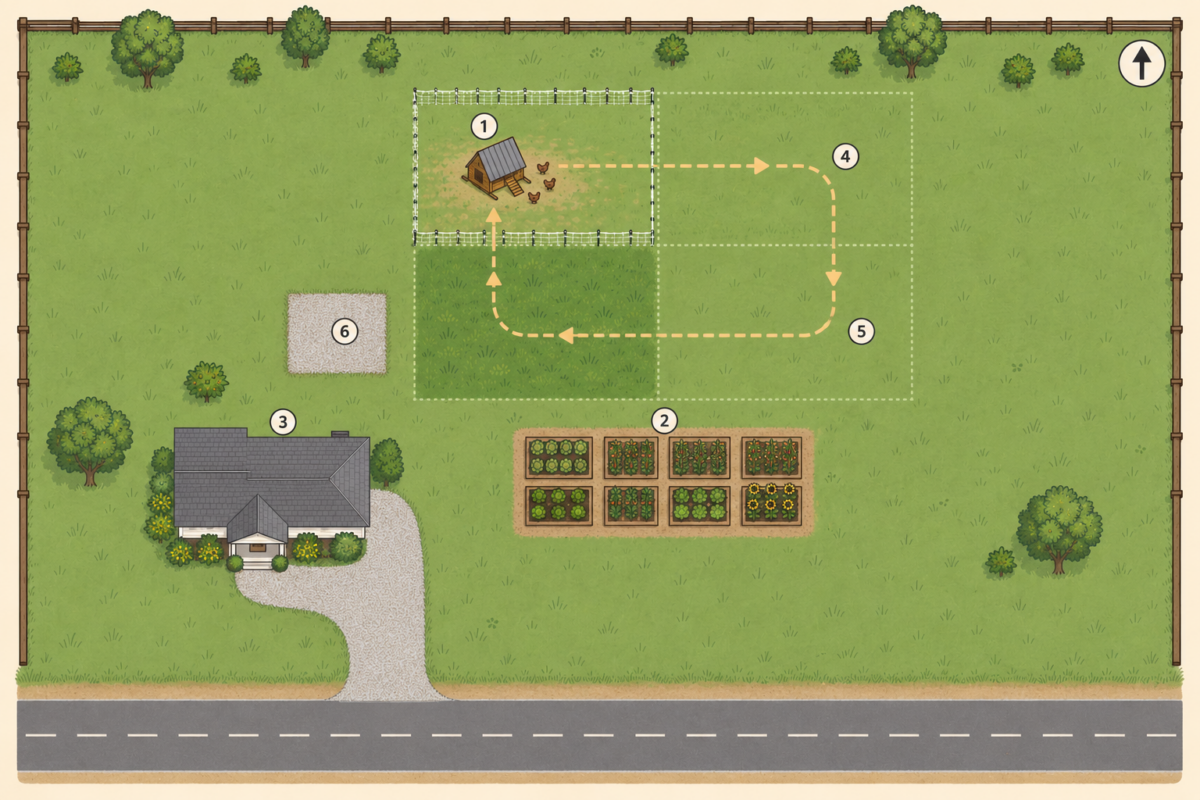
1 Portable coop on skids · 2 Netting around the current section · 3 The section it just left, resting · 4 Direction of the rotation · 5 The garden it crosses before planting · 6 Winter parking on gravel
Layout 4: The Traveling Coop
Leaving the coop in the same place is not generally known to be bad, but it will destroy the land it sits on. That land will no longer be suitable to grow crops for a long time. So, once you decide to place the coop somewhere, you know that place will forever be the “coop spot.”
But you don’t need to do this and you can use the coop to your advantage. Even more, you can put it to work and make your garden more productive.
Divide the open ground into four sections and move a portable coop through them on a set circuit. You can also use electric netting, which is a light plastic mesh fence you can pick up and move in a few minutes.
Move the setup every few days.
The chickens get fresh grass and bugs, and their droppings spread out instead of piling up in one place. Parasite pressure also drops because worm eggs in the soil don’t get the same chance to build up under birds standing on the same ground.
The best part is probably the mucking. A floorless pen on grass means no bedding to shovel and no permanent run to rake.
Time the rotation so the pen crosses your garden ground in early spring, a few weeks before planting. The birds can clear weeds, eat slugs and beetle grubs, and leave nitrogen behind before you put crops in.
Winter is when you can take a pause and let the coop stay in one place.
This whole setup has a very Amish-style logic to it: keep things simple, keep them useful, and make one structure do more than one job.
Most people stop at a portable chicken run. But if the coop itself can move too, the whole system gets easier. The catch is that not every coop can handle being moved around.
I also have a story about this. Keep reading to see why to never trust random websites.
I once bought a cheap coop from TEMU because it looked great in the photos. Within a month, panels were loosening, the roof was leaking, and every move seemed to make something else wobble.
So I gave up on the “cute little coop” idea and built something more serious, inspired by the way Amish builders think about these things.
What I liked the most is that the coop is built around the hens first: enough space, good airflow, natural light, proper nesting areas, and a layout you can expand later instead of replacing the whole thing. Many people just want to have a place to keep their hens, but that space is so important if you want healthy, productive hens. You can’t just simply put them in an empty box and hope to get good eggs every day.
Also, the modular design of this Amish-inspired coop makes it a much better fit for the traveling-coop method above.
If you want to see the coop I’d build now instead of buying another flimsy one, take a look here →
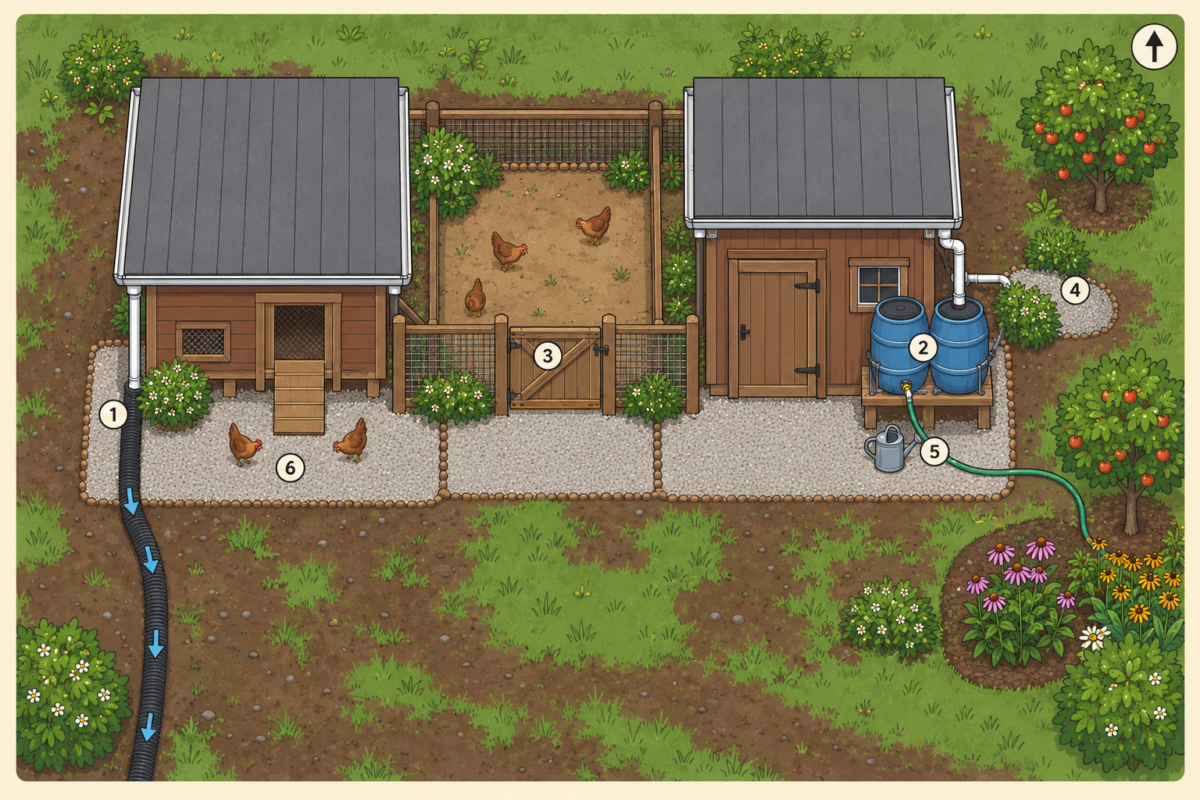
1 Gutters on the coop roof · 2 Barrels raised and strapped · 3 Overflow routed somewhere you chose · 4 Clean roof water piped away downhill · 5 Gravel at the gate · 6 Barrel water goes to trees and flowers, not food crops
Layout 5: Water From Every Roof
Every roof on your place is already collecting rainwater. The thing is that you might want to direct that water into your own reserve and use it.
The numbers surprised me. About 0.6 gallons per square foot in a one inch rain. So if 300 square feet of roof drains into one downspout, that’s roughly 180 gallons!
A 55-gallon barrel won’t be able to do the job. It fills, overflows, and keeps overflowing.
Also, put gutters on the coop and shed too, not only on the house. Then split the job between the two downspouts.
One side feeds barrels – Put the barrels on a solid raised platform. A barrel sitting flat on the ground won’t push water through a hose. Strap it to the building too, because a full barrel is heavy enough to do real damage if it tips.
Plan the overflow before the first storm – Run a pipe from the top of the barrel to a spot you’ve already chosen, well away from any foundation. It’s much nicer to decide where the water goes before you’re standing outside in the rain watching it spill everywhere.
The other side drains away from your gate – Run that downspout downhill, past the traffic. Clean roof water dumping where your animals stand is how you end up fighting the same mud all winter.
Then fix the ground around the gate and coop door. Strip off the sod, lay landscape fabric so the stone doesn’t sink into the soil, and add four to six inches of crushed gravel.
Keep that patch a little higher than the ground around it so the water runs off instead of sitting there.
That same gravel area can become the winter parking spot for the traveling coop when the rest of the ground gets too soft.
Important: Disconnect the downspout before a hard freeze.
Once you start catching rain, the next question is pretty obvious: where are you going to put all that water?
This is where a lot of homesteaders, even experienced ones, mess up…
Water storage is so much more than just “fill a barrel and forget about it.” For example, if you leave water sitting in the wrong container, let light or dirt get in, or ignore it for too long, you can end up with algae, mosquitoes, bad smells, or water that is simply unsafe to use, not to mention drinking.
You need to store it properly.
That’s why I like this setup. It shows you how to stack three barrels in a compact rack, keep them easy to access, and then takes it a step further with a system for building a much larger long-term reserve.
Also, you don’t need some giant commercial tank either.
Want to see how to store a serious amount of water without wasting half your shed? The full setup is here.
Final Thoughts
These layouts are meant to be guides, not rules you have to follow exactly. Every homestead is different, and what works perfectly in one yard might make no sense in another.
Maybe one layout fits your place almost exactly. Maybe you only take one idea from each of them. That’s fine.
The whole point is to make your daily chores a little easier. Look at where you walk, where you carry things, and what keeps wasting your time. Then use whatever ideas here actually fit your land.
A few small changes can make the whole place easier to live and work in.
You may also like: 
You’re Not a Real Homesteader if You Don’t Grow This…
Make a Space Heater That Works on Used Cooking Oil (Video)
These 7 Homesteading Skills Pay for Themselves in Under a Year
How to Make Your Own DIY Homestead Defense Kit
12 Ways To Mouse-Proof Your Homestead