You open the fridge looking for something, and there it is. That poor jar of sourdough starter you pushed to the back months ago and completely forgot about.
You open the lid and dark liquid sits on top. The starter underneath looks flat and lifeless. You try to give it a sniff and you get hit with a sharp, boozy smell that might remind you of nail polish remover.
At this point, it’s pretty easy to assume you killed it.
But don’t throw it away just yet.
Sourdough starter is surprisingly tough. Most of the time, an ugly starter isn’t dead. It’s just very, very hungry. So, there’s a good chance you can bring it back to life.
Ready?
Is It Worth Reviving, or Should You Start Over?
You could toss the old starter and make a brand-new one. Sometimes that feels easier, especially when the jar in front of you looks pretty questionable, like the one I described above.
But starting over means waiting… A new sourdough starter can take a week or longer to become strong enough for baking, and during that time you’ll be feeding it regularly and going through quite a bit of flour.
Your old starter already has something a new starter doesn’t: time. It has an established community of wild yeast and bacteria that has been living in that jar for a while. Even after sitting neglected in the fridge, some of it may still be alive and ready to get back to work. Brod & Taylor even compared an older revived starter with one made from scratch. By day five, the revived starter was close to tripling in size, while the new starter was still much slower.
So unless you see clear signs that your starter has spoiled, I’d try saving it first. It only takes a few minutes at each feeding, and you may have it bubbling again within a few days.
From the Homestead Kitchen
One Forgotten Recipe You Can Make With Your Sourdough
Some early settlers in America knew that when flour started running low, you had to get creative. Certain trees had an edible inner bark that could be dried, ground up, and mixed into dough to make whatever flour you had on hand last longer.
That bread became known as bark bread.
Here’s the part I find interesting. We walk past things every day that people once knew how to turn into food. Somewhere along the way, most of that knowledge just disappeared…
If you already have a sourdough starter sitting on your counter, you can actually try this old recipe yourself.
It’s much simpler than you’d expect and so rewarding. This is how you become more self-sufficient. You take small steps every day and you learn how to make the most of what you already have around you.
Once you know the trick, you can make your flour last longer, and even more, add extra nutrients to your loaf. That bark does so much more than doubling your flour, because it’s full of vitamins.
I put the old bark bread recipe and the full sourdough method here so you can take a look.
What’s Normal and What Means It’s Done
Before you start feeding your starter, look closely at what’s inside the jar.
Some neglected starters look downright awful while still being perfectly safe to revive.
Here are a few things that usually aren’t a problem.
Dark liquid on top
That liquid is called hooch. It’s mostly alcohol produced as the starter runs out of food. Hooch can be clear, gray, brown, or very dark. A dark layer by itself doesn’t mean your starter has gone bad. You can pour it off before feeding. Some people stir it back into the starter because they like the stronger, more sour flavor, but I usually pour it out when I’m trying to revive a neglected starter.
A dry or dark crust
The surface can dry out if the jar has been sitting for a long time, especially if the lid wasn’t sealed tightly. Scrape off the dried layer and check the starter underneath.
A strong boozy smell
A neglected starter can smell like alcohol, acetone, or nail polish remover. It’s not exactly a pleasant smell, but it usually means your starter is just starving. After a few fresh feedings, the smell should become much milder and pleasantly sour again. However, there are a couple of things I would not mess around with. Let’s take a look.
Fuzzy mold
If you see fuzzy growth that looks white, green, blue, or black, throw the starter away. Don’t scrape off the mold and try to save what’s underneath. Mold can spread farther into the starter than what you can actually see.
Also, mold is not just a sourdough problem. If you have it in your sourdough starter, well, you’ll throw away the jar and you’re done with it.
But what happens if mold took over your bathroom? What happens if it occupied your whole pantry or cellar?
This is incredibly common and the biggest problem is that people try various methods and they think the mold is gone when it actually isn’t. This is incredibly dangerous because mold exposure contributes to approximately 4.6 million asthma cases and tens of thousands of severe illnesses in the United States every year!
These are huge numbers for something that can easily be removed from your home. But the question is: How do you remove the mold effectively?
Doing so is not complicated and the best thing is that you don’t even need to pay for expensive mold removal services. You can do everything alone and the results will be as good as the ones professionals get.
Click here and see how to kill the mold that’s poisoning your air →
Pink or orange streaks
Pink or orange discoloration is another sign that the starter should be tossed. According to King Arthur Baking, pink or orange streaks are a sign that your starter has gone bad. That’s one situation where I wouldn’t try to rescue it.
No mold and no pink or orange discoloration? Then I’d give that starter a chance.
How to Bring It Back to Life, Step-By-Step
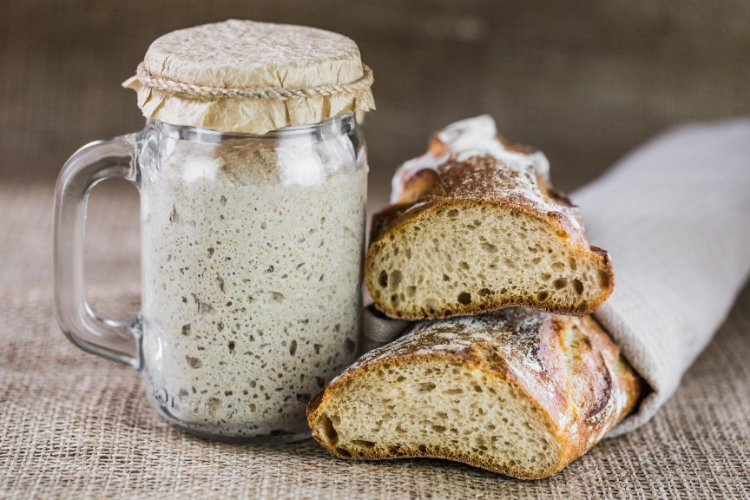
You don’t need anything special for this. Just flour, water, a clean jar, and a few days of regular feeding.
Here’s what I do.
First, pour off the hooch.
If there’s dark liquid sitting on top, I carefully pour it out. I remove any dried crust from the surface too.
Take a small amount of starter.
Scoop about a tablespoon of starter from underneath the dried or discolored surface and put it into a clean jar.
You really don’t need much.
It might feel weird to throw away most of your old starter, but trying to revive a small amount makes feeding much easier. You’re giving that little bit of surviving starter plenty of fresh food instead of trying to feed an entire jar.
Give it fresh flour and water.
If you have a kitchen scale, equal weights of starter, flour, and water are an easy place to begin. Without a scale, you can keep things simple. Add roughly 1/4 cup of flour and enough water to make a thick batter. Stir everything together well.
Put it somewhere comfortably warm.
Your starter doesn’t need tropical heat. A room around 70°F to 75°F works well. Keep the jar out of direct sunlight and cover it loosely.
Feed it about every 12 hours.
At the next feeding, keep a small portion of starter, discard the rest, and add fresh flour and water again.
Then repeat.
At first, you might not see much happening. That’s okay. After a few feedings, you should start noticing small bubbles. Then you may see the starter rise a little. Eventually, you want it to rise a little after every feeding. If yours is especially sleepy, you can replace part of the regular flour with whole wheat or rye flour for a feeding or two. Those flours can sometimes help get a sluggish starter moving again.
I also like to use the same type of flour the starter was originally fed whenever possible. If it has always done well on bread flour, for example, there’s no real reason to suddenly change everything.

How Long Does It Take?
This is the part where you need a little patience. If you feed your starter once and nothing happens, don’t assume it’s dead. A starter that has only been forgotten for a few weeks may bounce back within two or three days.
One that has spent several months hiding in the back of the refrigerator can take longer. You may need several days, or even around a week, of regular feedings before it behaves normally again. You need to be consistent with the feedings. This is the secret.
A healthy starter should become bubbly and rise noticeably after feeding. Once it is regularly doubling in size within several hours, that’s a much better sign that it’s ready for baking. You may have heard about the float test. That’s where you drop a spoonful of starter into a glass of water. If it floats, supposedly it’s ready.
But I wouldn’t rely on that test alone.
A perfectly healthy starter can sink, and a weak starter can sometimes float because air happens to be trapped inside it. So this test is not as reliable as people say on the internet. Watching how your starter rises after feeding tells you much more. A rubber band around the jar makes this really easy. Put the band at the level of the freshly fed starter. A few hours later, you’ll be able to see exactly how much it has risen.
How to make “The Super Bread”
Ok, so now that you have your starter, you probably want to make some good bread. You most probably know how to make some pretty good bread; I’m sure about that, but do you know how to enhance your loaves and make them more nutritious?
Think about it: everybody is yapping about how we should eat more vegetables, how we should eat more herbs, and so on. Well, this time, this is accurate information. Vegetables offer you a lot of unique nutrients, but the problem is that you can only eat so many vegetables.
Now, think about what it would be like to add vegetables to your bread. I know, I know, this sounds unreal. But this is an idea you should not sleep on. You can transform a regular loaf of bread into a super loaf by just adding some herbs!
This is a practice I picked up a while ago and I am so happy I did so. Why? Because why not make your bread better if it only takes 5 more minutes?
Now, the herbs you use are what make a difference. Using the right herbs will help you get the results you want.
For example, you can add lavender if you want to sleep better. The essential oils in this plant are known to calm you down and make your nights less restless.
Or you can add calendula. This one does something really unique. It moves lymphatic fluid and cleanses your lymphatic system from the mucky remnants of old infections and the metabolic waste we all accumulate over time.
And you can also try adding echinacea for immunity or feverfew for migraines. Most medicinal herbs will work, but I tried the ones that have a more neutral aroma or a pleasant one that would pair well with the bread.
I get all of my herbs from my garden and I always use 100% non-GMO seeds. I get them from here, and if you want to do the same, I advise you to do it right now, while they are still in stock. If you decide to buy them before the spring or right in the spring, you risk not being able to find them in stock. Been there, done that…
Get your own pack of medicinal herb seeds here →

Never Lose Your Starter Again
Once you’ve brought your starter back, you probably don’t want to repeat this whole process anytime soon. So, if you bake regularly, keeping your starter on the counter makes sense. Just remember that a starter kept at room temperature needs to be fed much more often. If you only bake occasionally, the refrigerator is the best option. I usually recommend feeding a refrigerated starter about once a week when possible. The cold slows everything down, which means you don’t have to babysit the jar every day.
But there’s another little trick I really like: keep a dried backup.
Wait until your starter is healthy and active. Then spread a very thin layer of it onto parchment paper and leave it until it is completely dry. Once it’s dry, break it into small flakes and store those flakes in a clean, dry container. You can use those dried flakes to start building it back up again with flour and water. It’s also an easy way to share your starter with friends or family without handing over half your jar.
Final Thoughts
Sourdough starter can resist a surprising amount of neglect.
It can look awful at first glance, but most of the time, it just needs food.
Check carefully for mold or pink and orange discoloration first. If you don’t see either of those, take a small spoonful, give it fresh flour and water, and see what happens.
Don’t worry if it doesn’t spring back af ter the first feeding. Give it a few days.
You should also read:
How to Start a Reliable Off-Grid Sourdough Culture Using Only Flour & Water
Emergency Bread Recipe, Step-By-Step (Video)
This Great Depression Dessert Turned Stale Bread Into Gold
Too Much Zucchini? 10 Smart Ways to Use and Preserve It