Knowing how to care for an open wound correctly is one of the most practical self-sufficiency skills you can have. Whether you are dealing with a farm accident, a workshop injury, a deep cut from a kitchen knife, or a wilderness scrape, the difference between a wound that heals cleanly in a week and one that becomes a serious infection often comes down to what you do in the first few minutes.
Most open wounds that people encounter day to day can be treated effectively at home using proper technique and basic supplies. But there is a category of wound that genuinely needs professional medical care, and recognizing that boundary is just as important as knowing what to do with the wounds you can handle yourself. This guide walks through both: the step-by-step process for treating minor to moderate open wounds at home, the signs that demand a trip to urgent care or an emergency room, and the ongoing care practices that support proper healing.
The protocols in this guide align with the 2024 guidelines published jointly by the American Heart Association and American Red Cross, which represent the most current evidence-based first aid recommendations available.
Understanding Open Wounds: Types and Severity
Before treating a wound, it helps to know what you are dealing with. Open wounds fall into a few distinct categories, each with different care implications.
Abrasions
An abrasion is a superficial wound caused by friction against a rough surface, like a gravel road rash or a concrete scrape. Abrasions do not usually bleed heavily, but they tend to be dirty, with debris embedded in the wound surface. Thorough cleaning is the priority with abrasions. They rarely require stitches but can become infected if not properly flushed and covered.
Lacerations
A laceration is a cut or tear in the skin, typically from a sharp object. Lacerations can range from minor nicks to deep gashes that reach muscle or bone. The key factors that determine severity are depth, length, location, and whether the edges of the wound come together on their own. Lacerations longer than about one-third of an inch, those with gaping or jagged edges that do not naturally come together, or those on the face often require stitches or skin adhesive closure by a medical professional.
Puncture Wounds
Puncture wounds are caused by pointed objects like nails, thorns, splinters, or bites. They tend not to bleed heavily on the surface, which can be deceptive. The danger with punctures is that they create a narrow channel of damage that reaches deep tissue, and that channel is an ideal low-oxygen environment for bacteria to multiply. Punctures are at significantly higher risk of infection than surface wounds, and they are the wound type most commonly associated with tetanus risk.
Incisions
An incision is a clean, straight cut made by a sharp edge such as a knife or broken glass. Incisions bleed more freely than punctures but are often cleaner and easier to close than ragged lacerations. According to the Merck Manual, wounds with clean edges that are not too deep and are less than about one-third of an inch wide can often be managed with wound closure strips or skin adhesive at home. Deeper or longer incisions need professional evaluation.
Step-by-Step: How to Care for an Open Wound at Home
The following steps apply to minor to moderate open wounds that do not require emergency care. Before starting, quickly assess whether the wound is something you can and should treat yourself. If you are uncertain about severity, always err toward getting it evaluated. It is far better to visit urgent care for a wound that turns out to be manageable than to leave a wound needing stitches untreated.
Step 1: Wash Your Hands First
Before you touch the wound or any supplies, wash your hands thoroughly with soap and water for at least 20 seconds, or use an alcohol-based hand sanitizer if soap and water are not available. Introducing bacteria from your hands into an open wound is one of the most common ways wounds become infected. If you have disposable gloves available, put them on after washing. This step is not optional, even in a hurry.
Step 2: Stop the Bleeding
Minor cuts and scrapes often stop bleeding on their own within a few minutes. For wounds that are still bleeding actively, apply firm, direct pressure using a clean cloth, sterile gauze, or the cleanest material available. Press steadily for a full five minutes before checking whether bleeding has stopped. Do not keep lifting the dressing to check, as this disturbs the clot forming at the wound surface.
If blood soaks through the material you are using, add more on top of it rather than removing and replacing the original layer. Removing the saturated dressing can pull away the forming clot and restart bleeding. Elevate the injured area above the level of the heart if possible to reduce blood flow to the site.
The 2024 American Heart Association and Red Cross first aid guidelines specify that for life-threatening bleeding that direct pressure alone cannot control, a tourniquet should be applied if the wound is on a limb and the person has been trained to use one. Tourniquets are for true emergencies involving severe blood loss, not for ordinary cuts.
Step 3: Rinse the Wound Thoroughly
Once bleeding is controlled, rinse the wound under cool running water for at least five minutes. Running water is the most effective single intervention for reducing wound infection risk. The mechanical flushing action physically removes bacteria, dirt, and debris from the wound bed far more effectively than any antiseptic solution.
For wounds with embedded debris such as gravel, grit, or splinters, use tweezers that have been wiped clean with alcohol to gently remove visible particles. If debris is deeply embedded or cannot be removed easily, do not force it. Deeply embedded foreign material needs professional removal. Leaving contamination in a wound guarantees infection.
Step 4: Clean Around the Wound with Soap
Use mild soap and water to clean the skin around the wound, but keep soap out of the wound itself. Soap is appropriate for the intact skin surrounding the injury but can slow healing and irritate tissue inside the wound if it enters the wound bed. The same applies to hydrogen peroxide and iodine solutions, which have been shown to damage healthy tissue and delay healing. As Mayo Clinic specifically notes, hydrogen peroxide and iodine should not be used directly on wounds, a practice still common in many households. Plain water and gentle soap around the edges are all that is needed for routine wound cleaning.
Step 5: Apply Antibiotic Ointment or Petroleum Jelly
After the wound is clean and dry, apply a thin layer of over-the-counter antibiotic ointment such as bacitracin, or plain petroleum jelly such as Vaseline, to the wound surface. This serves two purposes: it keeps the wound surface moist, which supports faster and cleaner healing, and it creates a physical barrier that reduces the risk of bacterial contamination.
Moist wounds heal significantly faster than dry wounds. The old practice of letting wounds air out and form a dry scab is not supported by current wound care evidence. A moist wound surface allows new skin cells to migrate across the wound much more efficiently. Note that some antibiotic ointments can trigger contact dermatitis in sensitive individuals. If you notice a rash developing around the wound site, switch to plain petroleum jelly.
Step 6: Cover the Wound
Cover the cleaned and treated wound with a sterile adhesive bandage, gauze pad secured with medical tape, or rolled gauze for larger wounds. The covering keeps the wound clean, maintains moisture, and protects it from physical trauma during healing. Very small, clean scrapes that have been properly cleaned can be left uncovered if they are in a location that is unlikely to become contaminated, but most wounds benefit from coverage.
Choose a dressing large enough to cover the entire wound plus a margin of surrounding skin. Do not wrap bandages so tightly that they restrict circulation. The dressing should be snug but not compressive.
Step 7: Change the Dressing Daily
Change the wound dressing at least once per day, or any time it becomes wet, soiled, or saturated. Each time you change the dressing, gently clean the wound again with water and reapply antibiotic ointment or petroleum jelly before placing a fresh covering. If the dressing sticks to the wound, soak it gently with clean water before removing it rather than pulling it away dry, which can damage new tissue that has begun to form.
What Not to Use on an Open Wound
Several common household products that many people reach for instinctively when treating a wound can actually slow healing or damage tissue. Knowing what to avoid is as important as knowing what to use.
- Hydrogen peroxide: Despite its reputation as a wound cleanser, hydrogen peroxide damages fibroblasts, the cells responsible for building new tissue. It kills bacteria, but it also kills the healthy cells working to repair the wound.
- Iodine solutions: Full-strength iodine is cytotoxic and delays healing. It should not be applied directly to open wounds.
- Rubbing alcohol: Alcohol causes significant pain on application and damages tissue in the wound bed. It is appropriate for cleaning intact skin and sterilizing instruments, not for open wounds.
- Antibiotic ointments with neomycin: Some triple antibiotic products contain neomycin, which causes contact dermatitis in a meaningful percentage of people. Single or double antibiotic products, or plain petroleum jelly, are safer for most individuals.
- Excessive soap inside the wound: Soap is for the surrounding skin. Getting it inside the wound irritates tissue and can delay healing.
- Cotton balls: Cotton fibers shed and can become embedded in wound tissue, creating a foreign body reaction and complicating healing. Use woven gauze instead.
How Wounds Heal: Understanding the Four Stages
Understanding what is happening biologically as your wound heals helps you recognize both normal progress and the early warning signs of complications.
Stage 1: Hemostasis (Minutes to Hours)
Immediately after injury, your body initiates clotting. Blood vessels constrict to reduce blood flow. Platelets rush to the site and begin aggregating into a clot. Fibrin threads reinforce the clot structure. This is the stage where external pressure is most helpful. The goal of the clotting process is to stop blood loss and seal the wound surface.
Stage 2: Inflammation (Days 1 to 5)
After bleeding stops, the wound enters the inflammatory phase. White blood cells move in to attack bacteria and clear debris. The wound site becomes red, warm, and swollen. Some clear or slightly yellow fluid may seep from the wound. This is normal inflammatory exudate and does not indicate infection. Pain is typically most noticeable during this stage. The inflammation you are seeing is an active, necessary part of healing, not a sign that something is wrong.
Stage 3: Proliferation (Days 5 to 21)
New tissue begins forming. Fibroblasts produce collagen to rebuild the wound structure. New blood vessels grow into the area. The wound edges begin drawing together. Granulation tissue forms across the wound bed, appearing red and slightly bumpy. This is healthy healing tissue. The wound will often itch during this phase as new nerve endings grow into the repair area. Itching is a positive sign, but scratching or picking at the healing tissue disrupts this process and increases scarring risk.
Stage 4: Remodeling (Weeks to Months)
The wound closes and the scar tissue matures. Collagen fibers reorganize to strengthen the healed area. Scars initially appear raised, red, or purple and gradually flatten and fade over months. Full tensile strength is not restored for some time after visual closure. According to GoodRx Health, minor wounds typically close within a week while larger wounds can take a month or more. The remodeling phase can continue for up to two years for significant injuries.
Signs of Wound Infection: What to Watch For
Every wound should be monitored during the healing process. Infection is the most common wound complication and the one most likely to turn a manageable injury into a serious medical problem. The key is catching signs early, before an infection becomes established.
Early Signs of Infection
- Increasing pain: A wound that was improving and then becomes more painful, or one where pain does not decrease after the first day or two, is a red flag. Healing wounds should progressively hurt less.
- Expanding redness: Some redness around a wound is normal during the inflammatory phase. Redness that spreads outward from the wound edges over time, particularly in streaks moving up an arm or leg, indicates infection spreading through the lymphatic system. This is a medical emergency.
- Increased warmth and swelling: If the area around the wound becomes noticeably warmer and more swollen after the first two to three days rather than improving, infection may be developing.
- Purulent discharge: Clear or slightly yellow fluid from a wound during the inflammatory phase is normal. Thick, white, yellow, or green pus that has a foul odor is not. Purulent discharge means bacteria are actively proliferating in the wound.
- Wound edges pulling apart or not closing: A wound that was beginning to close and then reopens, or one whose edges never come together after several days, may have underlying infection or inadequate closure.
Signs That Require Immediate Medical Attention
- Red streaks extending away from the wound toward the body trunk.
- Fever, chills, or body aches alongside a wound.
- Swollen, tender lymph nodes in the armpit, groin, or neck near the wound site.
- The wound produces a foul smell that worsens rather than improves.
- You feel generally unwell, fatigued, or confused.
These signs indicate that an infection may be spreading beyond the local wound site into deeper tissue or the bloodstream, a condition called sepsis in its most serious form. Wound infections that progress to sepsis are life-threatening. If you observe these signs, seek emergency care immediately, not urgent care the following day.
When You Need Professional Medical Care
Home wound care is appropriate for minor to moderate injuries. The following situations require evaluation by a healthcare provider, either at urgent care for non-emergency cases or an emergency room for serious injuries.
Go to the Emergency Room Immediately For
- Bleeding that does not stop after 10 to 15 minutes of firm, direct pressure.
- A wound that is visibly very deep, reaches bone, or exposes tendon.
- Loss of sensation, numbness, or inability to move fingers or toes near the wound site.
- A wound to the face, hands, genitals, or joints.
- An impaled object. Never remove an impaled object yourself. Stabilize it in place and get emergency care. The object may be preventing catastrophic blood loss.
- Signs of infection spreading (red streaks, fever, chills, confusion).
- Animal or human bites, which carry a high bacterial load and require professional assessment.
Get Evaluated at Urgent Care For
- Any laceration longer than about one-third of an inch (about one centimeter) that has gaping edges not coming together naturally.
- A puncture wound, especially from a rusty, dirty, or contaminated object.
- Any wound where you are uncertain about your tetanus vaccination status, particularly if the wound is deep, dirty, or caused by an animal or contaminated object.
- A wound that shows early signs of infection and is not improving with home care.
- A wound on the face where scarring is a concern.
The Tetanus Question
Tetanus is caused by Clostridium tetani bacteria found in soil, animal feces, and many outdoor environments. Any open wound carries some theoretical tetanus risk, but deep wounds, punctures, and wounds contaminated with dirt or animal waste carry substantially higher risk. The CDC recommends that anyone with a deep or dirty wound who has not had a tetanus booster in the past five years, or who cannot recall their last vaccination, should seek a booster promptly. For clean minor wounds, the threshold is ten years between boosters. Tetanus is preventable but becomes fatal in approximately one in ten cases in the United States when it does occur. It is not worth leaving to chance.
Special Situations in Wound Care
Wounds in the Field or Remote Locations
If you are in a wilderness setting, on a farm, or otherwise away from immediate access to medical care, the priorities are the same but the resources are more limited. Use the cleanest water available to flush the wound. If sterile saline is in your kit, use it. In a true emergency, drinking-quality water from a sealed bottle is an acceptable flushing agent.
Improvise dressings from the cleanest available cloth if sterile gauze is not available. Secure them with whatever you have. Keep the wound covered and get the person to professional medical care as soon as it is feasible, particularly for deeper wounds. A wound that is manageable for 24 to 48 hours in the field can become seriously infected if left untreated for days.
Wounds in Children
Children are more likely to touch, pick at, and disturb healing wounds. Explaining the healing process and the importance of leaving the wound alone helps. For younger children, covering wounds with dressings that are difficult to remove and replacing them at bath time with parental supervision keeps the wound cleaner. Any wound to the face of a child that appears to need stitches should be evaluated by a professional, as facial wounds in children tend to heal with more visible scarring if not properly closed.
Wounds in Diabetic Individuals
People with diabetes heal more slowly and are at significantly higher risk of wound infection and complications. Impaired circulation and reduced immune response mean that even minor wounds on the feet and lower legs can escalate quickly to serious infections. The American Diabetes Association recommends that people with diabetes have any foot wound evaluated by a healthcare provider, regardless of apparent severity. Do not attempt to manage diabetic foot wounds independently.
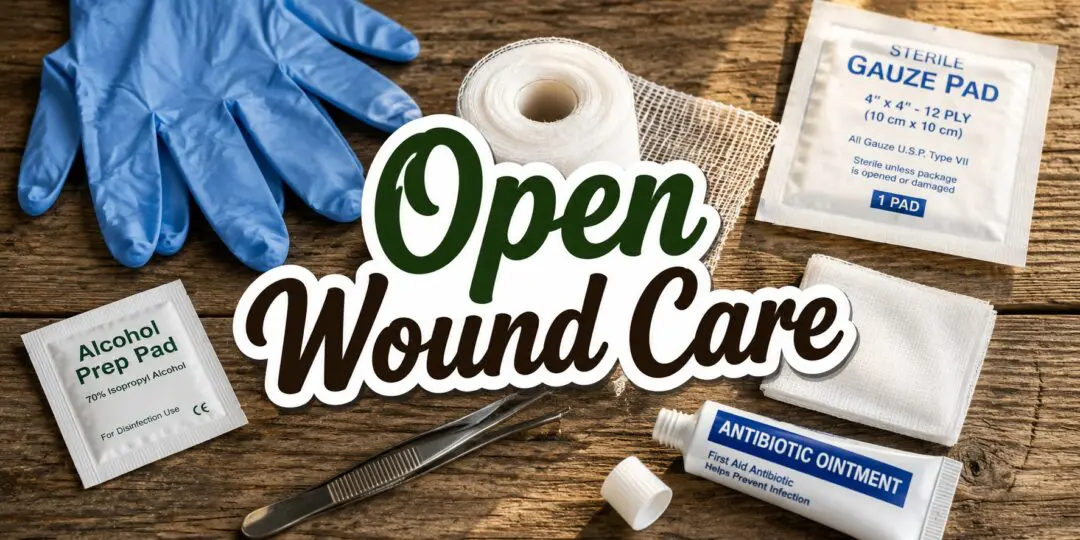
Building a Home Wound Care Kit
Having the right supplies on hand before an injury happens makes proper wound care faster and easier. A well-stocked basic wound care kit contains the following:
- Sterile gauze pads in several sizes.
- Rolled gauze bandage for securing dressings on irregular surfaces.
- Adhesive bandages in multiple sizes including butterfly closures.
- Medical adhesive tape.
- Nitrile or latex exam gloves.
- Blunt-tip scissors for cutting dressings.
- Tweezers, stored in a small zip bag for cleanliness.
- Alcohol wipes for sterilizing instruments and cleaning intact skin around wounds.
- Antibiotic ointment such as bacitracin or plain petroleum jelly.
- Saline wound wash or sterile saline solution for flushing.
- Wound closure strips for small lacerations that do not need stitches.
The American Academy of Dermatology Association provides detailed guidance on proper wound care and scar minimization at their patient resource portal. Their recommendations on moist wound healing and appropriate antiseptic use align with the protocols in this guide. You can review their wound care guidance at AAD.org.
Inspect and restock your kit after any use and check expiration dates on sealed products once a year. A kit with expired or depleted supplies is a false sense of security.
Be Ready When Medical Help Isn’t
Accidents happen without warning, and knowing basic first aid is only part of the equation. The Home Doctor is packed with practical, step-by-step guidance for treating wounds, burns, infections, fractures, allergic reactions, and dozens of other common medical emergencies when professional help isn’t immediately available.
Whether you’re preparing for emergencies or simply want greater confidence caring for your family at home, this guide belongs in every preparedness library.
👉 Get your copy of The Home Doctor today and be ready when every minute counts!
Summary: The Key Principles of Open Wound Care
Most open wounds that healthy adults and children encounter in daily and outdoor life can be managed effectively at home when the right steps are taken promptly. Clean hands, thorough rinsing with water, gentle cleaning around the wound, a moist covering with antibiotic ointment, daily dressing changes, and watchful monitoring for infection are the foundation of effective wound care.
The two most common mistakes people make are using the wrong things on wounds (hydrogen peroxide, iodine, alcohol directly in the wound) and failing to recognize when a wound exceeds the scope of home care. Both mistakes can turn manageable injuries into serious ones. Knowing the warning signs of infection and the types of wounds that require professional evaluation is not optional knowledge for anyone serious about self-sufficiency.
When in doubt, get it looked at. A healthcare provider taking five minutes to evaluate a wound and confirm that it is being handled correctly costs far less in time and money than treating an established infection or a wound that needed stitches and did not get them.
You may also like:
Dangerous Household Items You Should Get Rid Of
Survival Items You Need but Never Heard About (Video)
How to Manage Serious Wounds With Household Items
How to Build a Fire Pit – A Step-by-Step Guide for Your Backyard
How to Identify, Get Rid of, and Prevent Pantry Beetles


