
Before refrigerators, before canning, before vacuum sealing and freeze drying, homesteaders and farming families across every culture on earth preserved their harvest through fermentation. Crocks of sauerkraut in German cellars, kimchi buried in Korean earthenware, brine-cured olives in Mediterranean clay pots, pickled beets in Scandinavian root cellars. Fermented vegetables were not a culinary trend. They were a survival strategy, a way of turning a seasonal abundance into a year-round food supply without any technology beyond salt, water, and time.
That same method is just as practical today. If you grow a garden, raise a homestead, or simply want a reliable, zero-input food preservation technique that improves nutrition rather than degrading it, lacto-fermentation is one of the most valuable skills you can develop. It requires no special equipment, no electricity, no vinegar, and no canning knowledge. It relies entirely on naturally occurring bacteria that are already present on the surface of every fresh vegetable you grow.
This guide covers everything you need to get started and get it right: the science behind why lacto-fermentation works, the method in detail, the best vegetables for beginners and experienced fermenters alike, how to troubleshoot common problems, and how to build fermented vegetables into a year-round homestead food system.
The Science of Lacto-Fermentation: Why It Works and Why It Is Safe
Lacto-fermentation is a form of anaerobic fermentation driven by naturally occurring lactic acid bacteria (LAB), primarily species of Lactobacillus, Leuconostoc, and Pediococcus that live on the surface of fresh vegetables. These bacteria are not added to the ferment. They are already there, along with various other microorganisms including yeasts and potentially harmful bacteria.
The process works because lactic acid bacteria have a competitive advantage in a salt-brine environment with no oxygen. When you submerge vegetables in a salt solution and exclude air, you create the precise conditions LAB thrive in and most harmful bacteria cannot tolerate. The LAB begin consuming the natural sugars in the vegetable, producing lactic acid as a metabolic byproduct. As lactic acid accumulates, the pH of the brine drops, creating an increasingly acidic environment that further inhibits pathogens and preserves the vegetables.
This self-regulating process is what makes lacto-fermentation one of the safest food preservation methods available. The acid environment that develops is inhospitable to Listeria, Salmonella, E. coli, and Clostridium botulinum, the pathogens most associated with food preservation failures. According to the USDA National Institute of Food and Agriculture, properly conducted lacto-fermentation has an excellent safety record rooted in the acidification process itself rather than in heat treatment or chemical preservation.
Beyond preservation, lacto-fermentation actively improves the nutritional profile of the vegetables being fermented. Fermentation increases the bioavailability of minerals by breaking down phytic acid, which would otherwise bind to minerals and prevent their absorption. It produces B vitamins including B12 in some ferments. It generates beneficial organic acids and enzymes. And it creates a living food populated with probiotic organisms that support digestive and immune health in ways that heat-processed preserved foods cannot.
What You Need to Get Started
One of the most practical aspects of lacto-fermentation is how little equipment it actually requires. The traditional method uses nothing more than a crock, salt, and vegetables. A modern homestead setup needs only slightly more.
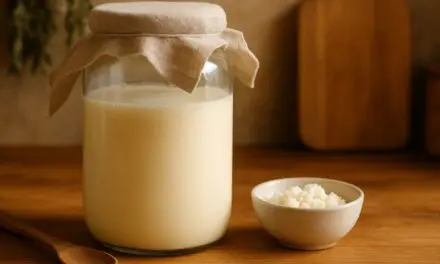
Wide-mouth mason jars are the most accessible fermentation vessel for most homesteaders. Quart jars work well for single-vegetable ferments and small batches. Half-gallon jars are better for larger volumes or whole-head ferments like sauerkraut. Gallon jars and traditional ceramic crocks are the appropriate scale for bulk seasonal fermentation of a significant harvest.
Salt is the single most important ingredient and the one most worth getting right. Use non-iodized salt only. Iodine is an antimicrobial added to table salt that inhibits the lactic acid bacteria you are relying on to drive the fermentation. Sea salt, kosher salt, pickling salt, and Himalayan salt all work well. The salt concentration you use determines the speed of fermentation and the final flavor. A standard brine for most vegetables is two percent salt by weight: 20 grams of salt per liter of water, or roughly one teaspoon per cup.
A weight or follower to keep vegetables submerged below the brine is essential. Exposure to air above the brine surface allows mold and yeast to grow on any vegetable matter that breaks the surface. Small zip-lock bags filled with brine, purpose-made ceramic or glass fermentation weights, or simply a smaller jar filled with water placed inside the mouth of the fermentation jar all serve this function.
Airlocks are optional but useful, particularly for beginners. They allow the carbon dioxide produced during fermentation to escape without allowing oxygen back in, which reduces surface mold risk and removes the need to burp jars daily. Standard fermentation airlocks fit wide-mouth mason jar lids with a simple drilled hole and grommet.
A kitchen scale is strongly recommended over volume measurements for salt. Weighing salt produces consistent results regardless of salt crystal size, which varies significantly between salt types and affects the accuracy of volume measurements.
Also Read: Canning Supplies: The Ultimate Guide
The Basic Lacto-Fermentation Method
The method is straightforward and applies to the vast majority of vegetable ferments with minor variations for texture and vegetable type.
Start with the freshest vegetables you can source. Freshness matters because the LAB population on the vegetable surface is highest in fresh-harvested produce. Vegetables from your garden, fermented the same day or day after harvest, will ferment more reliably and produce more complex flavors than vegetables that have been stored for days. Wash vegetables well but do not scrub aggressively or use antibacterial soap, as you want to preserve the bacterial population on the surface.
Prepare the vegetables according to the ferment you are making. Shredded vegetables like cabbage for sauerkraut are packed with salt and massaged until they release enough liquid to create their own brine. Whole or chunked vegetables like cucumbers, carrots, beets, and green beans are packed into jars and covered with a prepared salt brine.
- For shredded ferments: weigh your shredded vegetable, calculate two percent of that weight in salt, add the salt, and massage firmly for five to ten minutes until the vegetable releases significant liquid. Pack tightly into your fermentation vessel, pressing down until the liquid rises above the vegetable surface. Weight the vegetables down to keep them submerged. Cover the jar loosely or with an airlock.
- For whole or chunked ferments: prepare a two percent brine by dissolving 20 grams of non-iodized salt per liter of filtered or non-chlorinated water. Pack vegetables tightly into the jar with any desired aromatics such as garlic, dill, peppercorns, or bay leaves. Pour brine over the vegetables to cover completely, leaving one inch of headspace. Weight the vegetables below the brine surface. Cover with an airlock or cloth.
Chlorinated tap water can inhibit LAB activity. If your tap water is heavily chlorinated, use filtered water or allow tap water to sit uncovered overnight before using it in brine, which allows most chlorine to off-gas. According to the Centers for Disease Control and Prevention, chlorine is added to municipal water specifically to inhibit microbial growth, which is the opposite of what you want in a lacto-ferment.
Ferment at room temperature, ideally between 65 and 75 degrees Fahrenheit. Cooler temperatures slow fermentation and produce more complex, nuanced flavors but take longer. Warmer temperatures speed fermentation but can produce softer textures and sharper flavors. Most ferments are ready to taste at three to seven days and reach a flavor you might consider fully developed at two to four weeks, though personal preference varies significantly.
The Best Vegetables to Ferment
Almost any vegetable can be fermented, but some produce better results than others, particularly for beginners. Starting with high-success, forgiving vegetables builds confidence and skill before moving to more demanding ferments.
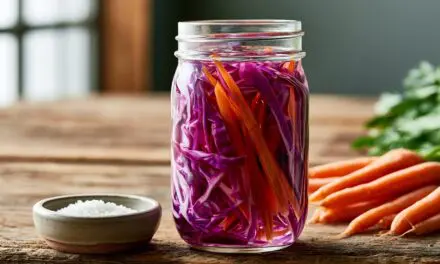
Cabbage is the classic starting point for good reason. It is high in natural sugars that feed LAB efficiently, has a strong enough cell structure to remain satisfyingly crunchy through fermentation, and is forgiving of minor technique variations. Green cabbage produces traditional sauerkraut. Red cabbage produces a visually striking purple ferment with a slightly different flavor profile. Napa cabbage is the base for kimchi. All are among the most reliable ferments for beginners.
Cucumbers are the second most common fermented vegetable and the basis for genuine fermented pickles, which are categorically different from vinegar-pickled cucumbers. Use small, firm pickling varieties rather than large slicing cucumbers, which tend to become soft. Adding tannin-rich leaves such as oak, grape, horseradish, or blackcurrant to the jar helps maintain crunch by inhibiting the enzymes responsible for softening.
Carrots are one of the most beginner-friendly ferments. Their density and sugar content make them reliable fermenters, and their firmness holds up well through the process. Fermented carrots develop a pleasantly sour and slightly effervescent quality that makes them one of the most palatable fermented vegetables for people new to the flavor profile. Cut into sticks or coins, packed with garlic and dill, and fermented for five to seven days at room temperature.
Beets ferment beautifully and produce a striking deep red brine that is probiotic-rich and valued in traditional Eastern European herbalism as a digestive tonic. Peel and slice or dice raw beets, pack with caraway seeds and a slice of fresh horseradish if available, and ferment in a standard two percent brine.
Green beans, radishes, turnips, peppers, garlic, and cauliflower all ferment reliably and can be combined in mixed vegetable ferments that use up surplus harvest efficiently. Garlic mellows and develops complexity through fermentation, losing much of its raw sharpness while gaining a rich, nuanced flavor that makes fermented garlic one of the most versatile condiments a homestead kitchen can produce.
Salt Ratios and Brine Strength: Getting It Right
Salt concentration is the variable that most directly controls the safety, speed, and flavor of a lacto-ferment. Understanding the range and what different concentrations produce gives you the ability to adjust ferments deliberately rather than following a fixed recipe.
- A one percent brine (10 grams per liter) produces fast, aggressive fermentation with a softer texture and sharper flavor. It is more vulnerable to surface mold and requires more vigilant monitoring. Some traditional kimchi recipes use lower salt concentrations, but they are fermented at cooler temperatures to compensate.
- A two percent brine (20 grams per liter) is the standard recommendation for most vegetable ferments and the safest starting point. It balances fermentation speed, texture, flavor, and mold resistance reliably across a wide range of vegetables and temperatures.
- A three percent brine (30 grams per liter) slows fermentation significantly, produces firmer textures, and is better suited to whole ferments or vegetables prone to softening. It is also more appropriate for fermentation in warmer environments where lower salt concentrations would produce overly fast and potentially problematic fermentation.
- Higher concentrations above three percent slow fermentation to the point that the brine functions more as a salt cure than a fermentation medium and will not produce the probiotic activity associated with lacto-fermentation. Some traditional cured olives and certain preservation methods use high-salt brines intentionally, but these are different processes.
The National Center for Home Food Preservation, operated through the University of Georgia, provides research-tested guidelines for fermented and pickled vegetables and is one of the most authoritative resources available for home fermenters working within established safety parameters.
Fermentation Timeline: What to Expect Day by Day
Understanding what a healthy ferment looks and smells like at each stage removes the anxiety that causes many beginners to abandon good ferments prematurely or fail to catch genuinely problematic ones.
Days one and two are often quiet. Visible bubbling may not begin immediately, particularly in cooler environments. The brine may begin to turn slightly cloudy, which is a normal and positive sign of LAB activity. The vegetables will begin to soften very slightly and the color will start to change.
Days three through five are typically the most active phase. Bubbling is visible and consistent, particularly if you press the weight down onto the vegetables. The brine becomes noticeably cloudy and begins to develop a sour, tangy smell that is clean and appetizing rather than putrid. This is when you should begin tasting the ferment daily to track flavor development.
Days five through fourteen represent the flavor-building phase. Active bubbling slows and eventually stops as the available sugars are consumed and the LAB population stabilizes. The flavor becomes progressively more sour and complex. Most people find their preferred flavor point somewhere in this window, though this is entirely personal.
After two weeks, move the ferment to cold storage in a refrigerator or cool root cellar. Cold temperatures slow LAB activity dramatically, extending the shelf life of the ferment to months while continuing to allow very slow flavor development. Properly made lacto-fermented vegetables stored at refrigerator temperature keep reliably for six months to a year.
Troubleshooting Common Fermentation Problems
Most fermentation problems are minor and easily resolved once you know what you are looking at. Very few indicate that a ferment needs to be discarded.
White surface film is the most common concern for beginners. A thin white film on the brine surface is almost always Kahm yeast, a harmless wild yeast that grows on the surface of ferments, particularly at warmer temperatures or lower salt concentrations. It does not affect the safety of the ferment but can impart a slightly off flavor if left to thrive. Skim it off, ensure all vegetables are submerged below the brine, and it typically does not return in significant amounts. Fuzzy growth in colors other than white, particularly green, black, or pink, is mold and indicates that vegetable matter was exposed to air. Discard surface mold and everything near it, assess whether the underlying brine and submerged vegetables smell clean and sour. If the ferment smells clean below the mold, the submerged portion is typically safe.
Soft or mushy texture in vegetables that should be firm indicates either too-warm fermentation temperature, too-low salt concentration, or vegetable varieties with high water content and low tannin levels. Adding tannin-rich leaves to future batches and fermenting at cooler temperatures addresses this.
No visible bubbling after three or four days at room temperature may indicate that the temperature is too cool, the salt concentration is too high, or the vegetables were very low in natural sugars. Warm the fermentation location slightly and be patient. The absence of visible bubbling does not mean fermentation is not occurring.
A ferment that smells putrid, rotten, or genuinely foul rather than sharply sour should be discarded. A properly progressing lacto-ferment smells increasingly sour and tangy but never rotten. Trust your nose. The smell of healthy fermentation is distinctive and clearly different from spoilage.
Building Fermentation Into Your Homestead Food System
The most valuable application of lacto-fermentation on a homestead is not making one jar of sauerkraut. It is building a continuous preservation system that moves seasonal abundance into year-round food security without freezer space, canning equipment, or electricity.
The practical approach is to ferment in bulk at peak harvest. When cabbage comes in, shred and ferment twenty pounds at once in a large crock. When cucumbers are producing faster than you can eat them, pack quart jars and gallon jars simultaneously. When the carrot harvest comes out of the ground, ferment ten pounds of carrot sticks. Move finished ferments into a root cellar, cool basement, or spare refrigerator and draw from them through winter.
A well-stocked fermentation shelf provides not only food preservation but also a consistent source of probiotics through winter when fresh food diversity is lower and immune function benefits most from digestive support. Traditional cultures understood this intuitively. Sauerkraut and kimchi were winter staples not just because they tasted good but because they kept people healthier through the cold months.
Integrate fermentation with your garden planning. Grow fermentation-specific varieties: small-fruited pickling cucumbers rather than large slicers, dense storage cabbages, firm carrots that hold texture through fermentation, and hot peppers for fermented hot sauce. Save the whey from any yogurt or cheese making to use as a fermentation starter culture that accelerates the initial LAB establishment phase.
Document what you make and when. A simple fermentation log noting the vegetable, the salt percentage, the start date, the fermentation temperature, and your flavor notes at the end of the ferment gives you the information needed to replicate successes and adjust failures systematically. Fermentation improves with practice and attention, and notes are what convert random results into a reliable and repeatable skill.
The Nutritional Case for Eating Fermented Vegetables Regularly
The homestead case for fermented vegetables is primarily about preservation and self-sufficiency, but the nutritional case is equally compelling and increasingly supported by research into the gut microbiome.
Lacto-fermented vegetables are a source of live probiotic organisms in a food matrix, which research suggests delivers those organisms to the gut more effectively than many encapsulated probiotic supplements. The lactic acid bacteria present in fermented vegetables, particularly Lactobacillus species, have documented associations with improved digestive function, reduced intestinal inflammation, enhanced immune response, and better absorption of nutrients from food.
A landmark study published in Cell and highlighted by Stanford Medicine, involving researchers from Stanford University, found that a diet high in fermented foods increased microbiome diversity and decreased markers of immune activation more effectively than a high-fiber diet over a ten-week period. Microbiome diversity is increasingly associated with overall health resilience, metabolic function, and reduced chronic disease risk.
The fermentation process also increases the content and bioavailability of certain vitamins. Fermented cabbage contains higher levels of vitamin C than raw cabbage in some preparations, which is one reason sauerkraut historically served as an anti-scurvy food on long sea voyages. B vitamin content increases during fermentation as LAB synthesize them as metabolic products.
Eating two to four tablespoons of fermented vegetables with one or two meals daily provides a meaningful probiotic and nutritional contribution without requiring large portions. The sour flavor also functions as a digestive bitter, stimulating bile production and gastric acid secretion that improves overall digestive efficiency.
The Amish Never Stopped Preserving Food This Way
Long before refrigerators, supermarkets, and industrial food systems, Amish families preserved massive harvests using methods like fermentation, root cellaring, drying, pickling, and cold storage. They did not learn these skills from YouTube videos or survival forums. They inherited them through generations because their survival depended on them.
That knowledge still exists today, but most modern families lost it somewhere along the way.
The Amish Ways is one of the best resources available for rediscovering those forgotten homestead skills. It covers traditional food preservation, self-reliance, gardening, old-world cooking, off-grid methods, and practical systems designed to help families become less dependent on fragile modern supply chains.
If learning how to ferment vegetables, preserve harvests, and build a truly resilient homestead lifestyle interests you, this book belongs in your library!
Final Thoughts
Lacto-fermentation is one of those skills that rewards you on every level a homestead skill can. It costs almost nothing to practice. It requires no electricity or specialty equipment. It preserves food more nutritiously than almost any other method. It produces food that actively supports health. And it connects you directly to one of the oldest continuous food traditions in human history.
Start with a single quart jar of carrots or a small batch of sauerkraut. Get the salt ratio right, keep the vegetables submerged, and let the process work. Within a week you will have made something genuinely useful from nothing but a vegetable, salt, and water. From there the skill scales as far as you want to take it: from one jar to a root cellar stocked with a winter’s worth of fermented produce.
The homesteaders who built this country’s food traditions did not have freeze dryers or vacuum sealers. They had crocks, salt, and the knowledge of how to use them. That knowledge is worth recovering.
You may also like: 
Don’t Forget To Join Our WhatsApp Channel For More Homesteading Guides
The Only Food That Grows Almost Faster Than You Can Eat It (Video)
Fermented Tea – A Complete Guide to Making, Using, and Storing Your Own at Home


