
You might think the big work is done by July. You’ve planted your vegetables, the animals are settled, and all you have to do now is just water and wait, right?
That’s exactly the way of thinking that helps you have a half-empty pantry when fall comes.
This is a month that might catch you off guard. Why? Because there are so many things happening at once. All of your vegetables are growing and are ready for harvesting at the same time and when you have a counter full of yesterday’s harvest, you need to act quickly. It can be a bit overwhelming…
I have felt it in my bones during my first summers on a homestead and that’s why I want to help you make things easier.
So, let me walk you through my July checklist.
First of All, Harvest Your Garlic 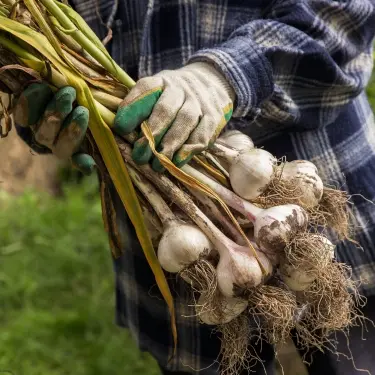
Garlic is the big July harvest, but a lot of homesteaders are not careful bout the timing. There’s a specific window when you should harvest your garlic. Pull it too early and the bulbs are small. Leave it too long and the cloves start to split out of their wrappers, which means they will not store well.
The secret is to watch the leaves. Each green leaf still on the plant is one papery layer wrapped around the bulb. When the lower leaves have gone brown, but you still count about five green ones up top, it is time. According to Iowa State University Extension, harvest can begin when only five green leaves remain, and in most of the country that lands sometime in July.
Don’t pull it out by the stem. Loosen the soil with a garden fork first, then lift the whole plant out gently. When the stem is broken, it can make the bulb rot. Also, never wash your garlic.
Then you have to cure the garlic. This means you will let it dry so it stores well in the long run. Lay the plants out somewhere warm, shaded, and breezy; a shed or a covered porch are perfect. Leave them there for about two weeks, or even longer if your air is humid.
When the outer skins are papery and the neck is dry and tight, you can be sure it’s cured. Set aside your biggest, prettiest bulbs to plant again in October. That is next year’s crop, all for free.
And now I want to share with you a little DIY project that uses garlic and I think it will be a good idea to know about it since you have a garden.
You use garlic for cooking; you may also use it to make remedies, but have you ever used it to keep your plants healthier? Yes, the same garlic that keeps you healthy can also keep your garden in top shape. This happens because garlic contains a compound called allicin and is famed for its antioxidant, antibacterial, and anti-inflammatory properties.
This is why you can use garlic to make a 100% natural pest control spray. This spray is applied in the evening on plants suffering from insect infestation, sprayed on both sides of leaves every few days until insects are gone. It can also be used as an insect deterrent weekly or fortnightly on healthy plants.
👉 See how to make the garlic pest control spray and keep your plants healthy
Plant Your Fall Garden
Yes, you still need to plant. July is the planting season for everything you’re going to harvest in the fall.
If you want broccoli, cabbage, cauliflower, or Brussels sprouts on the table in fall, you need to start those seeds in mid to late July, about five or six weeks before you would set them out. Start them in a shaded, cooler spot so the heat does not destroy them.
You can also get a second round of faster crops. Bush beans, beets, carrots, turnips, and radishes all have time to mature before frost if you plant them this month. Down South, this is the window for okra, southern peas, and sweet potatoes because these crops love the heat.
Start Putting Everything Up
There’s a moment every July when your garden will bury you. The beans, the cucumbers, the zucchini, the first real flush of tomatoes. It all comes at once. And you need to be prepared if you don’t want all of your harvest to spoil.
July is the month when preservation season begins and you shouldn’t let it pile up. Preserving helps your veggies keep the quality they have right now, so the sooner you deal with them, the better they will taste when winter comes.
You do not have to can it all. You can go with more preservation methods. What I do is pickle the cucumbers and beans, freeze the corn and berries, dehydrate the herbs, and ferment a crock of something, whatever feels more suitable. Spreading it out also means one freezer going down in a storm can’t wipe out everything you worked for.
And one thing that is famous in the homesteading community is that “if you want to can like a pro, you can like the Amish.” Since I started homesteading, I heard this phrase countless times. And yes, I have to recognize that this is true. No one has canned goods as good as theirs. But what makes their cans so special? What makes them different from your cans?
Well, maybe you opened Google or Facebook and simply found a random canning recipe and used that. No wonder your canned food doesn’t have the taste you were expecting or lasts just a couple of months. At least this is how I started. Then there are the people who use recipes learned from their families. This is one step up, but if you weren’t raised in an Amish family, your cans will still not be as good as theirs.
But recently, I can say that we, “the home canners,” have been blessed. We can finally take a glimpse at the recipes the Amish have been using for hundreds of years and all of this happens thanks to Eddie Swartzentruber.
Eddie was born and raised in one of the strictest Old Order Amish communities and after he left the community, he continued to live an off-grid life following the principles he learned at home. But what surprised him the most was that the people from the outside never heard of the old methods and techniques he was using on his homestead. That’s why he decided to share them with us.
Why Tomatoes Are Rotting on the Bottom In July
If you have ever picked up a beautiful and shiny tomato and than tured it over and discovered a sunken brown leathery patch on the underside, well, this is blossom end rot. It shows up most on the first fruit and on paste tomatoes.
The cause is what surprised most people. Blossom end rot is not a bug or a disease at all. This appears because the plant is not able to move calcium where it needs to go. This thing is triggered when the watering swings between bone dry and soaked, and July heat makes that swing worse.
All you have to do to fix this is water steadily. Water deeply and evenly, keep a few inches of mulch over the roots to hold that moisture, and go easy on high-nitrogen fertilizer that pushes fast growth.
Pick off the affected fruit so the plant can put its energy into the good ones. Once a tomato has the rot, no spray will reverse it, so save your money on those calcium sprays you’ll see pushed online.
Protect Livestock From Heat 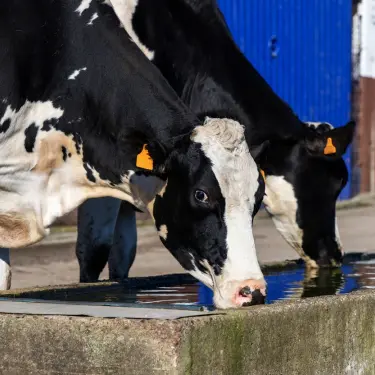
July is the hardest month of the year for your animals, especially when the nights stay warm and they never get a chance to cool down. Heat kills more livestock than cold does, and it does it fast.
Shade, airflow, and cool clean water are what it comes down to. For your birds, watch for panting and wings held out from the body, and get electrolytes in their water before a heat wave hits, not after. A frozen jug or a pan of cool water for them to stand in helps more than you’d think.
Goats, rabbits, and pigs all need shade and plenty of water too. Rabbits don’t say much but the heat affects them quickly, so a frozen water bottle in the hutch can be a lifesaver. Also, never hose down a woolly one to cool it off. The wet wool traps the heat right against the skin and makes it worse.
And do not forget fly control this month. Biting flies make cattle and other stock bunch up tight together, which blocks the airflow they need to shed heat. Stay on top of manure and keep things clean, and you cut the fly problem down at the source.
Now, depending on where you live, it might get really, really hot outside. Sometimes it can be so hot that the frozen water, the shade, and the electrolytes might not be enough for your livestock. Especially in today’s world, when you can see droughts and off-the-record temperatures becoming regular. There are countless records from farmers all across the U.S. about how their animals died in heatwaves.
One interesting project I stumbled upon is the DIY Air Conditioner. This is a project that takes 50 minutes to build and it can lower the ambient temperature by 20 degrees. This method works best in small spaces, so it’s perfect for a chicken coop or a barn. If you have a bigger space you want to cool down, I advise building two or three of these. And since you can use it inside a barn, why not use it inside your home too? This is a solution that can also keep you cool in the summer and not just your chicken.
The principle it uses to work is simple but efficient. Think of it as an upgraded version of the ice in the water trick I’ve mentioned above. The ice in the water serves two big purposes: one, your animals drink cold water and this cools them down internally, and two, it also cools down the air around it. This AC unit uses the second purpose and effectively amplifies it.
👉 If you want to see how it’s made, you can find the step-by-step instructions here
Take Care of the Pasture and the Bees
If you keep grazing animals, July is when cool-season pastures hit their summer slump and slow right down. Do not graze them to the dirt. The old rule is take half, leave half. Move your animals off when the grass is down to a few inches and let each section rest and recover before they come back to it. Keeping that grass a little taller shades the soil and helps it bounce back faster in the heat.
This is also second cutting time for hay in a lot of the country, usually around six weeks after the first cut. Cut it a little high again, and wait for a good three-day dry stretch to get it baled without rain on it.
And if you keep bees, July often brings what is called the summer dearth, when the big spring flowers are done and not much new is blooming. Your bees can burn through their stores fast, so check that they have enough, watch for robbing between hives, and make sure they have water. This is also the month mite loads climb, so plan to check and treat once your honey supers come off.
Final Thoughts
If you ask me, July is the hardest month of the year. There is so much to do and so little time. That’s why being organized is the most helpful thing.
On the other hand, July is also the month that fills the jars that will feed you through the whole winter. Everything you do out there in this hot weather is really a gift you’re handing your future self.
So, be patient, take care of your tasks, and you’ll see how rewarding this month can be.
You may also like: 
What June Says About Your Homestead
How to Defend Your Home When Help Isn’t Coming… (Video)
7 Seeds You Should Never Buy From a Big Box Store
You’re Not a Real Homesteader if You Don’t Grow This…
The Native American Remedy For Mosquito Bites


