If you are raising chickens on a homestead, hatching your own eggs is one of the most rewarding things you can do. It closes the full loop of self-sufficiency, gives you control over your flock genetics, and there is genuinely nothing quite like watching a chick pip through a shell for the first time. But getting there requires understanding exactly what happens inside the egg and what conditions the developing embryo needs to survive.
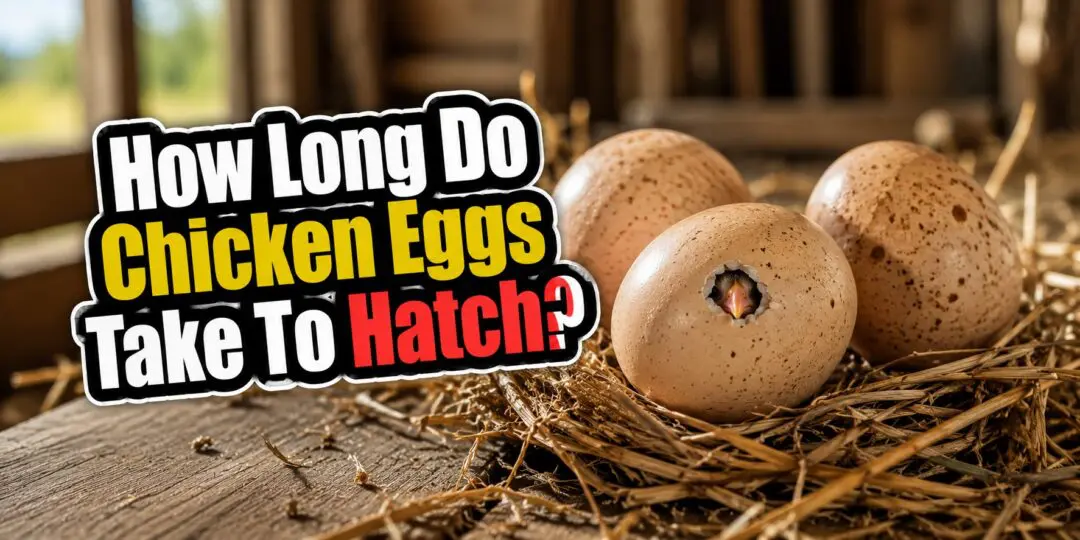
The short answer to how long chicken eggs take to hatch is 21 days. But the full answer is more useful than that. Temperature, humidity, egg turning, breed differences, and what you do in the final three days all have a direct impact on whether you end up with a healthy hatch or a failed one. This guide covers everything you need to know from the moment you set the eggs to the moment the chicks dry off and start peeping.
The 21-Day Rule: Why Chicken Eggs Hatch When They Do
Chicken eggs hatch in 21 days under normal incubation conditions. This is not an arbitrary number. It reflects the biological development timeline of a chicken embryo at the correct incubation temperature of 99.5 degrees Fahrenheit (37.5 degrees Celsius) in a forced-air incubator, or 101 to 102 degrees Fahrenheit in a still-air incubator where heat is measured at the top of the egg.
Temperature is the primary variable controlling developmental speed. A degree or two high and the embryo develops faster, hatching a day early with potential developmental defects. A degree or two low and development slows, the hatch is delayed, and chick viability drops. Consistent temperature throughout the full 21 days is one of the most critical factors in a successful hatch.
According to the University of Illinois Extension, chicken embryo development follows a precise daily sequence, with the heart beginning to beat on day 2 and all major organ systems forming within the first week of incubation.
Day-by-Day Development Inside the Egg
Understanding what is happening inside the shell helps you make better decisions about candling, humidity, and when to intervene. Here is a general overview of the key development milestones across the 21-day incubation period.
Days 1 to 7: Early Development
The embryo forms rapidly in the first week. By the end of day 1, the primitive streak (the earliest sign of the embryonic body axis) is visible under a microscope. By day 2, the heart has formed and is beating. By day 4, the embryo has limb buds and a clearly visible eye. By day 7, the embryo is roughly the size of a thumbnail and has all major organs in early development.
When you candle the egg at day 7, you should be able to see a spider-like web of blood vessels radiating from a dark center. This is a good sign of a developing embryo. If you see nothing but a clear egg, the egg was infertile. If you see a blood ring (a ring of blood with no central embryo), the embryo started developing but died early.
Days 8 to 14: Rapid Growth
The embryo grows quickly through the second week. Feather follicles appear around day 9. By day 14, the chick’s beak has hardened, claws are forming, and the body is covered in down feather sheaths. The air cell at the broad end of the egg grows noticeably as the chick consumes the contents of the egg.
Candling at day 14 shows a much larger dark mass filling most of the egg, with the air cell clearly defined at the top. You may be able to see the chick moving if you hold the egg still and watch closely.
Days 15 to 18: Final Preparation
The chick continues to grow and the yolk sac begins to be absorbed into the abdomen, providing the nutrition that will sustain the chick through the hatch process and the first day or two of life. The chick repositions itself with its head toward the air cell, which is the correct position for hatching.
By day 18, the egg is almost entirely filled by the chick. This is the point at which you stop turning the eggs and move them to the hatcher (or switch your incubator to lockdown settings), increase humidity, and stop opening the incubator.
Days 19 to 21: The Hatch
On day 19 or 20, the chick internally pips, breaking through the inner membrane into the air cell with its beak and beginning to breathe air for the first time. You may hear faint peeping from inside the egg at this stage.
External pipping, where the chick breaks through the outer shell, typically happens on day 20 or 21. The chick uses its egg tooth (a temporary hard point on the tip of the beak) to chip a small hole, then rests, then continues working around the circumference of the shell in a process called zipping. From external pip to hatch typically takes 12 to 24 hours, though it can take up to 48 hours in some cases.
Once the chick has zipped enough of the shell, it pushes free. Newly hatched chicks are wet, exhausted, and wobbly. They dry off over the next few hours in the incubator and quickly become steady on their feet. They do not need food or water immediately because the absorbed yolk sac sustains them for up to 72 hours, which is how commercial hatcheries can ship day-old chicks through the mail.
Incubator Settings for a Successful Hatch
Getting your incubator settings right before you set the eggs is far better than troubleshooting problems mid-hatch. Here are the key parameters to dial in.
Temperature
- Forced-air incubator:5 degrees Fahrenheit (37.5 degrees Celsius) throughout the full incubation period
- Still-air incubator: 101 to 102 degrees Fahrenheit measured at the top surface of the eggs
Run your incubator empty for 24 to 48 hours before setting eggs to ensure the temperature is stable. Invest in a quality separate thermometer rather than relying solely on the incubator’s built-in display, as these can be inaccurate.
Humidity
- Days 1 to 18: 45 to 55 percent relative humidity
- Days 19 to 21 (lockdown): 65 to 70 percent relative humidity
Humidity controls the rate at which moisture evaporates from the egg through the shell. Too low and the chick loses too much moisture, becoming stuck to the membrane inside. Too high and the chick retains too much fluid and may drown in the shell during hatch. The air cell size is a useful indicator of correct moisture loss: at day 18, the air cell should occupy roughly one-third of the egg’s volume.
Egg Turning
Eggs must be turned a minimum of 3 times per day from day 1 through day 18. Most modern incubators have automatic turning trays that rotate the eggs slowly and continuously. If you are turning by hand, turn an odd number of times per day (3, 5, or 7) so the egg does not rest on the same side two nights in a row.
Turning prevents the developing embryo from sticking to the inner shell membrane and mimics the behavior of a broody hen who shifts her eggs frequently throughout the day. Stop turning at day 18 when you move the eggs to the hatching position.
According to the USDA Agricultural Research Service, egg turning frequency during incubation has a direct and measurable effect on embryo survival rates, with more frequent turning producing better hatch outcomes than the minimum of 3 times per day.
Ventilation
The developing embryo consumes oxygen and produces carbon dioxide, just like any living animal. Incubators require adequate ventilation to prevent CO2 buildup, which is toxic to developing embryos. Most commercially built incubators have ventilation holes built in. Do not block them. In the final days of incubation when you are running higher humidity, resist the urge to tape vents to hold moisture. Oxygen supply is more important.
Broody Hen vs. Incubator: Which Is Better?
For homesteaders, the question of whether to use a broody hen or an incubator is worth thinking through carefully. Both approaches work, and each has genuine advantages.
Advantages of a Broody Hen
- No electricity required, making it the most self-sufficient option
- Hens naturally regulate temperature, humidity, and turning with remarkable precision
- Broody hens raise the chicks after hatching, reducing your workload significantly
- Hatch rates under a good broody hen are often higher than in a home incubator
- The chicks imprint on the hen and integrate into the flock more naturally
Advantages of an Incubator
- Allows you to hatch at any time of year, not just when a hen goes broody
- Lets you hatch large numbers of eggs at once
- Gives you full control over temperature, humidity, and turning
- Useful when you do not have broody-prone breeds in your flock
- Allows you to hatch eggs from multiple breeds or sources simultaneously
For most homesteaders, the ideal setup is both: use a broody hen when you have one willing and available, and use an incubator to supplement or to hatch specific breeding crosses the hen cannot manage herself.
What Affects Hatch Rate?
Even with perfect incubator settings, not every egg will hatch. Understanding the variables that affect hatch rate helps you improve your results over time.
Egg Fertility
An egg must be fertilized by a rooster to develop. Hens lay eggs regardless of whether a rooster is present, but unfertilized eggs will never hatch no matter how long you incubate them. A healthy, active rooster servicing a flock of 8 to 12 hens should produce fertility rates above 90 percent in most cases. Verify fertility before setting large batches by cracking a few fresh eggs and looking for the bullseye pattern on the yolk that indicates a fertilized egg.
Egg Storage Before Setting
Eggs stored before incubation lose viability over time. The ideal storage window is 7 to 10 days from lay to setting. Store eggs pointed end down at 55 to 65 degrees Fahrenheit with 70 to 75 percent humidity. Do not refrigerate hatching eggs as this damages the embryo. Hatch rates drop noticeably for eggs older than 10 days and become quite poor after 2 weeks.
Egg Selection
- Size: avoid very small or very large eggs; both tend to have lower hatch rates
- Shape: choose eggs that are oval and symmetrical; avoid elongated, round, or misshapen eggs
- Shell quality: avoid eggs with thin shells, cracks, heavy calcium deposits, or rough patches
- Cleanliness: do not wash hatching eggs as this removes the bloom (a natural protective coating on the shell); spot-clean only if necessary with a slightly damp cloth
Incubator Calibration and Stability
Temperature spikes, drops, or prolonged deviations from target are the most common cause of poor hatch rates in home incubators. Power outages, opening the incubator too frequently, and poorly calibrated thermostats all introduce instability. Check your incubator temperature multiple times per day in the first few days of incubation and invest in a second thermometer as a backup.
Rooster-to-Hen Ratio
Too few roosters in a large flock means some hens will not be regularly mated and their eggs will be infertile. Too many roosters can stress hens and reduce laying. A general guideline for standard breeds is one rooster per 8 to 12 hens. Heavy breeds do better with fewer hens per rooster (6 to 8), while lighter, more active breeds can manage ratios up to 1 to 15.
Candling: How to Check Egg Development
Candling is the process of shining a bright light through the egg to see the developing embryo inside. The name comes from the original practice of holding eggs over a candle flame. Today a bright LED flashlight or a purpose-built egg candler works far better.
Candle eggs in a darkened room for best visibility. Hold the egg against the light source at the broad end and rotate slowly.
- Day 7 candle: look for a spider web of blood vessels around a darker center (the embryo). Clear eggs are infertile. Blood rings indicate early embryo death.
- Day 14 candle: the egg should be mostly dark with a clear air cell at the broad end. Movement is sometimes visible.
- Day 18 candle: the egg should be almost entirely dark, with a large, well-defined air cell. This is your final check before lockdown.
Remove any clearly infertile or dead eggs after candling to prevent the risk of a rotten egg exploding in the incubator and contaminating viable eggs. A rotten egg has a distinctive sulfur smell and will look uniformly dark or murky inside when candled.
Lockdown: The Final Three Days
Lockdown refers to the period from day 18 to hatch when you stop turning eggs, raise humidity, and do not open the incubator. It is called lockdown for a reason. Opening the incubator during this period causes a sudden drop in humidity that can cause the membrane inside the shell to dry out and shrink around the chick, trapping it inside. This is called shrink-wrapping and it is one of the most common causes of chicks dying in the shell after pipping.
During lockdown:
- Lay eggs on their sides or in a hatching tray rather than in turning racks
- Raise humidity to 65 to 70 percent
- Do not open the incubator for any reason unless a chick has been struggling without progress for more than 24 hours after external pip
- Add water to humidity reservoirs through a small tube or syringe inserted through a vent hole if needed, rather than opening the lid
When to Help a Hatching Chick
This is the question every new hatcher wrestles with. A chick that has externally pipped but seems to be making no progress can be distressing to watch. The general rule is: do not help unless you are certain the chick will die without intervention.
Most chicks that appear to be struggling are actually resting. Hatching is extremely hard work for a small bird. A chick that pips and then goes quiet for several hours is not necessarily in trouble. It is recovering between bursts of effort.
Genuine reasons to consider assisted hatching:
- The chick has externally pipped and made no further progress after 24 to 36 hours
- You can hear the chick peeping weakly inside but it has not pipped after day 22
- The membrane visible through the pip hole is dried out and brown rather than white and moist
If you do assist, do so slowly and carefully. Moisten the membrane with a warm damp cotton swab before attempting to enlarge the pip hole. Never pull the chick free. Only remove small pieces of shell at a time and stop immediately if you see any bleeding, which indicates blood vessels are still attached. A chick that bleeds during assisted hatch has been helped too early.
Hatching Timelines for Other Poultry
If you are raising a mixed homestead flock, it helps to know how chicken hatching times compare to other common poultry breeds.
- Chicken: 21 days
- Bantam chicken: 19 to 20 days (slightly shorter due to smaller egg size)
- Duck (Pekin, Rouen): 28 days
- Muscovy duck: 35 days
- Turkey: 28 days
- Guinea fowl: 26 to 28 days
- Goose: 28 to 35 days depending on breed
- Quail (Coturnix): 17 to 18 days
Do not mix eggs from different species in the same incubation run unless you are prepared to manage different lockdown dates and hatching times. The humidity requirements during lockdown for waterfowl are higher than for chickens, and the different hatch dates make managing a mixed batch complicated.
The Penn State Extension poultry program recommends incubating only one species at a time for best results and clearest troubleshooting if hatch rates are poor.
After the Hatch: Moving Chicks to the Brooder
Leave newly hatched chicks in the incubator until they are fully dry and fluffy, which takes 12 to 24 hours. Wet chicks chill quickly outside the incubator. Do not move them early out of excitement.
Once dry, move chicks to a prewarmed brooder set to 95 degrees Fahrenheit at chick level for the first week. Reduce temperature by 5 degrees per week until the brooder temperature matches the ambient barn or coop temperature. Provide chick starter feed and fresh water with marbles or pebbles in the waterer to prevent drowning. Watch closely for signs of pasty butt (fecal matter clogging the vent), which is common in newly hatched chicks under stress and can be fatal if not cleared.
The first hatch is always the most nerve-wracking. By the second or third time, you will have a clear sense of your incubator’s quirks, your hatch rates, and the rhythm of the 21-day process. It becomes one of the most satisfying routines on any homestead.
🏡 Want to Raise Chickens the Old-Fashioned Way?
Hatching chicks is just the beginning. If you want to learn the time-tested Amish methods for raising healthier, hardier chickens without relying on expensive equipment, The Amish Ways Book is an invaluable resource.
Inside you’ll discover:
- 🐔 Traditional chicken-keeping techniques passed down through generations
- 🌾 Natural feeding and flock management methods
- 🏠 Simple homestead practices that save money and reduce dependence on modern systems
- 🥚 Practical tips for building a more self-sufficient lifestyle
If you’re serious about raising chickens and living more independently, this is a book worth having on your shelf!
Quick Reference: Chicken Egg Incubation at a Glance
- Incubation period: 21 days
- Forced-air temperature:5 degrees Fahrenheit (37.5 degrees Celsius)
- Still-air temperature: 101 to 102 degrees Fahrenheit at egg top
- Humidity days 1 to 18: 45 to 55 percent
- Humidity days 19 to 21: 65 to 70 percent
- Turning: minimum 3 times daily, days 1 through 18
- Lockdown begins: day 18
- Internal pip: day 19 to 20
- External pip: day 20 to 21
- Hatch to dry chick: 12 to 24 hours after hatch
- Brooder temperature week 1: 95 degrees Fahrenheit
You may also like: 
Why Some Hens Lay Blue Eggs (and Why This Happens)
Building Your Garden Beds Like This Will Double Your Harvest (Video)
Can You Freeze Hard Boiled Eggs? Essential Tips for Safe Storage


