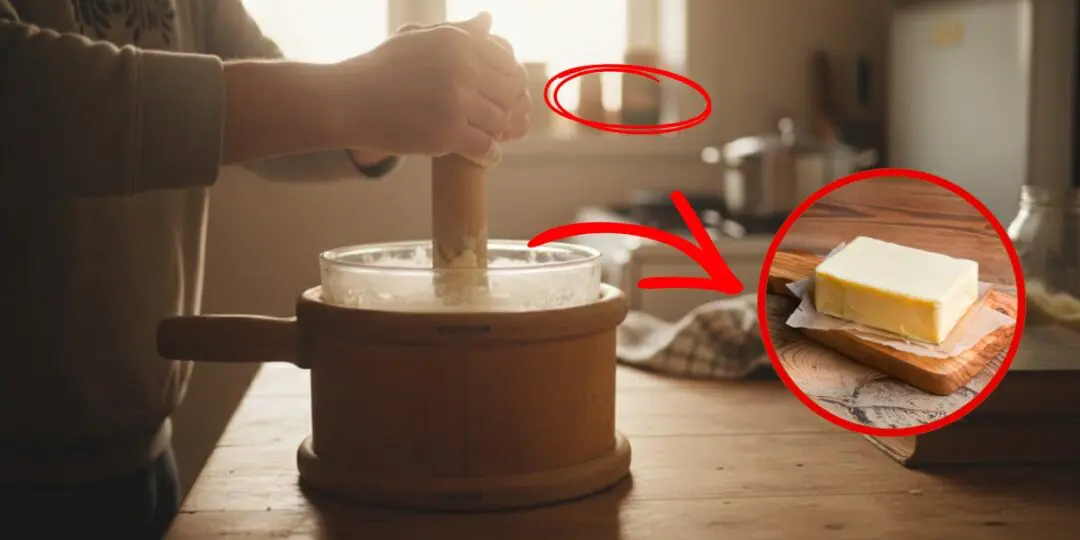
I found a jar of butter in my grandmother’s pantry six months after she passed away. The label said she’d canned it three years earlier. I nearly threw it out.
My aunt stopped me. “Open it first.”
The butter had separated, but after gently warming and stirring it, it smelled perfectly fine. That night, I baked cornbread with it.
To my surprise, it tasted just like fresh butter.
Turns out my grandmother had been pressure-canning butter since the early 2000s, stacking jars in her cool basement for years. Meanwhile, I’d been throwing away freezer-burned butter every few months.
That single jar sent me down a rabbit hole of preservation methods I’d never been taught.
Here’s the secret that actually keeps butter fresh for five years or more.
Traditional Root-Cellar Butter Keeping Methods
Your great-grandmother probably kept butter fresh in a crock filled with salt water, and this method still works if you have a consistently cool space. You need a ceramic or stoneware crock with a lid, cold water, and salt.
Pack your butter into the crock, leaving about an inch at the top. Mix salt water using roughly two tablespoons of salt per quart of water until it tastes noticeably salty. Pour this brine over the butter until it’s completely submerged. The salt water creates a barrier against air and bacteria while the cool temperature slows oxidation.
A proper root cellar maintains temperatures between 32°F and 40°F year-round with humidity around 85% to 95%. These conditions let you store butter in brine for several months without refrigeration.
Your cellar needs good air circulation to prevent stagnant pockets where mold can develop. Position your butter crock away from fruits and vegetables because they sometimes release some gases that are harmless but might affect the flavor of your butter. Check the temperature regularly with a thermometer because even a few degrees above 40°F shortens your storage window considerably.
Change the salt water every week to ten days. Over time, small amounts of butter fat and milk solids leach into the brine, creating food for bacteria. Fresh brine keeps everything clean and maintains the protective salt concentration.
When you change the water, rinse the butter surface quickly with cold water before adding new brine. Some people add a splash of vinegar to the brine, which further inhibits bacterial growth, though I’ve found straight salt water works fine if you’re diligent about weekly changes.
This method won’t get you to five years, but it handles three to six months reliably without electricity.
Now, here’s something most homesteaders don’t know about root cellars. You can build the perfect setup. You can nail the temperature, the humidity, and the airflow. You can do everything by the book. And still watch your food rot, or lose its flavor weeks before it should.
That’s because the cellar itself is only half the equation. How you store your food inside it matters just as much. The Amish figured this out generations ago. While the rest of us focus on building the perfect underground space, they’ve been quietly using this secret method that is still incredibly popular in their communities even today.
It’s not complicated. It’s not expensive. But it is specific, and these details are exactly what make the difference.
👉 If you want to discover exactly how the Amish use barrel root cellars to keep their food fresh for months, click here to learn their step-by-step method.
Freezer Storage Done the Right Way
Your freezer can keep butter fresh for two to three years if you wrap it properly. The original paper wrapper won’t cut it for long-term storage since it’s too thin and allows freezer burn.
Remove the butter from its packaging and wrap each stick or block tightly in aluminum foil, pressing out any air pockets as you fold.
Then wrap that foil-covered butter in plastic freezer wrap or slide it into a freezer-safe zipper bag. This double-layer system blocks both air and moisture.
Vacuum sealing takes freezer storage even further. I started vacuum sealing butter about four years ago, and the difference in quality after a year is obvious compared to foil-wrapped blocks. The vacuum removes nearly all oxygen, which stops oxidation almost completely.
Related: Building Your Amish Buried Fridge: a Step-by-Step Guide
You can vacuum-seal individual sticks or larger quantities, depending on how you plan to use the butter. Once sealed, the butter stays fresh in a standard freezer for three to five years without developing off-flavors or freezer burn. Make sure your vacuum sealer creates a tight seal—any air leaks defeat the purpose.
Label everything with the date and type of butter. When you’re pulling from a stockpile, you need to know which packages to use first. Write directly on the foil with a permanent marker or use freezer labels that won’t peel off in cold temperatures.
Keep a simple rotation system where new butter goes to the back and older stock moves forward. Your freezer temperature should stay at 0°F or below. Warmer than that, and you’ll shorten your storage timeline even with perfect wrapping.
Pressure-Canned Butter for 5+ Year Shelf Life
Pressure canning butter creates shelf-stable storage that lasts five years or longer at room temperature. You need a pressure canner, not a water bath canner, since butter is a low-acid food. Start with clean half-pint or pint jars and new lids.
Cut your butter into chunks and melt it slowly in a heavy pot over low heat, stirring constantly to prevent scorching. Once melted, pour the liquid butter into hot jars, leaving one inch of headspace.
Wipe the rims clean, apply the lids, and process at 10 pounds of pressure for 60 minutes for half-pints or 75 minutes for pints. Adjust pressure for your altitude.
Sterilize your jars before filling by running them through a dishwasher cycle or boiling them for ten minutes. Hot jars prevent thermal shock when you add the melted butter. Some people shake their jars every few minutes during cooling to keep the milk solids distributed throughout the butter rather than settled at the bottom.
Before you seal that butter into jars, there’s a preparation step that pioneer families used to push shelf life well beyond what regular canned butter can achieve. They called it “forever butter” because when it’s made correctly and pressure-canned, it practically never goes bad.
The “forever butter” is simple to make and it requires no special equipment beyond what you already have.
👉 If you want to see how to make “forever butter” and never worry about your stockpile going bad, click here to get the full method.
After canning, let the jars cool completely, then check the seals by pressing the center of each lid. It shouldn’t flex or pop.
Store your canned butter in a cool, dark place like a pantry or basement. Heat and light still degrade the fats even in sealed jars. Keep temperatures below 70°F if possible. The butter will separate into layers during storage, with clear butterfat on top and milk solids below.
Before using, warm the jar in hot water and stir thoroughly, or scoop out what you need and mix it in a bowl. Canned butter develops a slightly different texture than fresh, more like cultured butter, but it works perfectly for cooking and baking.
Clarified Butter and Ghee Preservation
Removing the milk solids from butter creates clarified butter or ghee, which lasts significantly longer than regular butter because you’ve eliminated the proteins and sugars that bacteria feed on. Heat the butter slowly in a saucepan until it melts completely.
The milk solids will foam on top and eventually sink to the bottom as brown sediment. Skim off the foam and carefully pour the clear golden fat through a fine-mesh strainer or cheesecloth into a clean jar, leaving the sediment behind. What remains is pure butterfat.
Ghee takes the process further by cooking the butter longer until the milk solids brown and develop a nutty flavor before you strain them out. The extra cooking removes more moisture, making ghee even more shelf-stable than basic clarified butter.
Both products can sit at room temperature for months without refrigeration because they contain almost no water or milk proteins. I keep a jar of ghee on my counter for daily cooking and it’s stayed fresh for over six months in summer heat.
For maximum longevity, store clarified butter or ghee in sterilized glass jars with tight-fitting lids. Keep them in a dark cupboard or pantry away from the stove.
Properly stored ghee lasts up to two years at room temperature and five years or more in the refrigerator. Use a clean, dry spoon every time you take some out to avoid introducing moisture or contaminants.
Clarified butter and ghee won’t spread like regular butter on bread since they’re liquid at warm temperatures and solid when cold, but they’re excellent for sautéing, frying, and any recipe where you’d use cooking fat.
Long-Term Butter Storage for True Food Independence
You now have multiple proven methods for keeping butter fresh beyond the typical freezer timeline.
Start with whichever approach fits your current setup. If you only have a freezer, begin vacuum-sealing butter this week.
Got a pressure canner? Put up a batch of shelf-stable butter.
Make ghee if you want cooking fat that doesn’t need refrigeration. Each method you implement moves you closer to food independence.
You may also like:
Home-Cooked Meals to Keep in Mason Jars for 5+ Years
What Happens When You Pour Honey Over Jalapenos? (Video)
Fermented Fish: A Self-Sufficient Food Tradition Worth Reviving
How to Store 2+ Years Worth of Food in a Small Pantry
Why You Should Pour Tallow Over Cornmeal


1*956*951*0