
When May is here, you know things are going to move fast. This month comes with a lot of wonderful changes, such as rising temperatures and longer days. This combo is a gift, but it can also destroy everything you planned if you’re not prepared.
I’ve been homesteading long enough to know that how you spend these four weeks decides how your summer goes. Weather has the final say, but the difference between a garden that is not yet ready in July and one that’s already feeding you comes down to the small work you do right now.
What to Do in the Garden This Month
By early May, most of the country is past the last frost. That’s the green light for the warm-season crops you’ve been babying all April indoors. If you’re up north in zones 3 or 4, check your local frost date before you get too excited. Further south, you’re probably already planting. Either way, don’t just take your seedlings out of the kitchen window and plant them the same afternoon. That’s how you lose a whole tray of tomatoes in one cold night.
Harden Off Your Seedlings Before You Plant Them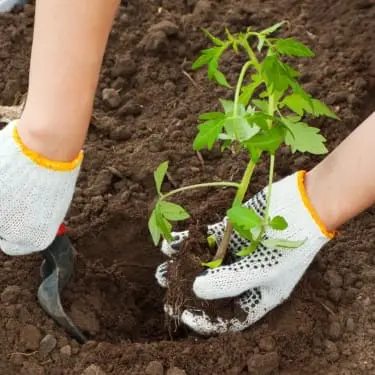
Seedlings you grow inside are soft. They’ve never felt real wind, direct sun, or a temperature swing. Drop them straight into the garden and a lot of them will sulk, bleach out, or die.
The fix is slow exposure. Gradually increasing outdoor time over about two weeks, starting in shade around 45 to 50 degrees and cutting back on water. In practice, I set my trays outside in morning shade for a couple of hours on day one. Then I stretch the window a little each day. By the end of week two, my plants can take a full day of sun and an overnight in the garden.
Transplant the tough guys (brassicas, onions, lettuce) as soon as you’ve hardened them off. Hold tomatoes, peppers, eggplant, squash, and basil until nighttime temps stay above 50. In most of the country that lands around Mother’s Day, which is a handy mental marker.
One more thing that makes a real difference: pinch off any blooms or tiny fruits on your transplants before you bury the root ball. I know it feels wrong, but do it anyway. You want that plant to use its energy to grow strong roots for the first couple of weeks.
Tips like this one are the kind of thing you won’t find in modern gardening books. They come straight from the people who couldn’t afford to lose one single plant, so they figured out all these little practices and passed them down for generations. The Amish still do things this way, and their gardens produce more per square foot than most folks dream of.
You can find more secrets like this one inside The Amish Ways. The man behind this amazing book is Eddie Swartzentruber. He grew up in one of the strictest Amish communities in America, and when he left, he took the knowledge with him. Now he’s putting it on paper for the rest of us.
Here are just some of the things you can read more about:
- How to build a year-round underground food garden,
- Herbal pest control spray,
- Crop rotation Amish style,
- Heirloom Amish seeds,
- Snake juice.
Click here to get the full collection of Amish skills
Direct-Sow Vegetables in Waves, Not All at Once
May is prime time for direct-seeding. Carrots, beets, parsnips, radishes, lettuce, spinach, kale, collards, mustard. Once the soil is genuinely warm (not just the air), you can sow beans, corn, and cukes straight into the ground.
Plant in succession. If you seed all your corn on the same Saturday, you’ll get all of your harvest at the same time and this is not a wise move. Instead, sow a short row of beans and corn every two weeks through May and into early June. Same with lettuce and radishes. You harvest all summer instead of one big pile.
Thin Your Fruit Trees and Protect Your Strawberries
May is easy to skip for orchard work, but if you have fruit trees, give them a couple of minutes now, and they will pay you back with the best harvest.
Thin your developing apples, peaches, and plums. I know it hurts to pinch off baby fruit, but an overloaded branch makes a hundred mediocre apples instead of fifty good ones, and sometimes it could also snap under the weight in August. The “golden ratio” is one fruit every four to six inches on a branch.
If you’ve got strawberries, make sure you are laying netting or insect mesh over them this month. The robins are watching and they don’t have mercy when it comes to strawberries.
How to Care for Your Animals in May
Early summer is the part of May that can sneak up on you if you are a new homesteader. For April, I mentioned spring cleaning the coop and checking fences. This is easy to remember since it’s something you are already doing. But heat stress isn’t that simple to notice and what is even scarier is that it can show up well before the thermometers start showing a temperature you might find concerning.
Spot the Early Signs of Heat Stress
Goats, sheep, rabbits, and big fluffy chickens like Orpingtons or Brahmas start struggling well before you do. University of Missouri Extension notes that heat stress in goats and sheep cuts feed intake and milk production, and recommends plenty of shade, clean cool water (one to two gallons per animal per day), and avoiding shearing sheep during extreme heat.
Signs to watch for on your morning and evening walks:
- Panting or open-mouth breathing in chickens
- Animals crowded under the one patch of shade
- Drool, weakness, or refusing food
- Wet, listless hens with wings held out from their bodies
THIS Is How Settlers Dug Their Own Wells Without Spending a Dollar
If you see any of that, take action quickly, preferably on the same day. Install a fan in the coop. Freeze jugs of water and set them in the run. Hang a shade cloth over the hot side of the pasture. Never hose down a woolly sheep. Wet wool holds heat against the skin and makes things even worse.
You can also shift grazing to early morning and late evening, and keep the water in the shade so it stays drinkable. Stale hot water is the most common reason animals stop drinking it.
Treat Parasites in Goats and Sheep the Smart Way
If you keep goats or sheep, May is when internal parasites wake up hard. The old advice was to deworm everybody on a schedule. We now know that’s how we ended up with dewormer resistance on so many farms.
The better approach is called targeted selective treatment, which is a fancy way of saying you only deworm the animals that actually need it. You check each one individually using a method called FAMACHA scoring (you pull down the lower eyelid and compare the color to a chart, since a pale pink eyelid means anemia from worms).
You only treat the ones showing problems. The rest stay untreated on purpose, which keeps a population of non-resistant worms in the system, so the dewormers keep working long-term.
If you’ve never done FAMACHA scoring before, ask your vet or local extension agent to show you once. It takes about thirty seconds per animal.
Check Your Beehives Before the Honey Flow Peaks
If you’ve got hives, late May is when the spring honey flow peaks. Check that the queen has room to lay, and add an empty super (the box where bees store honey) when the existing one is about three-quarters full. A crowded hive starts thinking about swarming, and a swarm in May is a lot of wasted honey.
Maintenance Around the Property
Here’s the part of May that’s easy to skip. The garden is right there and the animals are too, but the house and outbuildings just sit there and they will start falling apart if you let them. Give them one morning this month and you’ll save yourself a week of repairs later in the summer.
Inspect the Roof and Clean the Gutters
Depending on where you live, winter is usually hard on the house. One piece of advice I follow every spring is to look up. You should be checking for missing shingles, loose flashing around chimneys and vents, and any spots where ice dams hit.
Clean the gutters while you’re up there, and run a hose down every downspout to make sure nothing’s clogged. Water that can’t drain will eventually start rotting the wood under your eaves by August.
Test Your Irrigation and Rain Barrels
Turn on every irrigation zone one at a time and watch it run. You’re looking for geysers, sprinkler heads that aren’t spraying, and drip emitters that cracked over winter. Fix now, not in July when the tomatoes are wilting.
If you use rain barrels, clean them out before they fill for real. A barrel holding last year’s leaves becomes a mosquito factory until mid-June!
You know this feeling very well. You finally sit down outside after a long day, and within five minutes, you’re slapping at your arms, your neck, your ankles. Hopefully, there is a solution that can protect you for the whole summer.
This old homestead salve has been keeping mosquitos away for generations and all you need are one little jar, some herbs, and just 10 minutes of work. It’s 100% natural and you probably already have most of what you need in the kitchen.

Set Up Trellises, Cages, and Stakes
Tomatoes, pole beans, peas, cucumbers, and squash all need something to climb on. Put the trellises, cages, and stakes in the ground before the plants are tall enough to need them. Once a tomato is three feet tall and leaning, you’ll never get a cage over it without snapping branches.
A Weekend Project: Build a Simple A-Frame Trellis
The best thing is that this build doesn’t cost much and you can get the materials from the closest Walmart or Home Depot. Also, it takes an afternoon to make this project, and a single trellis can handle a whole row of pole beans, peas, or cucumbers. Another thing that I love about it is that you can build it in a way that it folds flat for winter storage, so it will not take up too much space in your shed.
What you need:
- Four 6-foot 1x2s for the legs (the cheap thin boards at any lumber yard)
- Ten 24-inch 1x2s for the rungs (five per panel)
- A hammer and a box of 1-inch finish nails, or a pin nailer if you have one
- Two 3-inch exterior strap hinges (the flat kind) with screws
- A 3-foot length of rope or light chain
- Exterior paint or an outdoor wood sealer
- Two flat rocks or bricks for the feet to sit on
How to build it:
Build the first ladder panel. Lay two of your 6-foot legs on a flat surface 22 inches apart, parallel to each other. Set a rung across the tops and nail it down, with the ends of the rung overhanging each leg by about an inch. This overhang is what gives the nail something solid to bite into. Then add four more rungs below it, spacing them roughly every 12 inches down the legs. Don’t stress about exact spacing. The plants won’t care.
Build a second identical panel the same way.
Stand the two panels up facing each other, leaning their tops together to form an upside-down V. Lay one of your strap hinges flat across the outside of one pair of legs where the two panels meet, with half the hinge on each panel, and screw it in. Do the same with the second hinge on the other pair of legs. Strap hinges sit flat on the outside face, which is exactly what you want for a joint that opens and closes at an angle. 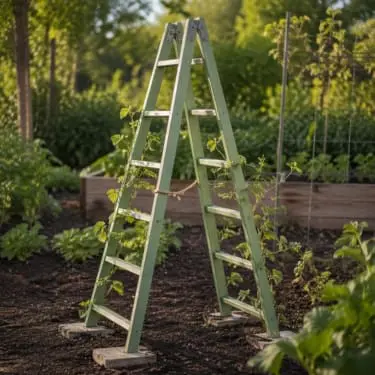
Now add the rope that stops the A from splaying open. Tie one end of your rope to a midpoint rung on one panel, and tie the other end to the matching rung on the other panel. Leave the rope loose enough that the feet of the trellis can open to about 24 to 30 inches apart, but no wider. When the trellis is fully open, the rope goes taut and holds the shape. When you fold the trellis for storage, the rope just hangs loose between the panels.
The 2,400-Calorie Survival Bar You Can Make at Home (Get the Full Recipe Here)
Paint or seal it. Any exterior color works. I do mine a soft green so it disappears behind the vines, but I’ve seen folks paint them barn red, cream, even black. It’s your trellis.
To install, open the trellis in the garden and set each pair of feet on a flat rock or brick. Wood sitting directly in wet soil rots fast, and two-dollar patio stones will give you years of extra life. Plant your beans, peas, or cukes at the base of each leg, and the vines will climb up both sides and meet in the middle.
At the end of the season, pull the dead vines off, wipe the trellis down, fold the panels together, and tuck the whole thing against a shed wall. A well-built A-frame will outlast your garden hose.
Final Thoughts
I know May is not a dramatic month. There is no harvest, there is no bad weather to destroy your plants, and everything around you, from trees to insects, is alive and thriving.
But all of these small things that you are doing now on your homestead are the bricks that build the homestead that is ready to feed you, shelter you, and hold up when life gets hard.
Nothing is pointless here and you are the one who decides whether August finds you sitting on the porch watching it all unfold, or trying to fix everything that is not adding up.
You may also like: 
Join Our Homesteading WhatsApp Community!
How to Turn Your Homestead Into an Indestructible Bunker (Video)
What April Says About Your Homestead
What January Says About Your Homestead
Homesteading To Do’s: February


