Vegetarians fear bacon. It’s the “gateway meat”. The temptation heightens with the mere aroma of this sizzling strip tease. Only the most hardcore herbivores can withstand the maddening scent in the olfactory receptors! Here’s how to dry cure pork belly to make bacon.
From a bacon-lover perspective, preserving this fat-laden meat is a Doing the Stuff skill “worth its weight in salt.” However, if you believe the Big Fat Lie, go ahead and brace yourself for some disturbing news…
Your grandparents had it right… Bacon fat won’t kill you. You need healthy fat in your diet.
Whether for health concerns or just to build a self-reliant skill, making bacon is a simple process anyone can do.
The recipe I used was given to me by Brian Manning, my instructor at The Pathfinder School. He made a video called “Hog and Hominy” where he carves up a side of his dry-cured bacon to fry over an open fire. I had to make my own.
I asked and he shared his recipe in the description box under his video. Be sure to check out his channel – Snow Walker Bushcraft – for some great tutorials and 18th-century living skills.
I also found a helpful video by Steve Davis on his channel, “woodcrafter76“.
Here’s what you’ll need for makin’ your own bacon to cure what ails you…
The Bacon Cure
Find a fresh pork belly, pasture-raised if possible. I bought mine at a health-food grocery store called Earth Fare. Your local butcher shop may have fresh pork belly or can order it for you. Of course, the freshest route is to butcher a hog yourself. My pork belly weighed 12.6 pounds and was on sale, at half-price!
Buy salt and brown sugar. Lots of it. Three-pound boxes of course salt. I used about 12 pounds of salt and 12 pounds of brown sugar. I’d probably use less on my next batch of bacon.
Brian used cracked black pepper for an outside coating. I did not but may add some for taste.
A large plastic bin with a lid. No need to be airtight. You’ll also need a second large container to combine and store the cure mix.
A dark, cool place. A refrigerator, root cellar, or cooler works.
Butcher string or stainless steel meat hooks. Don’t have any meat hooks? Use string and a needle to hang your cured bacon to air dry.
Patience. My pork belly took 14 days to cure.
Step 1 of Makin’ Bacon
In a large container, combine equal amounts of salt and brown sugar thoroughly. In hindsight, I should have used a larger mixing container. Sugar ants made a visit to our kitchen because of the spillage from my smaller container. You can never clean all those tiny granules off the cabinets and floor.
Step 2 of Makin’ Bacon
Rub the pork belly with the cure. Make sure you don’t miss any of the crevices on the flesh side. It’s like applying a rub on a pork butt for smoking… rub it good and cover it all! These little hidden hideaways need a cure applied to prevent moisture buildup. Moisture is your bacon’s enemy.

Place the coated sides in your container(s) and stick ’em in the fridge or a cooler with some ice blocks. I used a large cooler since there wasn’t much room in DRG’s fridge. Plus, I don’t trust Moose and Abby, our two rescue dogs, to be in the house alone with bacon sitting about.
I found that frozen water bottles worked better than those blue freezer blocks. I even added a 4-year-old glass jar of frozen chili to the rotation. Simply swap out melted water bottles with 4 or 5 frozen bottles in your freezer each time.
Leave the curing container in the cool place overnight and let it work.

Drain the collected liquid and re-apply the cure. Only this time you’ll want to add a thicker layer. Spread a 1/2 inch layer of cure in the bottom of your container and place the skin side on top of the cure. Now add a generous amount of cure to the flesh side which is facing up. Remember to hit all the creases with the cure. I added a 1/2 to 1 inch layer on top. In hindsight, that much was probably overkill but Brian said I should add more cure. So I did.

Put the lid back on the container and place it back in your cool place.
Step 3 of Makin’ Bacon
Repeat step 2. Drain the liquid and re-apply cure mix. After a few days you’ll notice the amount of accumulating liquid on the flesh side decreases. The cure on the bottom (skin side) will still be wet and should be replaced with new/dry cure mix.
At that point in the curing process, you can scrape off only the dissolved cure mix and apply a thin layer to the area. I didn’t chance it. I basically re-coated the entire pork belly for 10 of the 14 days of the process.
Step 4 of Makin’ Bacon
Once satisfied that the liquid had stopped draining from the meat, I gave it a couple more cure applications. On day 14, I examined the belly and found no liquid had dissolved the cure mixture on top or underneath.
Step 5 of Makin’ Bacon
Wash off the remaining cure mix under cold water. Use your hand and fingers to scrap off any stubborn cure mixture from all sides of the pork belly.

Pat the pork belly dry with paper towels or a drying towel.
Step 6 of Makin’ Bacon
This step is optional but I prefer a good smoke flavor in my bacon. Smoke is also an added preservative in meats.
I used my Big Green Egg and applewood chips for smoke flavor. You want to smoke the belly not cook it. Keep your smoker temperature under 200 degrees. If you have a cold smoker, even better.
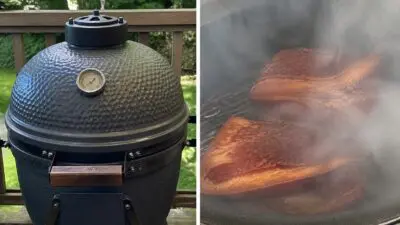
It took some doing to get my BGE to hover between 150 to 175 degrees. Once regulated, I smoked the pork belly for about 5 hours. I gotta admit that I was a bit worried when I saw the belly looking all sweaty after the smoking process. It was supposed to be dry to keep bacteria from forming on and in the meat.
I hoped that the next step would remedy the wet, flimsy looking sides of pork belly.
Step 7 of Makin’ Bacon
And it did.

String up the cured bacon with butcher’s twine and a needle or use meat hooks if you have some. Hang the slabs of goodness in a room in your house to air dry. You’ll want to cover them in a breathable fabric to keep flies and insects off the meat. I was in the process of hand-sewing a canvas bag when DRG, in her common sense tone, suggested using an old pillowcase.
And the rest is history, folks. I love my smart wife!
The two slabs of bacon are air drying from a shelf in our laundry room encased in cotton pillowcases.
If you took your time and followed the process, the dry-cured bacon will last several months at room temperature. I plan on dividing the belly into sections freezing all but one part for immediate use and saving the rest for future outdoor adventures… if it doesn’t get eaten beforehand.
Now go enjoy the intense flavor of your homemade bacon over a campfire! Or your kitchen. Or anywhere you can!
This article was written by Todd Walker and first appeared on Survival Sherpa.
You may also like:
Chicken Secrets Nobody Told You About
The Succulent Red Plant That Tastes Like Bacon (Video)
Canning Mistakes Even The Most Advanced Homesteaders Make
What I’ve Learned Homesteading With My Family of 8
How To Build An Outdoor Mud Oven
How to Build a Smokehouse In Your Backyard (with Pictures)


I applaud your initiative in seeking out ways to become less dependent on a failing food distribution and production system. I also thank you for taking the time to record your work and share it with everyone here. Good article.
The point of curing is to provide a means of preservation. Freezing or rather the need to freeze your bacon, belies the idea that it was cured. Adding cure salt #1 in the appropriate amount mixed into your salt and sugar will ensure that your bacon is actually cured. Cold smoking that cured meat further dries and protects it from bacteria growth, as well as providing a wonderful flavor. Once those steps are taken, simply hanging it in a cool dry place is enough, allowing you to cut only the slices of meat you want for a particular meal. You will probably find that it won’t last long enough to go bad!!!