In 1992, Hurricane Andrew tore through South Florida with winds exceeding 165 mph. When the devastation cleared, investigators made a shocking discovery: thousands of homes lost their roofs not because the roofing materials failed, but because the roofs were never properly attached to the walls in the first place. This single observation revolutionized building codes across America and brought hurricane ties—small metal connectors that most homeowners have never heard of—into the spotlight as one of the most critical components of residential construction.
Whether you live on the Gulf Coast, in tornado alley, along the Atlantic seaboard, or even in areas prone to severe thunderstorms, understanding hurricane ties could mean the difference between minor repairs and catastrophic loss. For the self-sufficient homeowner who takes pride in maintaining and improving their property, learning about these essential structural connectors is not just smart—it’s empowering.
This comprehensive guide will walk you through everything you need to know about hurricane ties: what they are, how they work, when you need them, and most importantly, how to install them yourself. By the end of this article, you’ll have the knowledge and confidence to assess your own home’s structural integrity and take concrete steps to protect your most valuable investment.
Let’s dive in and discover how these small pieces of metal can provide enormous peace of mind.
What Are Hurricane Ties?
Hurricane ties, also called hurricane straps, roof tie-downs, or seismic ties, are galvanized or stainless steel metal connectors specifically designed to secure your roof framing to your wall framing. Think of them as reinforced brackets that create a continuous structural connection from your roof all the way down to your home’s foundation.
The Problem They Solve
To understand why hurricane ties matter, you need to understand how wind affects your home. Most people assume that high winds damage homes by pushing against walls or blowing in windows. While that certainly happens, the greatest threat from severe winds is actually:
uplift – the powerful suction force that tries to pull your roof right off your house.
When wind flows over and around your home, it creates negative pressure on the leeward side (the side away from the wind) and especially on the roof. This is the same principle that allows airplanes to fly. In a hurricane or severe storm, these uplift forces can exceed 10,000 pounds, easily overwhelming the typical connection between rafters and wall plates—which in older homes often consists of nothing more than a couple of toe-nailed nails.
Hurricane ties solve this problem by creating a mechanical connection strong enough to resist these massive uplift forces. Instead of relying on the shear strength of a few nails driven at an angle, hurricane ties distribute the load across multiple fasteners driven perpendicular to the wood grain, creating a connection that can withstand forces many times greater.
How Hurricane Ties Work
The engineering principle behind hurricane ties is called a continuous load path. In structural terms, a load path is the route that forces travel through a building from where they’re applied (like wind pressure on the roof) to where they’re ultimately resisted (the foundation).
Without hurricane ties, the load path has a weak link at the roof-to-wall connection. With properly installed hurricane ties, the path becomes continuous and strong:
- Wind uplift force acts on the roof sheathing
- Roof sheathing transfers force to rafters/trusses through nails
- Hurricane ties transfer force from rafters to top wall plates
- Top plates transfer to wall studs
- Wall studs transfer to bottom plates
- Bottom plates transfer to foundation through anchor bolts
Each connection in this chain must be strong enough to handle the entire load. Hurricane ties ensure that the critical roof-to-wall connection doesn’t become the failure point.
A Brief History
While metal framing connectors have been available since the 1950s, they weren’t widely required by building codes until after Hurricane Andrew in 1992. The extensive post-storm investigations revealed that many homes suffered catastrophic damage not from extraordinary wind speeds, but from inadequate connections that would have failed in much weaker storms.
This led to sweeping changes in building codes, particularly in high-wind regions. Today, the International Residential Code (IRC) requires hurricane ties or equivalent connectors in most new construction, with specific requirements varying based on wind exposure zones. However, millions of homes built before these code changes remain vulnerable—which is where retrofit installation becomes crucial for self-sufficient homeowners.
Types of Hurricane Ties
Not all hurricane ties are created equal. Different designs serve different applications, structural configurations, and load requirements. Understanding the main types will help you choose the right connector for your specific situation.
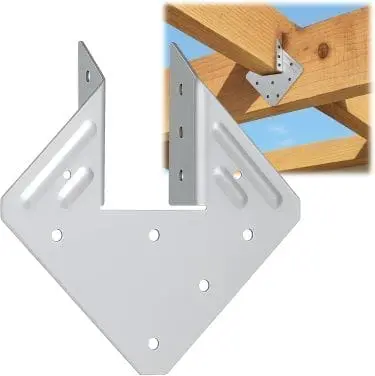
 H Clips (Hurricane Clips)
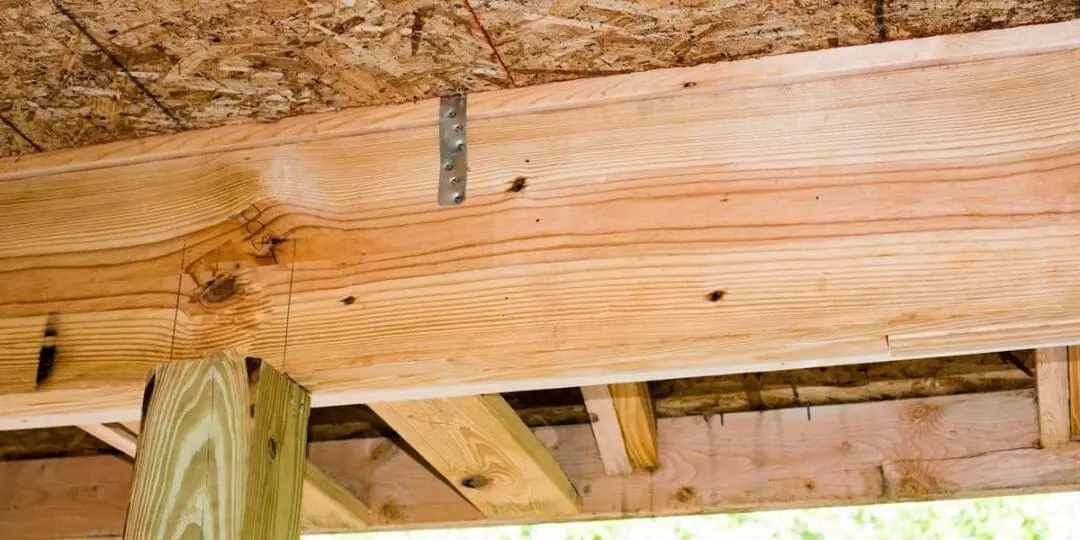
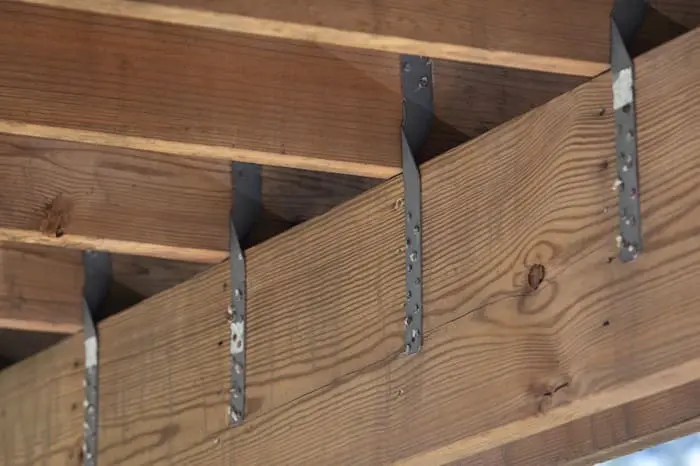
H clips, sometimes called H2.5 or H1 clips depending on their load rating, are among the most common hurricane ties for residential construction. These bent metal connectors wrap around the rafter or truss and attach to both sides of the top wall plate, creating a strong mechanical connection.
- Best for: Standard wood-frame construction with 2×4, 2×6, or 2×8 rafters
- Load ratings: Typically 700-1,500 pounds uplift
- Pros: Compact design fits in tight attic spaces, relatively easy to install in retrofits, widely available and code-approved
- Cons: May not provide enough capacity for high-wind coastal areas, requires good access to both sides of the connection
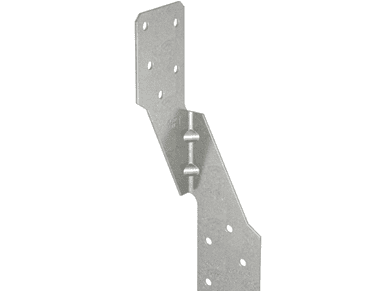
 Twist Straps
Twist straps are long metal straps that attach to the side of a rafter or truss, extend down the wall stud, and are fastened at multiple points. The “twist” refers to a 90-degree turn in the strap that allows it to transition from roof to wall framing.
- Best for: High-wind applications, new construction or major renovations where wall access is available
- Load ratings: Typically 1,000-3,000+ pounds uplift depending on model
- Pros: Very high load capacity, excellent for coastal and hurricane-prone areas, creates strong continuous connection
- Cons: Difficult to retrofit in existing homes, requires access to wall studs, more expensive than clips
 Rafter Ties/Truss Clips
These specialized connectors are designed specifically for engineered trusses or for connecting opposing rafters in conventional roof framing. They typically attach to the sides of the framing members rather than wrapping around them.
- Best for: Truss-to-wall connections, situations where side access is better than top access
- Load ratings: Varies widely, 500-2,000 pounds uplift
- Pros: Works well with pre-engineered trusses, good for retrofit applications
- Cons: Must verify compatibility with specific truss design, may require engineer approval
Heavy-Duty Straps
For the most extreme wind conditions or special structural situations, heavy-duty straps provide maximum connection strength. These are essentially beefed-up versions of twist straps with thicker metal and more fastening holes.
- Best for: Coastal construction in highest wind zones, commercial buildings, engineered solutions
- Load ratings: 3,000-6,000+ pounds uplift
- Pros: Maximum strength, meets most stringent code requirements
- Cons: Expensive, difficult to install, typically requires engineer specifications
Embedded Straps
These specialized straps are used in concrete block or masonry construction where the strap is embedded in the concrete during construction and extends up to connect to the roof framing.
- Best for: Concrete block construction, masonry walls, new construction only
- Load ratings: Varies based on embedment and strap design
- Pros: Excellent for masonry construction, creates strong continuous load path
- Cons: Impossible to retrofit, requires careful planning during construction, must coordinate with masonry work
Do You Need Hurricane Ties?
This is perhaps the most important question for self-sufficient homeowners to answer. The truth is that even if your local code doesn’t mandate hurricane ties, they may still be one of the smartest investments you can make in your home’s structural integrity.
Building Code Requirements
The International Residential Code (IRC), which most U.S. jurisdictions have adopted in some form, requires roof-to-wall connections capable of resisting specific uplift forces. These requirements vary based on your home’s wind exposure category, which is determined by factors including:
- Geographic location and wind zone
- Distance from coastline
- Terrain features and local topography
- Building height and roof design
Generally, homes in coastal areas within one mile of the shoreline, areas prone to hurricanes or tornadoes, and high-wind zones require hurricane ties. However, many jurisdictions extend these requirements further inland or to areas with documented severe weather patterns.
To check your specific requirements, contact your local building department or visit their website. Many jurisdictions now provide wind zone maps and prescriptive connection tables online. Don’t assume your older home is exempt—while it may have been built to code at the time, current standards reflect decades of improved understanding about wind loads and structural performance.
Beyond Code Requirements
Even if your home isn’t in a designated high-wind zone, there are compelling reasons to consider installing hurricane ties:
- Seismic Benefits: Hurricane ties also resist earthquake forces, helping keep your roof attached during seismic events. If you live in an earthquake-prone area, they serve double duty.
- Insurance Advantages: Many insurance companies offer premium discounts for homes with documented wind mitigation features, including hurricane ties. The savings over time can offset installation costs.
- Resale Value: Homes with verified structural improvements sell faster and often command higher prices, especially in regions where buyers are becoming more weather-conscious.
- Climate Change Considerations: Weather patterns are shifting, and areas that historically didn’t experience severe winds are seeing more frequent severe weather events. Installing hurricane ties is a proactive measure against future risk.
- Peace of Mind: For self-sufficient homeowners, knowing your shelter is structurally sound is priceless. Hurricane ties are relatively inexpensive insurance against catastrophic loss.
Assessment Checklist
Use this checklist to determine if your home needs hurricane ties:
- Age of home: Was it built before 1995? Homes built before widespread code adoption are unlikely to have adequate roof-to-wall connections.
- Location: Are you within 100 miles of a coast, in tornado alley, or in an area with documented severe thunderstorms?
- Roof type: Hip roofs perform better in high winds than gable roofs, but both benefit from hurricane ties. Complex roof designs with multiple valleys and ridges need extra attention.
- Previous damage: Has your roof or a neighbor’s roof sustained wind damage in the past? This indicates vulnerability.
- Insurance requirements: Does your insurer offer discounts for wind mitigation, or have they requested improvements?
- Property use: Is this a full-time residence, vacation home, or rental property? The consequences of damage vary.
If you answered yes to two or more of these questions, installing hurricane ties should be a priority for your home improvement list.
Choosing the Right Hurricane Ties
Selecting the appropriate hurricane ties for your home involves balancing structural requirements, installation feasibility, and budget. Here’s what you need to consider:
Based on Your Structure
Wood frame vs. masonry: Standard H clips and twist straps work for wood-frame construction. Masonry walls require embedded straps or special masonry-compatible connectors installed during construction.
Roof pitch and design: Steeper roofs may provide better access for installation but experience higher wind loads. Low-slope roofs may require different connector orientations. Complex roof designs need individual assessment of each connection point.
Rafter vs. truss construction: Conventional rafter framing offers more flexibility in connector choice. Pre-engineered trusses may have specific manufacturer requirements for connections—never modify a truss without engineer approval.
Existing vs. new construction: New construction allows for twist straps or embedded solutions. Retrofit situations typically require clips that can be installed from the attic.
Based on Your Location
Your location determines the required load ratings. The IRC provides prescriptive tables based on wind speed zones:
- Wind Zone 1 (85-90 mph): Basic clips rated 700-1,000 lbs typically sufficient
- Wind Zone 2 (100-110 mph): Mid-range clips rated 1,000-1,500 lbs recommended
- Wind Zone 3 (120-130 mph): Heavy-duty clips or straps rated 1,500-2,500 lbs required
- Wind Zone 4 (140+ mph): Maximum-strength straps rated 2,500+ lbs, often requires engineer design
Coastal areas within one mile of the ocean typically require stainless steel connectors instead of galvanized to resist salt air corrosion. This is not optional—galvanized connectors will deteriorate rapidly in marine environments, compromising their strength.
Understanding Load Ratings
Hurricane tie load ratings indicate the maximum uplift force (in pounds) the connector can resist when properly installed with specified fasteners. These ratings are determined through rigorous testing and are listed on the manufacturer’s documentation and often stamped on the connector itself.
Critical point: The load rating applies only when you use the exact fasteners specified by the manufacturer. Using different screws or nails, omitting fasteners, or incorrect installation voids the rating and may violate code. Always follow the manufacturer’s installation instructions precisely.
For complex situations or high-wind zones, consider hiring a structural engineer to calculate the specific loads your roof connections must resist and specify appropriate connectors. The cost of an engineer’s consultation (typically a few hundred dollars) is trivial compared to the potential cost of inadequate connections.
Material Considerations
- Galvanized steel: The standard choice for most inland applications. Hot-dipped galvanized coating provides excellent corrosion resistance for typical environments. This is the most economical option and meets code requirements for non-coastal areas.
- Stainless steel: Required for coastal construction within one mile of saltwater. Also recommended for areas with harsh industrial environments or anywhere corrosion is a significant concern. Stainless steel connectors cost 2-3 times more than galvanized but last indefinitely in corrosive environments.
- Specialty coatings: Some manufacturers offer enhanced corrosion protection through additional coatings. While these can extend the service life in moderately corrosive environments, don’t substitute coated galvanized for stainless steel in coastal applications.
Budget Considerations
Hurricane ties are remarkably affordable given the protection they provide. Here’s what to expect:
- Basic H clips: $2-4 each
- Heavy-duty clips: $5-8 each
- Twist straps: $8-15 each
- Stainless steel versions: 2-3x the cost of galvanized
- Fasteners: $15-30 per box (100 count)
For an average 1,500 square foot home with rafters on 24-inch centers, you’ll need approximately 60 connectors. Using mid-range clips at $4 each plus fasteners, you’re looking at roughly $300 in materials for complete roof protection. Even with stainless steel in coastal areas, the material cost rarely exceeds $800.
Where to buy: Major home improvement stores (Home Depot, Lowe’s, Menards) stock common Simpson Strong-Tie and USP connectors. For specialty items or bulk purchases, lumber yards and contractor supply houses often offer better prices. Online retailers like Amazon and contractor supply websites provide the widest selection.
Pro tip: Buy all materials at once to ensure consistency and avoid multiple trips. Get 10% extra connectors and 20% extra fasteners to account for damaged parts or installation mistakes.
Tools and Materials Needed
Proper tools make hurricane tie installation safer, faster, and more accurate. Here’s everything you’ll need:
Essential Tools
- Impact driver or drill: An impact driver is strongly preferred for driving structural screws. It provides better torque control and doesn’t strip screw heads. A corded drill will work but is more tiring for repetitive fastening.
- Hammer: If using nailed connections. A 20-ounce framing hammer works well.
- Appropriate bits: #2 square drive or #3 Phillips bits for structural screws. Buy several—they wear out.
- Ladder or scaffolding: Sized appropriately for safe attic access. Extension ladders for exterior work if needed.
- Headlamp or work light: Essential for attic work where lighting is poor. LED headlamps leave both hands free.
- Safety glasses: Non-negotiable when working overhead with power tools.
- Work gloves: Metal connectors have sharp edges and can cause nasty cuts.
- Dust mask or respirator: Attics are dusty, and disturbed insulation creates airborne particles.
- Tape measure: For locating rafters and marking positions.
- Carpenter’s pencil or marker: For marking connector locations on wood.
Helpful Optional Tools
- Inspection mirror: For viewing tight spaces and verifying fastener installation.
- Right-angle drill attachment: Invaluable for tight spaces where a standard drill won’t fit.
- Nail gun: If installing many connectors with nails, a pneumatic nailer saves time and reduces fatigue.
- Camera or smartphone: Document your work for insurance records and permit inspections.
- Level: Ensures connectors are properly aligned.
- Knee pads: Make attic work much more comfortable when moving between ceiling joists.
Materials Checklist
- Hurricane ties: One for each rafter/truss connection, plus 10% extra
- Structural screws or nails: ONLY the exact type specified by the connector manufacturer. Common specifications include Simpson #9 x 1.5″ screws or 10d or 16d common nails. Never substitute.
Critical fastener note: The load rating of any hurricane tie is only valid when installed with the specified fasteners. Using drywall screws, deck screws, or any non-structural fasteners completely voids the connector’s rating and creates a dangerous false sense of security. Always use structural-grade fasteners rated for the application.
 How to Install Hurricane Ties: Step-by-Step Guide
Installing hurricane ties is well within the capabilities of most DIY homeowners, but it requires attention to detail and proper technique. This section focuses on retrofit installation in existing homes, as this is the most common scenario for self-sufficient homeowners.
Before You Begin: Critical Safety and Planning
Safety Considerations:
- Heat: Attics can exceed 140°F in summer. Work early morning or evening, take frequent breaks, and stay hydrated. Heat exhaustion is a real danger.
- Electrical hazards: Attics contain electrical wiring. Never lean ladders against wires, and be cautious when moving around. Turn off circuits if working near junction boxes.
- Falling through ceiling: Step only on ceiling joists or place boards across joists to create walkways. Stepping on drywall will cause you to fall through.
- Insulation: Fiberglass insulation irritates skin and lungs. Wear long sleeves, gloves, and a quality dust mask. Shower immediately after work to remove fibers.
- Sharp edges: Metal connectors have sharp corners and edges. Gloves are essential.
When to hire a professional: Consider professional installation if you have limited attic access, complex roof geometry, are uncomfortable working in confined spaces, or have any health conditions that make attic work dangerous. The labor cost is typically $40-80 per connection, which includes materials.
Permit and code considerations:
Check with your local building department before starting. Some jurisdictions require permits for retrofit hurricane tie installation, others don’t. Even if not required, having your work inspected provides documentation for insurance purposes and peace of mind that you’ve done it correctly.
Planning Your Installation
Before climbing into the attic, create a plan:
- Count your rafters or trusses: From outside or inside the attic, determine how many connections you need. Rafters/trusses are typically spaced 16″ or 24″ on center.
- Assess accessibility: Can you reach all connections? Some areas may require creative solutions or exterior access.
- Plan work sequence: Work systematically from one end to the other. Mark completed connections to avoid missing any.
- Prepare materials: Stage connectors and fasteners in containers you can carry. Dropping fasteners in attic insulation means they’re gone forever.
- Clear insulation: You’ll need to temporarily move insulation from work areas. Plan how you’ll manage this and ensure you replace it properly.
Retrofit Installation Process
Step 1: Access the Connection Points
Enter your attic through the access hatch. Give your eyes time to adjust to the dim lighting and let your headlamp do most of the work. Locate the wall top plate where it meets the rafters or trusses. This is your connection point.
The top plate is the horizontal 2×4 or 2×6 that sits on top of the wall studs. Rafters or trusses should rest directly on this plate. In most homes, this connection is currently made with just a few nails driven at an angle (toe-nails).
Carefully move insulation away from the connection points. Place it nearby where you can retrieve it later. If you have blown-in insulation, use a box or bag to collect it from work areas.
Step 2: Inspect and Prepare Surfaces
Before installing connectors, inspect the wood at each connection point:
- Look for rot, decay, or insect damage. If you find compromised wood, it must be repaired before installing connectors. Hurricane ties are only as good as the wood they’re attached to.
- Brush away dust and debris from connection surfaces. Connectors must sit flush against solid wood.
- Verify that rafters actually rest on the top plate. Occasionally you’ll find gaps due to settling or original construction issues. These require correction before installing ties.
If you discover structural problems during inspection, stop and consult with a contractor or structural engineer. Installing hurricane ties over compromised framing is pointless and potentially dangerous.
Step 3: Position the Hurricane Tie
This is where careful attention to the manufacturer’s installation instructions is crucial. Hurricane ties are designed to be installed in a specific orientation, and installing them incorrectly can significantly reduce their effectiveness.
For H-clips (the most common retrofit connector):
- The clip wraps around the rafter and down both sides of the top plate
- The bend in the connector should fit snugly into the corner where rafter meets plate
- The connector should be centered on the rafter, not offset to one side
- All nail/screw holes should be accessible and over solid wood
Before fastening, do a dry fit to ensure everything aligns properly. If the connector doesn’t sit flush, determine why before proceeding. Common issues include:
- Debris preventing full contact
- Irregular wood surfaces that need cleaning
- Wrong size connector for the framing lumber
- Existing hardware interfering with placement
Step 4: Install Fasteners in Correct Sequence
This is the most critical step. The structural integrity of the connection depends entirely on proper fastener installation.
Key principles:
- Use only specified fasteners: Check the connector itself or manufacturer documentation. Common specifications are Simpson Strong-Tie SD screws or 10d/16d common nails.
- Install ALL fasteners: Every hole must have a fastener. Skipping holes reduces the connector’s capacity proportionally.
- Drive fasteners perpendicular: Screws or nails must enter the wood at 90 degrees, not at an angle.
- Proper depth: Screws should be driven flush with the connector surface. Overdriving deforms the metal and weakens the connection. Underdriving leaves gaps.
- Sequence matters: Start with fasteners on one side (either rafter side or plate side), then alternate to the other side. This prevents the connector from shifting during installation.
Detailed installation sequence for H-clips:
- Position the connector and verify fit
- Install one fastener on the rafter side to hold connector in place
- Install one fastener on the opposite plate side
- Check alignment—connector should still be centered and flush
- Complete all remaining fasteners, alternating sides
- Verify all holes are filled and all fasteners are properly seated
Common fastening mistakes to avoid:
- Using drywall screws or deck screws: These are not structural fasteners and will fail under load.
- Skipping holes: “Close enough” doesn’t work with structural connections.
- Installing connector upside down: More common than you’d think. Double-check orientation.
- Deforming the connector: Bending or twisting connectors during installation reduces their capacity.
- Fastening into damaged wood: Rotten or severely split wood cannot hold fasteners properly.
- Missing the framing: Fasteners must penetrate solid framing lumber, not just sheathing.
Step 5: Verify Installation Quality
After completing each connection, take a moment to inspect your work:
- Is the connector sitting flush against both framing members with no gaps?
- Are all fastener holes filled?
- Are fasteners driven to proper depth (flush, not overdriven)?
- Has the connector been bent, twisted, or damaged during installation?
- Is the connector properly oriented and centered on the rafter?
Use your phone to photograph each completed connection. This creates a record for insurance purposes, helps with inspection, and allows you to review your work later to ensure consistency.
Step 6: Repeat for All Connections
Work systematically through the attic, installing a connector at every rafter-to-plate connection. Don’t skip any. A continuous load path requires connections at every structural member.
Mark completed connections with chalk or tape as you go to ensure you don’t miss any. It’s surprisingly easy to lose track in a dusty attic with repetitive framing.
Take breaks as needed, especially in hot weather. Rushing leads to mistakes, and mistakes in structural connections can be dangerous.
Step 7: Replace Insulation
After completing all connections in a section, carefully replace the insulation. Maintain proper depth and coverage, but don’t compress it—compressed insulation loses R-value.
If you’re working with blown-in insulation, you may need to add material to restore proper depth after disturbing it. Fiberglass batts should be laid back in place gently.
Ensure insulation doesn’t block soffit vents or restrict airflow. Attic ventilation is crucial for roof longevity and energy efficiency.
Special Installation Situations
Trusses vs. Rafters:
Engineered trusses may have specific connection requirements from the manufacturer. Never cut, notch, or modify a truss without engineer approval. Some trusses use specialized clips designed for their particular geometry. When in doubt, contact the truss manufacturer or consult a structural engineer.
Limited Attic Access:
Some homes have very limited attic access, making it impossible to reach all connection points from the interior. Options include:
- Creating additional access hatches (requires ceiling repair)
- Exterior installation by removing soffit or fascia boards
- Using specialized long-reach tools
- Hiring professionals with specialized equipment
Cathedral Ceilings:
Vaulted or cathedral ceilings with no attic access require exterior installation. This typically means removing fascia boards or working from the roof side during re-roofing. This is a job best left to professionals unless you’re experienced with exterior work at height.
Complex Roof Geometry: Homes with hips, valleys, dormers, and multiple roof planes have numerous connection points at different angles. These situations may benefit from engineer review to ensure all critical connections are properly addressed.
Cost Analysis
Understanding the full cost picture helps you make an informed decision about DIY installation versus hiring professionals.
DIY Installation Costs
For a typical 1,500 square foot single-story home with rafters on 24-inch centers (approximately 60 connections):
- Hurricane ties ($4 each): $240
- Structural screws (600 count needed): $90
- Safety equipment (if not owned): $50-100
- Total material cost: $380-430
- Time investment: Most homeowners complete installation over 2-3 weekends, working 3-4 hours per session. Total time investment: 15-20 hours.
Professional Installation Costs
Professional installation typically costs $50-80 per connection including materials. For the same 60-connection home, expect:
- Total professional cost: $3,000-4,800
- Time investment: Professionals typically complete the job in 1-2 days.
Return on Investment
The value proposition of hurricane ties extends beyond initial cost:
- Insurance savings: Many insurers offer 10-20% premium reductions for documented wind mitigation. On a $2,000 annual premium, that’s $200-400 per year.
- Avoided losses: The cost to replace even a partial roof failure starts at $10,000-15,000. Complete roof replacement with interior damage easily exceeds $50,000.
- Home value: Wind mitigation features are increasingly desirable to buyers, particularly in storm-prone regions.
- Skills gained: DIY installation teaches you about your home’s structure, builds confidence for future projects, and demonstrates self-sufficiency.
Conclusion: Protecting Your Most Important Investment
Hurricane ties represent one of the simplest yet most effective upgrades you can make to protect your home from severe weather. These small metal connectors, costing just a few dollars each, can mean the difference between minor damage and catastrophic loss when high winds strike.
For the self-sufficient homeowner, installing hurricane ties embodies the core values of preparedness, self-reliance, and taking active responsibility for your property’s safety. Rather than hoping your home will survive the next storm, you can take concrete steps to ensure it will.
The installation process, while requiring careful attention to detail, is well within the capabilities of most DIY enthusiasts. By following manufacturer specifications, using proper fasteners, and working methodically, you can create structural connections that will protect your home for decades to come.
Key takeaways:
- Hurricane ties create a continuous load path from roof to foundation, preventing wind uplift from tearing off your roof
- Choose connectors based on your location’s wind zone, structural configuration, and installation constraints
- Always use manufacturer-specified fasteners and install them at every hole—no exceptions
- DIY installation is feasible for most homes, saving thousands compared to professional installation
- The investment pays for itself through insurance savings, avoided damage, and peace of mind
Your next steps:
- Assess your home’s current roof-to-wall connections
- Research local building codes and permit requirements
- Calculate how many connectors you need and choose the appropriate type
- Purchase materials and gather necessary tools
- Schedule installation time, working during cooler weather if possible
- Document your work with photos for insurance and inspection
- Consider extending protection to outbuildings, sheds, and garages
Remember that structural preparedness is an investment in your family’s safety and your financial security. Every hurricane tie you install is one more connection keeping your roof attached where it belongs.
Don’t wait until a storm is approaching to think about wind protection. By then, it’s too late. Take action now, while you have time to do the job properly. Your future self—and your home—will thank you.
The self-sufficient path isn’t always the easiest path, but it’s the path that gives you control over your destiny. Installing hurricane ties is a perfect example: a weekend project that delivers a lifetime of protection. Get started today, and add one more layer of resilience to your self-sufficient homestead.
You may also like:![]()
How to Get Running Water When the Next Hurricane Hits
75+ DIY Projects That Help You Survive Without Electricity (Video)
The First 7 Days After Hurricane Helene Hit My Homestead
How to Harvest 1000+ Gallons of Water from Your Roof
How To Make Your Property Inflation-Proof


