The traditional methods for water purification have usually involved boiling the water for at least 3 minutes or treating it with chemicals with either a chlorine or iodine base. They all work, but they have some downsides. Chemical treatments often leave a chemical aftertaste, and boiling can sometimes leave the water tasting flat.
There are solutions, including treatment tablets that neutralize the chlorine or iodine aftertaste, or, in the case of boiling water, pouring the water back and forth into containers to aerate it. But there’s another solution many people might not be aware of.
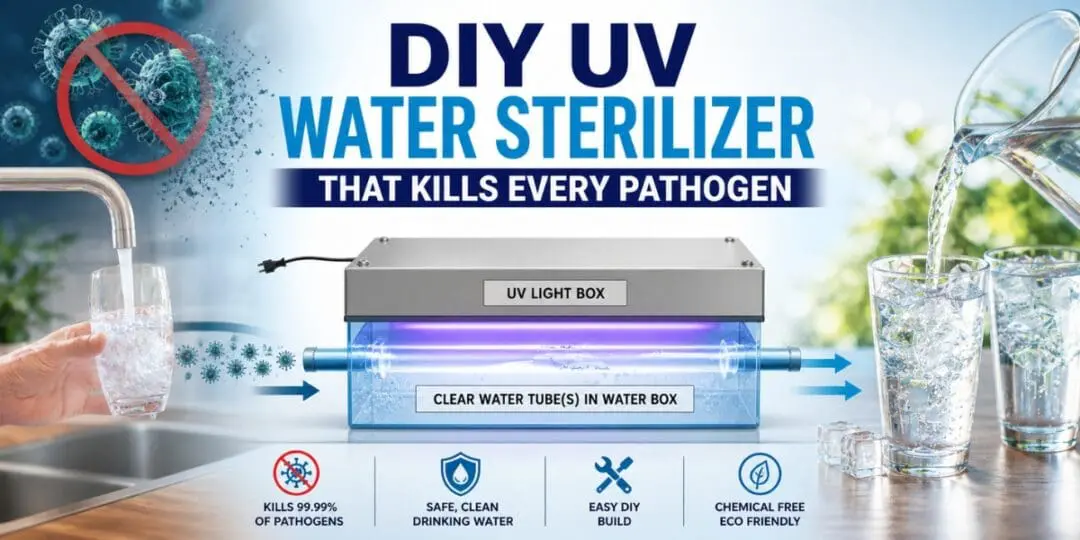
Ultraviolet Light Sterilization
Ultraviolet light (UV) radiates from the sun on a constant basis. Ultraviolet is at the far end of the light spectrum and is even invisible at higher wavelengths. What’s curious is that UV light at certain wavelengths will actually interfere with the nucleic acids and DNA in microorganisms, effectively killing them and preventing reproduction or spread. It’s called ultraviolet germicidal irradiation (UVGI).
Once you have clean water, it’s incredibly important to be careful about how you store it. Store it wrong and you might compromise your entire stockpile in a couple of days. Water gets contaminated easily if you don’t store it correctly.
The average adult human needs about 1 gallon of water per day. This means you need to keep your stockpile in containers that are able to satisfy this need for weeks. Hopefully, building a safe water storage system is a project that takes a few hours.
Click here if you want to see how to build a safe water tank for long term storage.
UV Light 101
Ultraviolet light emanates from the sun at all wavelengths. Fortunately, the harmful wavelengths are absorbed by the Earth’s ozone layer. Without the ozone layer, DNA in “all” organisms would be affected.
The wavelength of UV light is measured in nanometers (nm). A nanometer is one-billionth of a meter. The wavelength for UV light ranges between 400 nm and 100 nm. Across the UV spectrum, there are three basic levels indicated by the letters A, B, and C:
- UVA (320–400 nm): longest UV wavelengths; penetrates deepest into skin; used in blacklights and tanning lamps.
- UVB (280–320 nm): medium wavelengths; responsible for sunburn; partially absorbed by the ozone layer.
- UVC (100–280 nm): shortest and most energetic; germicidal; mostly absorbed by Earth’s atmosphere.
What’s worth noting is that the shorter the wavelength, the higher the energy. As for the visible spectrum, that ranges from 400 to 700nm and infrared goes from 700 to above 3,000 nm.
The Perfect UN NM Wavelength
The ideal UV wavelength for sterilizing water is 254 nm. That wavelength is lethal to the DNA structure of harmful microorganisms. But there’s a big note of caution. UV light at 254 nanometers can cause blindness, serious burns, and potentially damage human DNA. That’s why the UV sterilizer we’re going to build is totally enclosed. The UV light is contained and is shut off anytime the interior of the unit needs to be inspected or is not operating.
Timing
We’re going to install a valve on our UV sterilizer to control the flow rate of water passing under the ultraviolet lights. The ideal flow rate is 1 to 3 gallons per minute. This will ensure the water is exposed to the UV light for a sufficient time to sterilize it.
The Importance of Water Clarity
For a UV water sterilizer to be effective, the water must be clear. That’s why filtering is often the first step to remove any particles causing cloudiness. Any turbidity will diminish the UV effectiveness significantly.
To do this, you’ll need a water filter. Now, you have two options. You can buy one for hundreds of dollars, or you can build one yourself for a few bucks. If you follow this method, building your own filter will cost you x3 times less than buying one. All you need are some basic tools and a couple of materials you can find in any speciality store.
Click here if you want to see how to build a water filter in less than 3 hours.
Building a UV Water Sterilizer
MATERIALS:
- 2-foot x 4-foot sheet of plywood
- 2 – 8-foot 2×4’s
- 20 feet 1-inch diameter clear plastic hose
- Wood screws
- 20 1-inch clamps
- 1-inch diameter valve
- 36” x 60” sheet metal
- Rivets and rivet gun
- 3 – 254nm UV lights (mercury lights)
- Electrical connections for each light
INSTRUCTIONS:
- The Water Box
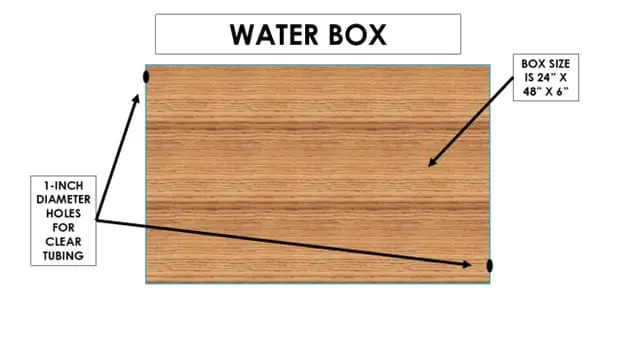
- Cut the 2×4’s to two 48-inch lengths and two 24-inch lengths.
- Cut a 90-degree angle on the corners.
- Attached the 2×4’s to the 2-foot by 4-foot sheet of plywood.
- Attach the 2×4’s to the perimeter of the plywood with wood screws.
- Drill a 1-inch diameter hole at the top side and opposite bottom side of the water box to allow the 1-inch tubing to slide in and out.
- Slide the tubing through the top side hole and the end through the bottom side hole so both are protruding from the box.
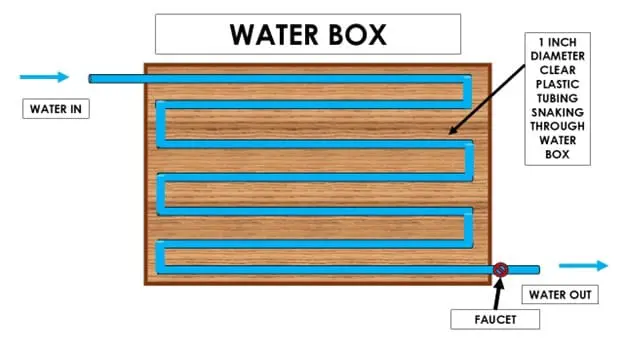
- Use the 1-inch C-clamps to attach the tubing to the bottom of the plywood, creating a snaking progression through the box.
- Attach the valve to one end of the tubing where the water will exit.
- The UV Light Box
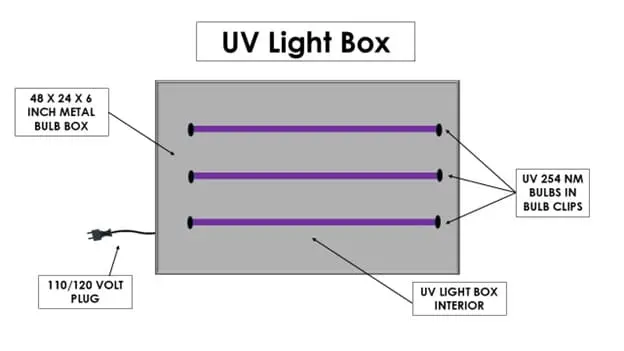
- Cut the corners of the sheet metal at a 45-degree angle, 6 inches long.
- Fold in the sides to create a box and rivet together. (Wear leather work gloves).
- Install the UV lights in the box equally spaced and parallel
- Drill a hole in the side of the light box and run the power cord to the UV light setup.
- Final Assembly
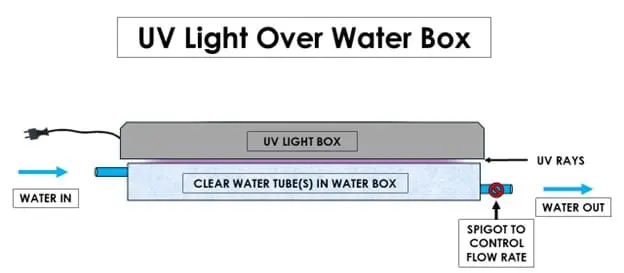
- Place the light box on top of the water box.
- Turn the UV lights on.
- Connect the water supply to the plastic tubing and adjust the flow rate on the spigot to 3 gallons per minute.
- Bottle and store the sterilized water.
Critical Steps
- Always make sure the water is filtered and clear.
- Test your purified water for pathogens to ensure you have 100% sterilized water.
- The average lifecycle of a 254nm UV bulb is one year of constant use. Even when the light appears to be as intense as it originally was, the UV wavelength could have diminished over time. Another reason to test the water from time to time.
- If the water does not test 100% sterile, decrease the flow rate so the water moves more slowly through the water box.
- NEVER look at or expose skin to the UV lights. Keep the box enclosed and always turn the UV lights off before lifting the light box lid. UV light at 254nm can cause blindness and burns.
Where to Locate Your UV Sterilizer
The whole setup is rather large, but you can always downsize it to fit a certain space. Some good locations include a basement, garage corner, or shed. You just want to make sure that kids and pets don’t get around it. In fact, some locking clamps attaching the light box to the water box might be a good idea
You may also like: 
How to Harvest 1000+ Gallons of Water from Your Roof
DIY $17 Hand Pump That Moves Water Without Electricity (Video)
8 Invisible Threats Hiding in Your Water Supply
Why You Should Add Alum Salt to Your Water
The Native American Way To Self-Water Your Backyard


I’m ready to go off grid as soon as possible