Quick question: what do you do if you don’t have electricity and need light? The answer: Not much…
Or you always work during the afternoon or night and the electricity bill is always high.
A lighting system will light up your home or be helpful in your garden. But the thing is, it is expensive and will drive your electricity consumption up.
This is why we decided to build a DIY Solar Powered Lamp for our next project. It is a perfect device to illuminate the area around you while keeping your electric bill down to a minimum.
Here’s How You Can Make Your Own DIY Solar Powered Lamp
Important Notes to Remember
First thing’s first: one thing you need to know is that if you’re not well-versed in electronics, it’s not easy to accomplish this project and you’ll need all the help you can get. This is why I employed the help of my dad to get this done.
However, if you know how to work with a soldering rod and can follow simple schematics and diagrams, then this should be a walk in the park for you.
So, without further ado, let’s proceed to the materials and tools you need for this project.
Materials Needed
- 1 x Bulb and Socket
- 2 x 1 m Speaker Wires of different colors
- Mason Jar (or any jar with cap)
- Slide Switch, Solar Panel, Solar Battery Charging Circuit or Module
- Glue Gun Stick
Tools Needed
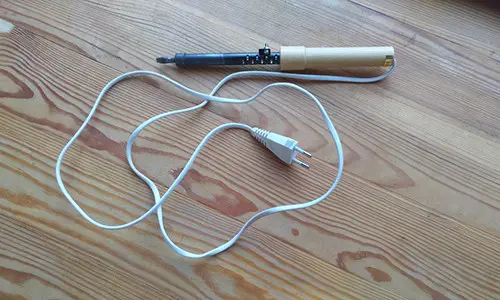
- Soldering Wire, Soldering Lead
- Hot Glue Gun, Drill (Optional, Pliers
Steps In Making A DIY Solar Powered Garden Lamp
This lamp we are about to make consists of three primary components: the charging circuit, the lighting assembly, and the switch circuit.
Now, let’s get down to business and actually make this.
Related: How To Change An Electrical Outlet
Preparing The Lighting Assembly
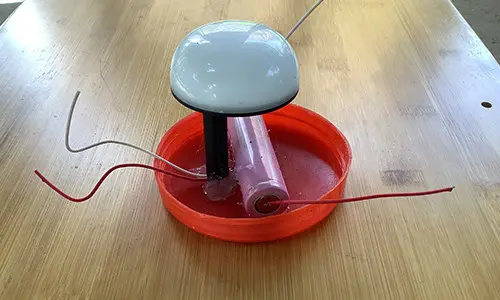
We found out that the easiest way to start this project is to start with the lighting assembly. We were feeling a little fancy so we opted for a 3D-printed led dome with a 2-inch stem so that the light source seems to be suspended in the middle of the jar.
However, a tiny 3V light bulb and a bulb socket will work just as well. To do this step, connect all the wires first in the socket’s positive and negative terminal.
Assign one color for each terminal to avoid confusion and remember to leave enough length to connect it to the circuit and the slide switch.
Afterward, apply a generous amount of hot glue at the base of the socket and simply stick it to the inside of your jar’s cap.
The next step would be to add the battery. Here’s the thing: we highly recommend getting a battery holder for this step. We would’ve used it on ours but it didn’t arrive together with the rest of the materials to we just had to make do without it.
Just like the bulb socket, simply apply a decent amount of hot glue at the base of the battery holder and stick it to the underside of the cap. Make sure that all the wires are connected to the right terminals before gluing the holder.
To test it out, pair up positive wires and the negative wires of the battery and the socket and the light should immediately turn on.
Connecting The Charging Circuit
The charging circuit is designed to control the amount of charge that the solar panel provides to the battery as well as to transfer that energy into the light bulb.
That said, you need to connect the light bulb, the battery holder, and the solar panel to the circuit board by means of soldering the wires to their designated spots.
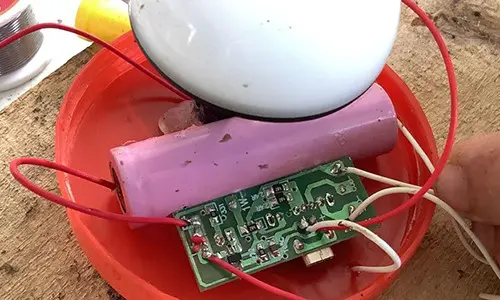
There are plenty of solar charging circuit boards available in the market and the one we used might be different from the one you bought. So, make sure that you read that you familiarize yourself with the circuit first, or better yet, ask for help from one that knows how to do it.
However, it should be indicated by general, easy-to-follow terms such as the following:
- S-: Solar Panel Negative
- S+: Solar Panel Positive
- L-: Lamp Negative
- L+: Lamp Positive
- B-: Battery Negative
- B+: Battery Positive
As the light bulb and the battery holder have already been fixed and won’t go anytime soon, let’s start with the solar panel first so it can follow suit.
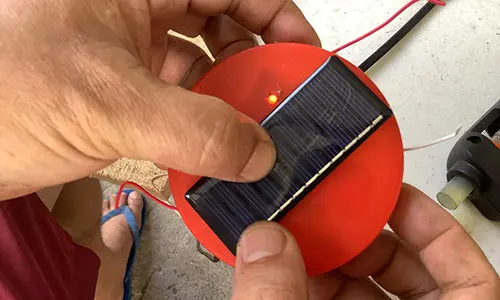
Flip the solar panel to its backside and you should see a positive and negative signs there. Next, make a hole through your cap so the wires can get inside the jar and reach the charging circuit.
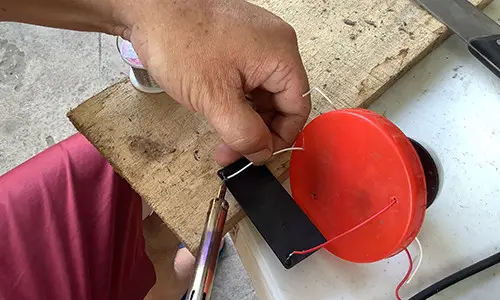
Now, solder the wires to the points reserved for the Solar Panel as indicated in your charging circuit.
If you’re charging controller comes with a led charging indicator, then it should turn on when exposed to sunlight. Now, cover the solar panel with your hand and see what happens: if the led indicator turns off, then congratulations because your lamp is now charging successfully. You can then proceed to permanently attach it to the top side of the cap.
Remember to make a hole for the led charging indicator so you can easily see it up top. Once you’re done with the solar panel, simply do the same step the battery connections.
Putting the Switch
There’s a reason why the lamp was left out of the preceding step. That’s because it requires a special step that you can’t afford to miss and that is the insertion of the switch somewhere in the middle of its positive wire. Here’s how you’ll do it:

First, cut off a piece of wire from the color you’ve assigned the positive connection to. Afterward, solder it to the circuit to the point that’s indicated as L+ or Lamp Positive.
Now for the switch, you may choose any kind of switch to use on this project but we highly recommend the slide switch thanks to its small, inconspicuous size.
To get it done, just affix the positive wire leading from the lamp to the middle pin. Afterward, attach the positive wire from the circuit board to any of the outside pins.
The side with the blank pin will be the OFF switch while the side which pins that were occupied with the positive wires will be the ON switch.
Once you’ve finished it, simply make a hole through the cap and stick the switch right through. Lock it in place using hot glue.

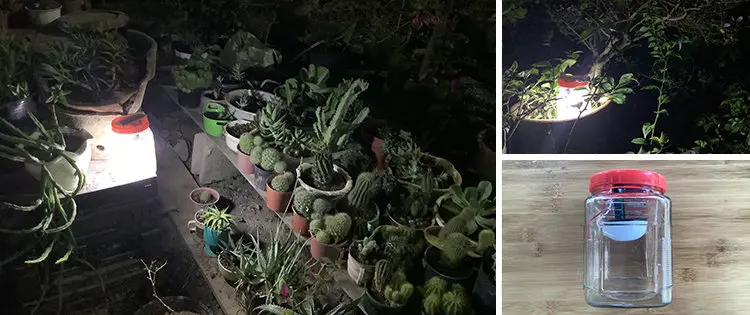
Finished Product
After you’ve finished putting everything together, turn the switch ON and see what happens. If you followed everything correctly, then your bulb should light up without any problems.
Now, all that’s left to be done is to find the right spot in your house for your DIY Solar Lamp to shine its light on.
You may also like:

Arizona Farmer Accidentally Discovers Trick To Turn Air Into Water (Video)
DIY Cheap & Portable Washing Machine
Backyard Projects That Might Get You Arrested
How To Live Next To A Neighbor Who Doesn’t Share Your Political Views


I like small potable solar charged lights, but there are plenty of reliable and inexpensive solar lights available on the open market. This might make a good “science project” learning experience, but I would prefer to buy ones that work than try to make them myself on a trial-and-error basis.
Yes, I agree. But doing this project opens up plenty of other opportunities for Solar Powered Projects. This got me thinking of getting a 3D printer to create more shapes and designs. What do you think?