Being able to repair your own home is important. But I’ll have to say; the ability to make them in the midst of a disaster is even more so. It’s not unusual for homes to be damaged in the midst of a disaster, and if we don’t know what we’re doing, making repairs to that damage can be quite costly.
But as we know, not all damage is due to disasters. The day to day use of our homes can wear things out and force us to make repairs. For most, that’s costly, as they have to call in specialists to do the work. However, there is very little that you can’t repair on your own home, if you know how. Learning how to make these repairs can not only save you a bundle of money, but can also make your home safer, as you won’t be waiting to make all those repairs, leaving your home in a less than safe condition.
One such area is electrical repairs. Few of us do those ourselves, preferring to leave that sort of work to an electrician. But since electricians are costly, we try to avoid hiring them. So what ends up happening, is that we let the need for those repairs wait until we have some more important need to call an electrician. For some, that day never comes.
But poor electrical connections are a very real danger, one that causes 13% of home fires and 18% of civilian deaths by fire. This is nearly 50,000 home fires per year, many of which can be attributed to faulty connections caused by worn out electrical outlets.
The truly sad part of this is that it’s not all that hard to change out an electrical outlet, protecting your family from such a happenstance. When should you do that? Whenever you encounter a loose electrical outlet (one which the plugs are loose in), one that sparks when you connect or disconnect from it, one that gets hot, or one where there is carbonization (black) around the holes in the outlet.
Safety First
If you’re going to work on your home’s electrical systems, you have to put safety first. Electrical shocks can be serious and you can get some really serious shocks from your home’s wiring.
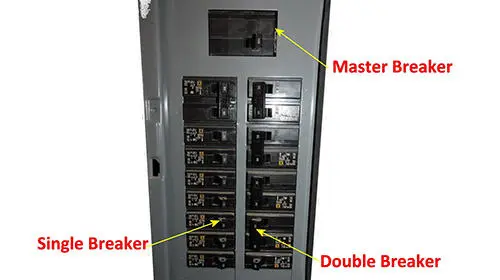
The first thing to do is to shut off the appropriate breaker in your home’s breaker box. You will find that there are two types of breakers in there. The more common type takes up only one space. These are used for your home’s electrical outlets and wiring. Up near the top, there will be another type, which uses up two spaces. These are used for the HVAC, hot water heater and stove. Some homes may have one additional large breaker at the top of the panel, which shuts off the whole house; but these re rather rare.
Theoretically, there should be a label inside the door of the breaker box, showing which breakers are used for what; but those labels are rarely marked. Rather what you’ll have to do is to plug something in, like a light, and have someone else watch it, while you turn off the breakers one at a time, finding the one that will cause the light to go out. While you’re at this, you might want to take the time to fill out that label.
If you have a multi-meter or outlet checker available, verify that your electrical outlet is dead before proceeding. If not, try plugging a light or hair drying into the outlet to check it.
With the breaker off, it should be safe to touch the wiring in that room, without risk of electrical shock. However, just to be sure, it’s a good idea to use only tools with rubber handles, so that if the power is not off, you will be protected from shock.
Remove the Old Outlet
Before putting the new outlet in, we obviously have to remove the old one. Before that, we need to remove the cover plate, which is held in place by one screw, right in the center. Try to make sure you don’t lose that screw, as you’ll need it for reattaching the cover plate on the new outlet.
The working part of the electrical outlet is held in place with two screws; one at the top and the other at the bottom. Those screws are captive, so you shouldn’t lose them. Pull the outlet out as far as the wires allow. You will feel considerable resistance to pulling it out; that’s okay.
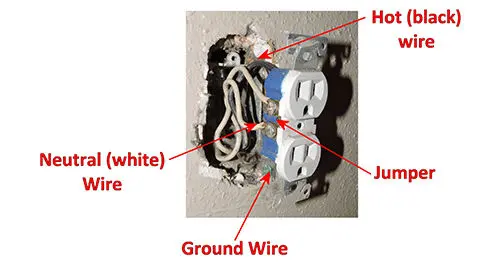
In most cases, there will be three wires attached to the outlet; a black one, a white one and one without insulation on it. They may be wrapped around a screw or pushed straight into a hole in the back of the outlet. You’ll need to disconnect all three. For wires attached to screws, just loosen the screws. For those pushed into the back of the outlet, push a small screwdriver into the rectangular slot, next to the hole the wire is going into. This will release the grip on the wire, allowing you to pull it out.
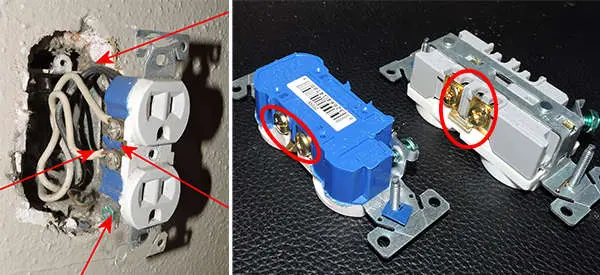
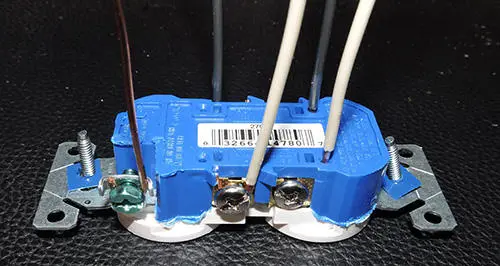
You may encounter a situation where you have more than three wires attaching to the outlet. In that case, you’ll probably have two white wires and two black wires, as in the picture of the outlet in the wall above. This is done if one of the outlets is switched (turns on and off with a light switch on the wall) or where the outlet is being used as a junction, with the extra set of wires going on to another outlet.
In the case where one of the outlets is switched, you need to keep track of which set of wires is attached to the upper outlet and which is attached to the lower outlet. Wrapping a piece of tape around the wires, before disconnecting them, will suffice for identifying one pair of these wires.
Connect the New Outlet
Shown below are the back sides of two new outlets: a residential one (blue) and a commercial one (grey). They are essentially the same, with the exception that the commercial one is heavier duty than the residential one. It is also more expensive. You can use either in your home.
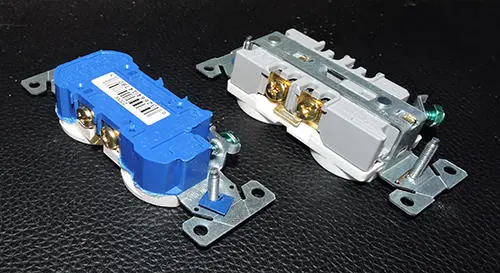
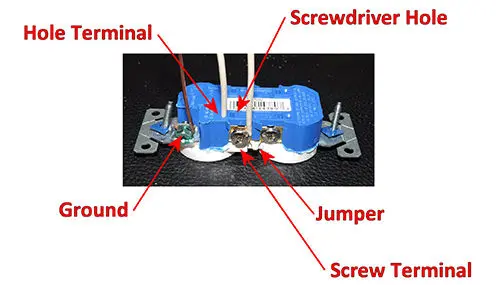
Both of these outlets provide the same connections, allowing you to wrap the wire around the screw post or push it into a hole. In the case of the commercial outlet, there are more holes available for the wire to be pushed into, but there is no slot for releasing the wire once it is in. Rather, the same screw that needs to be tightened if the wire is being wrapped around the screw will have to be tightened to capture the wire in the holes.
In both cases, there is a gauge molded into the plastic housing, showing you how much wire to strip off, if you are going to have to cut your wire off and strip a new end. This should not be necessary, if the wires are still in good shape. However, if the insulation around the wires is blackened or the wires themselves are brittle, you may need to cut off the existing ends and strip the insulation back for new ends.
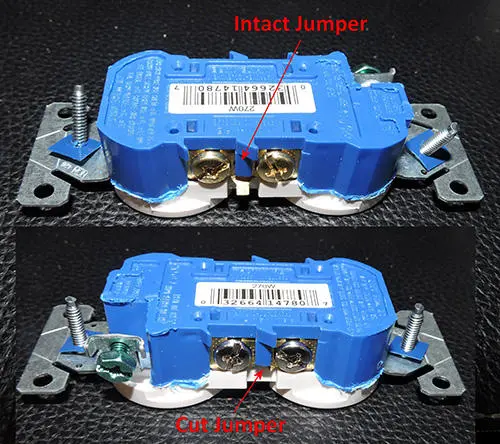
Before attaching the wires to the new outlet, check the old one, looking to see if the jumper connecting the two screw contacts on each side has been broken. This is done when one of the outlets is being used as a switched outlet. If that is the case, you will need to break or cut the jumper. This can be done with diagonal cutters or needle nose pliers.
Attach the wires to the new outlet, so that the black wires (hot wires) are attached to the brass-colored screws and the white wires (neutral wires) are attached to the silver-colored screws. The bare wire should be attached to the green screw in the corner of the outlet. This is the ground wire. Make sure that you orient the outlet so that the ground will be at the bottom when the outlet is installed.
It doesn’t matter if you use the holes in the back of the outlet to connect the wires or wrap them around the screws; both will provide you with an adequate connection that meets code and is secure. However, if you are reusing the wire ends and those ends are already curved from being wrapped around the screw, there’s no way you can put them into the holes.
Double check that all the wires are secure. Tighten all the screws, even if there is nothing attached to them.
Finishing up the Job
Push the outlet into the electrical box. This may be difficult, as the wires in the box won’t want to cooperate. Just let them know that you’re the boss.
Tighten the two captive screws for the outlet, one at the top and one at the bottom. Run these screws into the holes in the box, tightening them snug, but don’t overtighten.
Reinstall the cover plate over the new outlet or install a new cover plate.
Turn the breaker back on and test your electrical outlet to see that it works properly. If one of the outlets was switched, be sure to check that the switching function works on your new outlet.
You may also like:
 How to Build Your Own Wall Hanging Can Rotator
Woman With MS Survives in the Wild With Just a Knife and the Plants She Found (Video)
What Foods Can You Bury Underground For Winter?
Urbanites Moving To Rural Paradise Ruining It For The Locals
How To Make A Mini Root Cellar In Your Backyard In Less Than Two Hours


I couldn’t see the difference between an intact jumper and a cut jumper and I don’t understand what the jumper does.
As an electrician, I would like to interject with an alternate method that will prove easier and more reliable. never use the device as a feed-through method it shows two wires connected to the receptacle I have had the jumper break on the receptacle causing loss of power to the remaining circuit. Now what is the better method? Twisting the wires together for both, the hot set is usually black together with an ideal finished length of around three eights in length. doing the same for the neutral wires, usually white or grey. then attach pigtails to the receptacle ensuring the wire is put clockwise around the screw. Never use the poke in connection. these wires must be six inches long. wrap the stripped end around the twisted pair and use a wire nut of the proper size. The package will tell you the wire size and how many to safely use. then tuck the wires into the box. I use the handle of my screwdriver to provide leverage and not damage the insulation. the proper length for wires that stick out of a box is six inches. never cut them shorter than this. if you have more than two sets of wires in a box then determine which is the set of wires the power coming into the box is. twist the other sets together and the power wires that supply the box are connected last. then connect the device with wire pigtails. This method will give you secure connections that will not overheat with a maximum load. I use this method because the use of devices like hair dryers use a lot of current. devices wired using the quick stab-in method will arc inside the receptacle and cause a loss of power. I have seen them heat up and even melt. My method may seem harder but it will help keep you safe. Always do the job as if you want it to last a century.——- I, Grampa