
If you’ve ever come home from vacation to a house full of dried-out plants or realized too late that you forgot to water something, you’re not alone. Even the most diligent gardeners forget to water their plants sometimes – but keeping them in a self-watering container can help! Here’s how to make a self-watering planter from a water bottle.
There are hundreds of self-watering planters on the market, many of which are very expensive and complicated. But you don’t need to spend a fortune just to make sure your plants can survive a few days without intervention. In just a few minutes, you can make a simple DIY version at home!
How Do Self-Watering Planters Work?
Despite the name, a self-watering planter doesn’t water itself. But it will provide consistent moisture to your plants with less watering on your part!
There are many different styles of this type of planter, but they all work the same way: a reservoir on the bottom is filled with water, which gets wicked up into the planting container over time and delivered directly to your plant’s roots.
Advantages Of Self-Watering Containers For Plants
Self-watering containers make it easier to grow almost any potted plant. Instead of having to check your water levels daily, you simply fill up the reservoir so the plant can take what it needs when it needs it!
Self-watering planters have 3 main benefits compared to traditional garden pots:
- Consistent Moisture Levels and Less Frequent Watering
By keeping the reservoir filled, you can ensure that your plants always have access to water, even when you forget them for a few days.
- More Efficient Water Usage
When you water plants from above, you lose a lot to evaporation or spillage. But when you keep the water in an enclosed reservoir, you don’t waste any of it.
- Prevents Diseases
Many plants are prone to fungal or bacterial disease, especially when water gets on their leaves. By watering from below instead of above, you can minimize those risks!
The Best Plants For A Self-Watering Pot
Self-watering containers are great for plants that like consistent moisture at the roots, like tomatoes, basil, and peppers.
Note: Some plants do better when they are allowed to dry out between waterings – like rosemary, cactus, or succulents. These types of dry-weather plants are not good candidates for a self-watering system.
How To Make A DIY Self-Watering Container From A Water Cooler Bottle
With this DIY self-watering container (made from a water cooler jug!), you’ll never come home from vacation to crispy houseplants again.
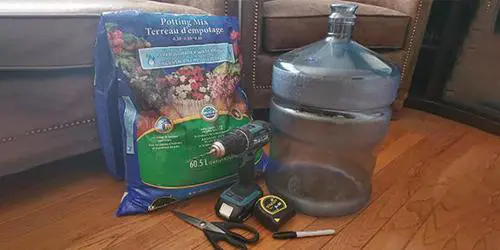
To make this planter, you will need:
- An empty water cooler jug
- Scissors or a sharp knife
- Measuring Tape
- A pen
- A drill
- Potting mix
Assembly
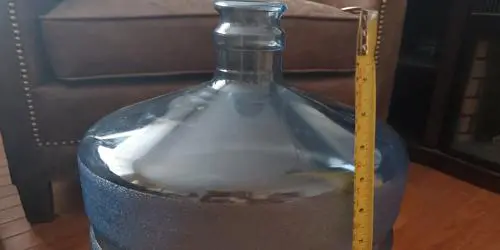
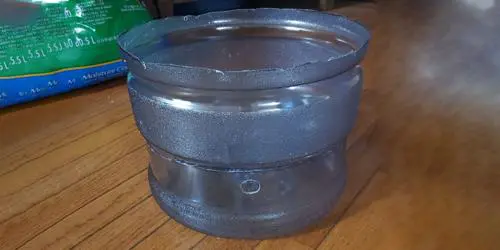
Start with a clean, empty water cooler jug. Measure the distance between the top of the spout to the point where the slope meets the straight side. This will be the height of your reservoir.
Measure that same distance up from the bottom of the water jug and mark your line all the way around. If the water bottle you’re using has a handle, mark another line just above it.
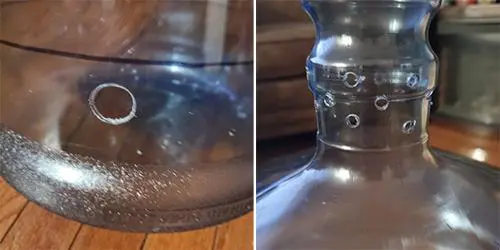
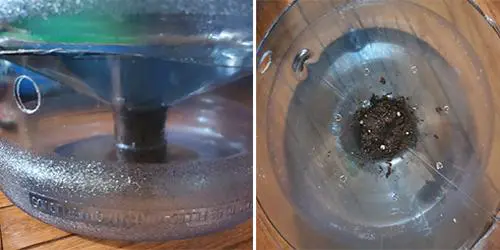
Drill or cut a hole ⅔ of the way up the bottom section for overflow and to give yourself a place to add more water later on.
Related: Gardening Myths That Are Actually True
Drill a few holes along the slope and spout of the water bottle for drainage and aeration.
Using a sharp pair of scissors or a knife, carefully cut along the line or lines you drew. If your bottle has a handle, you will have to cut that section out entirely for this project to work.
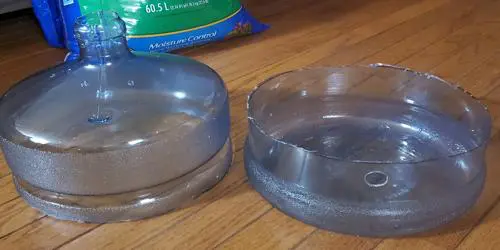
Flip the spout half upside down into the reservoir and double-check that the spout is laying flush against the bottom and your planter section is resting firmly in place. If things aren’t fitting together, use your scissors to shave off a small section of the spout at a time until it does. If you accidentally take off too much, you can use a small terracotta tray to raise the floor in your reservoir.
With the top half in place, pack the spout of your water cooler bottle with moist potting mix. You want to pat it down so it’s solid in the bottom, so the soil doesn’t leak out into your reservoir.
Related: Read This Before Starting An Indoor Garden
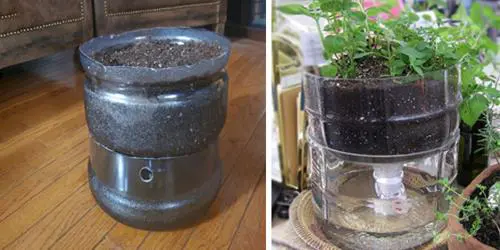
After the spout is packed in, fill the rest of your planter with potting mix, and add your chosen plant. Water everything from the top to settle your soil, until water starts draining into the reservoir. This is the only time you’ll have to add water from the top.
Wait a few minutes. Once the water has stopped filtering through to the bottom, you can top up the reservoir through the overflow hole.
How To Use A Self-Watering Planter Garden Pot
Self-watering planters are a great option for forgetful or busy gardeners! But they are not completely hands-off and do require a small amount of maintenance and care.
To get the most out of your new planter, keep an eye on the water level in the reservoir, and don’t let it dry out. If it does dry out, you’ll want to water everything from the top to make sure your soil is evenly moist before filling the reservoir again. Dry potting soil won’t be able to pull the water up to deliver it to your plants, so even if the reservoir is full your plants won’t be getting the moisture they need!
If you’re keeping your new planter outside, stay mindful of the weather. If water freezes inside the reservoir, the bottle might crack and start leaking, so you’ll want to move it indoors or drain it before then. It’s also a good idea to clean your planter out at the end of each season, to prevent roots from blocking the drainage holes and wicking section.
You may also like:
Homesteading After 60: What You Need To Know
Similar to Morphine: The Best Natural Painkiller that Grows in Your Backyard (Video)
How to Build a Smokehouse In Your Backyard (with Pictures)


Is that a piece of cloth (the white stuff) hanging out of the spout of the planter?