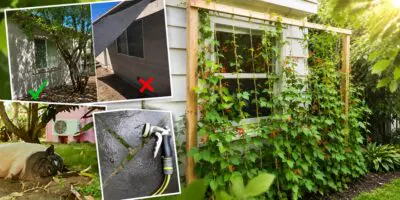
Since we need electricity for the water supply in our homes, if there was a power outage, we would have no way of transporting water. Therefore, it is important to make sure you are adequately prepared in case of a storm, hurricane, or any other disaster. Additionally, excess water due to floods, melting snow, or rain will damage your basement if you are unable to drain it. A very effective way to prepare is by constructing a water pump in your backyard. Here is a step-by-step guide on how to do so.
How to Build a PVC Hand Pump
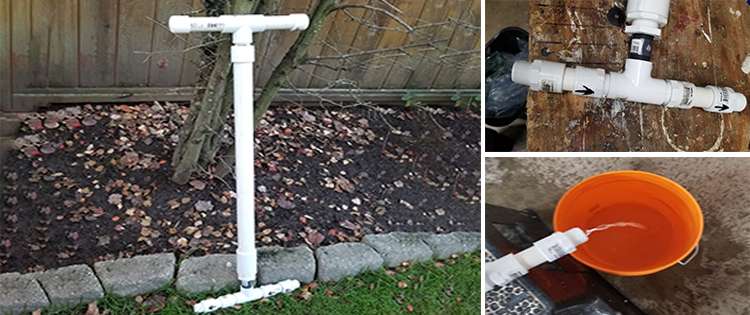
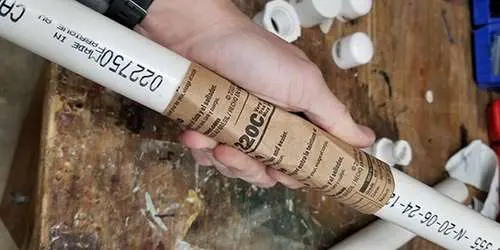
A PVC hand pump is simple to build but very useful. You may have the parts available in your home; if not, you can purchase them online, or from a hardware store. The pump consists of two parts, the pump, and the check valves.
The Pump
Suction is created with two pieces of PVC pipe. Join them together by inserting one inside the other.
Check Valves
The check valves are responsible for the water flow, you can position them in any direction. Attaching a hose or other pipe is simplified with a ¾” NPT thread.
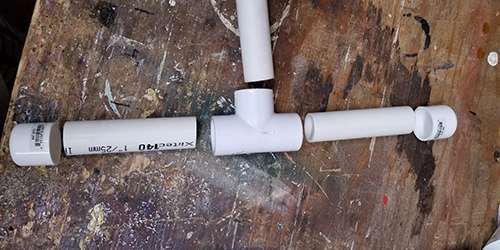
Putting the Pump Together
A helpful word of advice before you get started is to put the pump together without gluing it to make sure it works properly. Once you are satisfied, you can take it apart and rebuild it using glue.
In the photos, you will notice that I didn’t use any thread tape or PVC cement. However, I suggest that you use them both.
The first step is to cover the construction of the check valves because this is the most important part of the entire system.
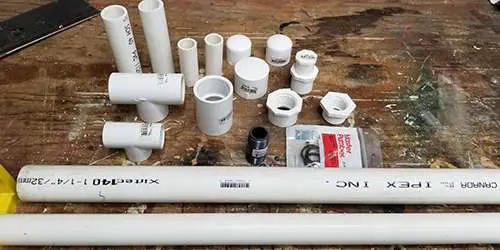
You will need several tools to build your water pump, they are as follows:
Tools
- Tape measure
- Petroleum jelly
- Sandpaper
- Files and handsaw
- PVC cement
- A hand drill or drill press
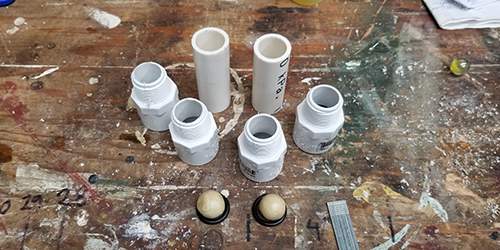
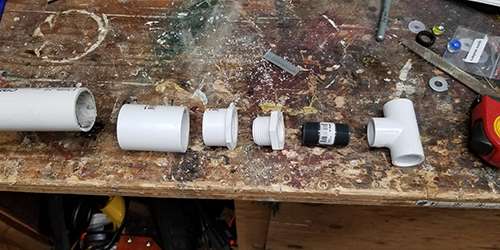
Check Valve Parts
- 4 – ¾” slip on to ¾” MNPT PVC fittings
- 2 – pieces of ¾” PVC pipe cut to 2 ½”
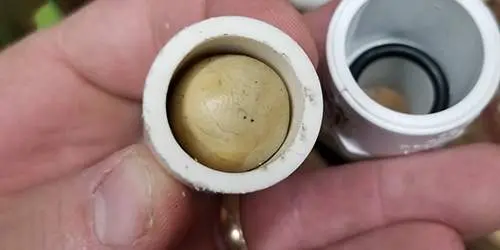
- 2 – washers or O-rings that will fit inside the fittings
- 2 – acrylic or rubber balls about ¾” in diameter (they should fit in the pipe with just enough room for water to get around it, but not enough room for the ball to fall through the fitting or past the washer).
- 2 – Brad nails or other stiff thin metal
How to Build the Check Valve
#Step 1: Make sure the washer or O-ring fits inside a fitting.
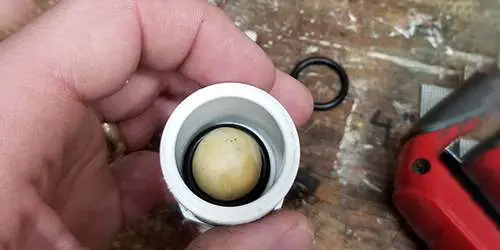
#Step 2: Check that the ball forms a good seal by nesting it with the washer. The O-ring provides extra protection, and the ball prevents the backflow of water through the fitting.
#Step 3: Measure the width of the fitting and put the O-ring and ball into the fitting.
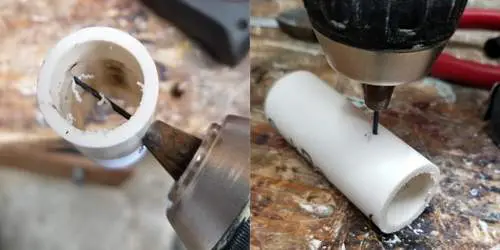
#Step 4: Measure the distance between the top of the ball and the end of the fitting. Subtract the measurements in steps 3 and 4.
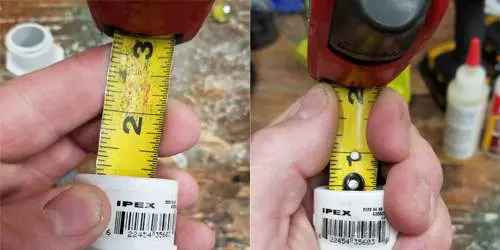
#Step 5: Drill a small hole in the pipe using the measurement from the answer in step 4, plus an eighth of an inch.
#Step 6: Push a brad nail through the hole and use pliers to snip the end.

#Step 7: Put together one end of the check valve by inserting the ball into the pipe, and the washer into the fitting. Make sure the check valve is working by blowing through the pipe, you shouldn’t feel any air released.
#Step 8: Blow air through the fitting, you should feel it come through the pipe.
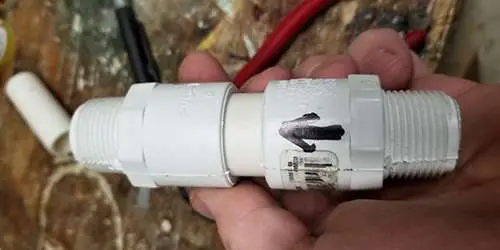
#Step 9: Join the pipe and the fitting together. Highlight the direction of the water flow by drawing an arrow onto the fitting.
Pump Body Parts
- 1 – 24” piece of 1¼” SCH40 PVC Pipe
- 1 – 26” piece of 1” SCH40 PVC Pipe
- 2 – 4” pieces of 1” SCH40 PVC Pipe
- 1 – 1¼” PVC slip-on coupling
- 1 – 1¼” PVC slip-on cap
- 1 – 1¼” to ¾” PVC FNPT fitting (This fitting was not available in my local hardware store so I used a 1 ¼” to 1” FNPT and a 1” MNPT to ¾” FNPT fittings to do the same job)
- 1 – ¾” FNPT x ¾” FNPT x ¾” FNPT PVC Tee
- 1 – ¾” NPTPVC coupling
- 1 – 1” PVC Plug
- 1 – 1” PVC slip-on tee
- 2 – 1” PVC slip-on caps
- 2 – Washers that fit on 1” pipe tightly
How to Build the Pump Body
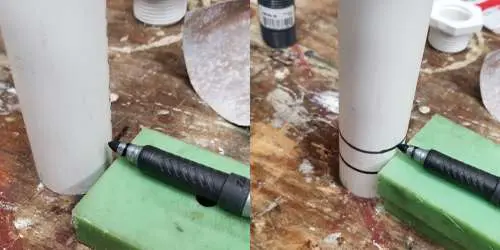
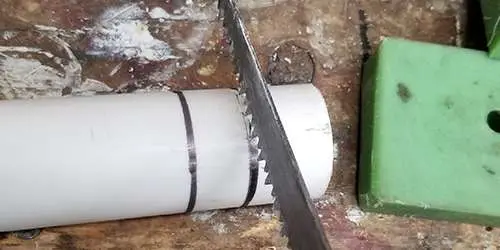
#Step 1: Smooth out the 1” pipe by sanding it down, for the O-ring grooves, layout two lines. The measurements for the spacing should be around ¾” to 1”.
#Step 2: Use a pen to line the position of the O-rings, cut along these lines, and file them down. You can simplify the process by building a jig using a table saw. There should be enough space in the grooves so that the O-rings make a strong seal for the pipes at the same time as making movement easy.
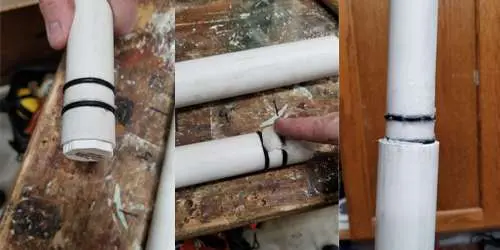
#Step 3: Place the O-rings onto the pipes, lubricate the 1” PVC with petroleum jelly and check that it fits onto the pipe. If so, position the 1” plug into the O-rings end closet.
#Step 4: Create a tee handle by Installing the 1” slip-on tee onto the end of the 1” pipe and slide the two 4” pieces of the pipe into the open ends of the tee. Use the 1” slip-on caps to cap the ends of the line.
#Step 5: Join the 1 ¼” slip-on coupling to one end of the pipe as well we the 1 ¼” to ¾” FNPT fitting.
#Step 6: Attach the 3/4 “ NPT coupling into the pump body with the ¾” FNPT x ¾” FNPT X ¾” FNPT tee using a screwdriver.
#Step 7: Drill a hole using a 1 3/8” bit in the 1 ¼” slip on cap, it should be big enough so that the 1” pipe can slip through easily.
#Step 8: Oil the O-rings with petroleum jelly and slide the 1” pipe into the pump body.
#Step 9: Connect the check valves according to the direction you want the water to flow.
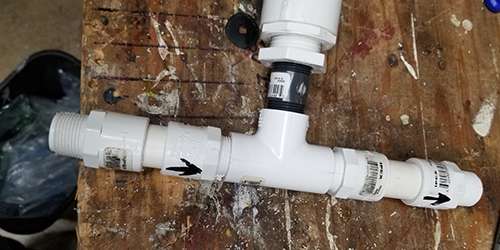
#Step 10: Connect the piping or hosing to the ends of the check valves that have been threaded.
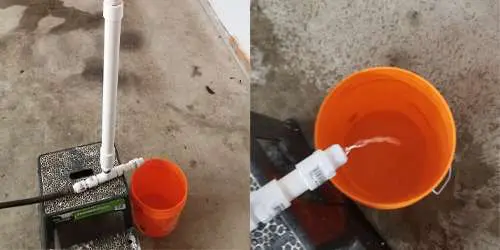
#Step 11: The pump is now ready to use.
Final Thought
Now that you have a complete guide on how to build a water pump in your backyard, take action now and put one together because you never know when disaster may strike.
You may also like:
36 PVC DIY Projects for Your Homestead
What Really Happens When You Bury A Shipping Container (Video)
Do You Have An Escape Plan For Your House?
Is It Legal To Harvest Rainwater In Your State?
How to Build a Water Purification System in 10 Minutes


Forgive my ignorance. What does the hose hook up to?
I have a well on my property. Do I hook the hose directly to the well? Or do I need some other source?
You can connect additional lengths of PVC pipe that could extend down to the level of the water in your well. I personally would not rely on this particular idea to pump water from my well. First, it’s made from PVC which is a plastic and could break under extended and or vigorous use. Secondly; while possible, it could be quite laborious to use this to pump water out of your well. Take into consideration how deep your well is and think about how much work it will take to pump that water up. 1 gallon of water weighs (I believe) just shy of 9 pounds. I’m afraid a pump made from plastic (especially the handle) won’t hold up long to the kind of force needed to pump water out of your well. This would work okay for a rain barrel and occasional use but I’d go for something more robust if you want an off grid long term option. If this is a concern for you I’d do some research and put a plan in place. Maybe find a good durable option, save up and permanently install it on your well to work separate from and along side your electric well pump. Good luck.
I am like the previous person and don’t know what to hook the pump up to. Unlike her, I am in a small town, but on city-provided water. How would I access that source of water for my pump?
I live in a city. Are you saying we can tap into our city water supply? Water pressure inside the house: Would having a hand pump in my yard affect this? Are there permission issues to check on for city water pipes? What is a good source for researching these questions?
I’m afraid it would be quite complicated to hook this to a city water source and could be prohibited by the city anyway. That is unless we are considering a major event such as a grid down scenario. In any case, it just isn’t feasible to rely on a municipal source for emergency water. If the power grid goes down or something happens to the water plant then there will be no water to pump or the water could be unsafe to drink/use (has your town ever issued a boil water advisory?). Your best option is to collect and store rain water in rain barrels or other potable water container (if not prohibited by your state or local governments). Any water you collect from any source (during an emergency) should be filtered, boiled or treated to ensure it is safe to drink. There are many filtration systems on the market that use a pump/filter combo to collect water qnd make it safe to drink. Katadyne and Berkey are two that come to mind but there are many out there. Also, think of other possible sources of water near you. Are there any lakes, ponds or streams near your house? Again, all water collected during some type of “event” should be considered unsafe to drink until properly treated. In the end, while this PVC pump is a neat idea and will work to a degree but it is not a durable option should you need to use it for a long period of time. Hooked to a rain barrel and used occasionally? Yep, it would work fine. Hope this helps.
Thank you for your response!! That was so nice of you! You saved us all a lot of time, money, and headache with your information and opinion. Blessings
its sounds silly but getting the perfect size & type of ball seems hard LOL