Roughly two-thirds of US families have one or more dogs. Most allow their dogs in the house, but there are some families who keep their dogs outdoors. But even families who have their dogs living in the home need to leave them outdoors from time to time, close to some dog-friendly plants. Sometimes that ends up being the wrong time, and the dog gets caught outdoors in bad weather. Here’s how to make a DIY winter doghouse.
Granted, some dogs love the outdoors and their coats help keep them warm when the weather starts getting chilly. Even so, sometimes the temperature drops faster than we expect, leaving our furry friends and guardians stranded and cold. It would be nice for them to have someplace to go into, just to keep warm.
How To Build a DIY Winter Doghouse
There are a few basic things to do, as part of making a good DIY winter doghouse that will keep your friend warm, those times when they have to be outdoors and need a safe refuge.
- Insulate it – Most doghouses are simple wood walls, without any insulation. Even adding one inch of Styrofoam insulation can do wonders in keeping your dog warm. We’re going to add two layers of ¾” thick insulation, giving a total R-value of 7.5. That’s not as good as a house, but a whole lot better than windows and doors.
- Put in an insulated floor – Getting ‘Fido’ up off the ground can make a huge difference, as the ground is often colder than the ambient air. Since you’re going to put in a floor anyway, why not insulate that floor?
- Make two rooms – This is the one hardly anyone thinks about. If you make a two-room doghouse, with an entry room and a bedroom, arranged so that the doorway to the bedroom is 90 degrees from the entry door, your dog will be a whole lot warmer. Any wind coming in the front door won’t be able to just go directly into their sleeping room.
- Make a hinged roof – When your pet is in their home, comfy and warm, they might not be all that willing to come out. Making the roof hinged, so that you can lift it up, makes it possible for you to get to your dog, even if they’re not in a hurry to come out. Of course, if that doghouse is kept on the back porch, instead of out in the yard, you can use a flat roof, which is a whole lot easier to hinge.
Related: How To Build Your Own Wall Hanging Can Rotator
The Start (The Foundation)
Start building your dog’s house by constructing a sturdy frame. You’ll add the siding and insulation later. Decide how big to make it based on your dog’s size.
Measure your dog’s length and standing height to determine the dimensions. Make the bedroom roughly square, with each wall as long as your dog is lying down. Remember to account for the ½” thick OSB (oriented strand board) layer you’ll add to the inside walls. Build the framework slightly larger to fit this layer. Ensure the doghouse is at least four inches taller than the doorway for enough headroom.
Design the entry room like a hallway—just wide enough for your dog to enter comfortably. If it’s too narrow, your dog might hesitate to use it. Making the entry room about half the width of the bedroom usually works well.
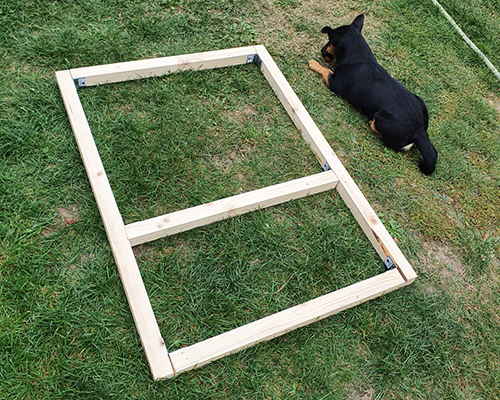
To make the frame, use 2”x 2” dimensional lumber. The basic idea is a box, with a patrician to divide it into the two rooms. So start out by making the outline of the floor, using the dimension you measured for your door laying down, plus one inch, for the bedroom, and the width you need for the door for the other room. You’ll actually need three identical pieces, one for the bottom, one for the top, and one for the lid.
Related: If You Have Pets, Get Rid Of These Plants Immediately!
Use metal angle brackets on the inside corners to easily connect the pieces. As shown in the photo, this method works better than gluing and nailing because end grain doesn’t hold glue well. Joints with end grain often fail when glued or nailed.
Avoid using screws, as their threads tear the wood grain, which can weaken the joint over time. Instead, choose inexpensive metal angle brackets for strong, durable connections. These brackets help your pet’s house last longer.
After assembling the top and bottom, cut six identical 2”x 2” pieces for the vertical frame. Place these pieces at the four corners and at both ends of the dividing wall. Frame the doorway in the dividing wall by adding one more vertical piece and a horizontal beam across the top of the door frame. As shown in the picture, leave several inches of space above the doorway.
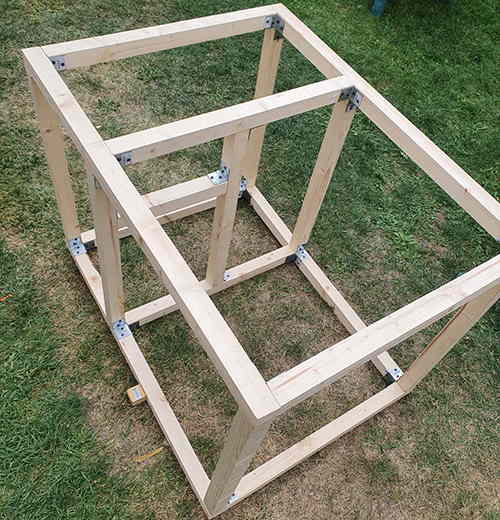
The Flooring And Insulation For Winter
Install the flooring and insulation once the frame is ready. Cut a piece of OSB large enough to cover the entire bottom of the frame, reaching all the edges. Secure it to the bottom using glue and nails or screws. Align the corners carefully, as this piece will keep the DIY winter doghouse square.
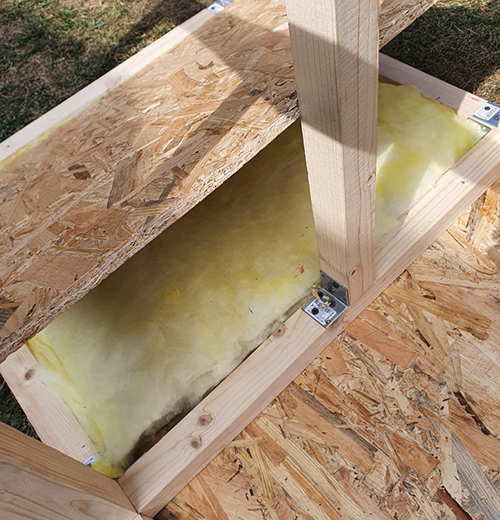
Flip the doghouse over, so it rests on the bottom piece. Cut fiberglass batts or Styrofoam sheets to fit snugly inside the floor. Place the insulation, then cover it with another layer of OSB. Notch the top OSB layer to fit between the vertical structural elements.
The Walls Of The Winter Doghouse
With the floor in place, the interior walls can be added. Notice in the photo below, that the piece of OSB being used for the wall is notched to go around the horizontal structural elements. It only goes halfway across the vertical elements, leaving wood for the other panel to attach to as well.
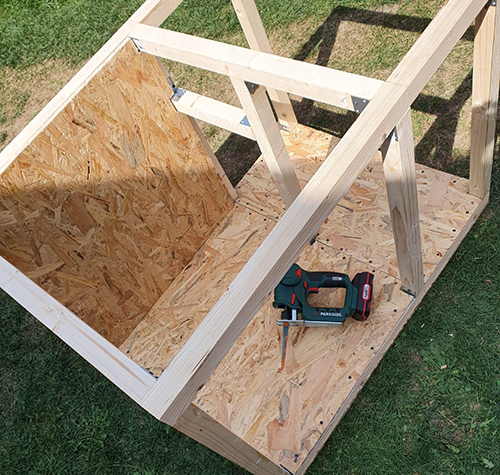
Finish covering the interior of the doghouse by attaching OSB to all the walls. Notice in the picture below a 2”x 2” block nailed above the flooring on the left side (the wall the dog leans against).
Add these blocks where needed. In this case, the block was necessary because the floor covered the frame element, leaving no place to secure the interior wall. Install similar blocks around the base, except for the doorway area.
Related: 10 Medicinal Seeds You Should Start This Winter
Notice in the photo that only the end piece (next to the dog) connects to the vertical corner brace. The wall the dog leans against does not attach, but this isn’t an issue.
Attach the OSB panel at the top and bottom. The DIY winter doghouse doesn’t require the full structural strength of a home. Your dog won’t push this wall down or hang anything heavy on it. As long as the board stays stable, it works just fine.
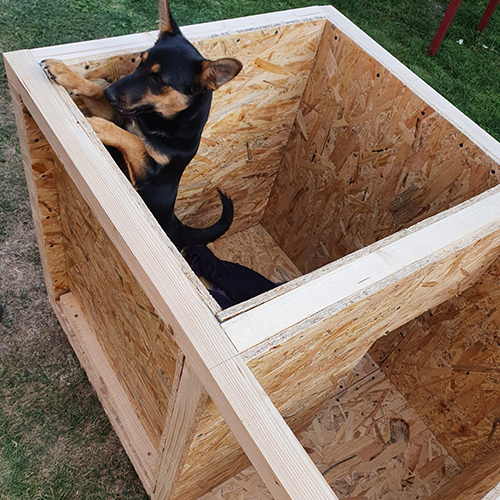
With the interior walls in place, it’s time to install the insulation and put the siding on the house. The same fiberglass batts or Styrofoam sheets that were used on the floor can be used on the exterior walls. Glue or staple them in place, so that they are not a problem as the siding is installed.
Related: What Should I Feed My Chickens In Winter?
You have several options for exterior siding. In this example, we used leftover beaded planking from another project. This material would normally be an expensive choice for a winter doghouse, but it worked perfectly as surplus.
For a more budget-friendly option, consider T-111 siding. It’s one of the least expensive siding materials available and works well for this purpose.
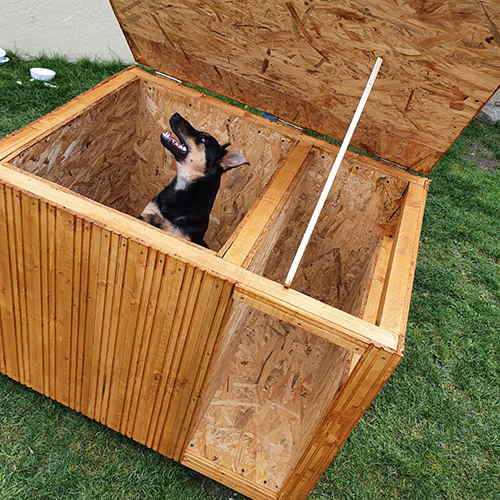
Finish the doghouse by building the top. Use the third frame for this, following the same process as the rest of the DIY winter doghouse. Start by attaching a piece of OSB to the inside and squaring up the frame. Ensure it aligns properly with the doghouse before fastening everything securely. Add the insulation next, and then attach the exterior siding to complete the top.
Attach the top to the doghouse with hinges. This lets you lift it to access the inside or clean the doghouse easily. For convenience, add a handle to the front to lift the lid more easily. While we skipped this step, you could install a prop rod to hold the lid open. However, make sure it’s stable since a falling rod could scare the dog.
Related: What The Pioneers Did To Survive Harsh Winters
DIY Winter Doghouse – Final Thoughts
Your finished DIY winter doghouse is best sitting in the corner of the patio, where it has some protection from the weather. That will help keep it from getting cold inside, as well as protect the wood from damage.
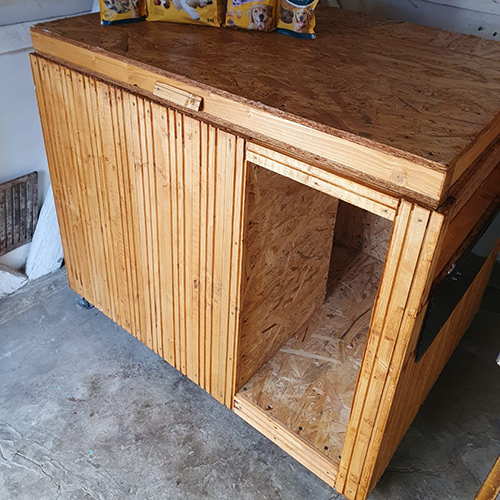
A DIY winter doghouse is essential, even for dogs that live indoors. Building one provides a warm, safe space for your dog when they’re outside. Make it insulated to shield them from the cold. This ensures your furry friend stays comfortable while waiting for you. When built correctly, the dog’s body heat will naturally warm the interior, creating a cozy shelter.
You may also like:
 The One Tree That Every Homesteader Should Plant
Easy to Build Root Cellar in Your Own Back Yard (Video)
How To Change An Electrical Outlet

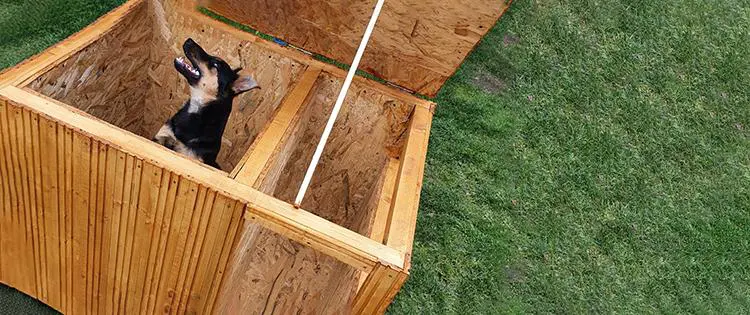




you can also put a small piece of flexi glass to check him out
I just order two items but your page added the third offer without my permission
Please contact me about this
Hi Willard,
Thank you so much for your interest in our work.
I am sorry to hear about this. I will look for your orders in our system right now and send you an email with further details.
God bless,
The Self-Sufficient Projects Team
By Hunting you must mean Elk or deer and not bird hunting… While good for Deer you couldn’t possibly recommend a Elk hound for water fowl or Pheasant hunting… and it would also depend on your climate…
How many brackets in total did you use? And how many OSB Sheets?