Have you ever thought of how much you actually spend on heating during the winter? This original solution was created in order to reduce heating costs in places where you don’t necessarily want to achieve a constant temperature, as high as 64.4°F. It was originally found useful by farmers that needed to provide some sort of thermic comfort to their animals—and let’s face it, in a chicken coop, every degree matters. This is also true for the shelter of goats or sheep; they are resilient animals, but every extra degree you can obtain during the cold season means increased productivity and decreased costs.
But keep in mind that this method doesn’t make miracles. It works only in moderately cold temps and only in daytime.
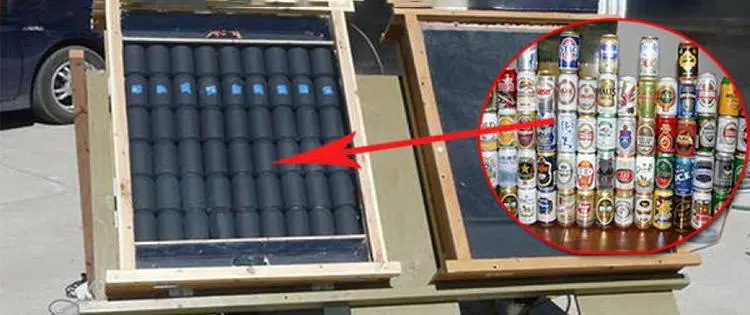
You can actually build a solar panel out of empty aluminum cans. You can use beer cans or juice cans; it doesn’t really matter. The best thing about this project is that you don’t need expensive, fancy materials to build it. You will basically need some pieces of wood to build a wooden frame, a piece of plywood to keep the cans in place, a piece of glass, and some black paint.
Materials:
- Aluminum cans: Their number depends on the size of the unit, but they should all be the same size.
- An old double window or some pieces of wood to build a wooden frame
- A sheet of plywood the size of the wooden frame
- Heat-resistant silicone
- A sheet of glass (Plexiglas would be even better) the size of the panel
- Heat-resistant flat black paint: One can should be enough.
- Screws
- Drill
- Air blower: You can use a recycled one from an old computer for example.
How does it work?
The unit is normally placed in the wall or roof of the building you need to heat. You must be sure to place it facing South so it gets plenty of sun exposure. The panel will be heated by the sun. Air is drawn from the inside of the room, heated through the air columns made of cans, and pushed back into the room.
How do you actually build it?
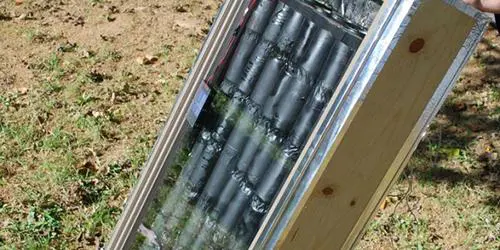
The first step of this DIY project is to build the wooden frame. Once it’s in place, cut a piece of plywood that fits perfectly inside, and nail it to the back of the frame.
Next, it’s time to put your drill to work. You will need to drill holes in the frame, for the inlet and the outlet hoses. Make sure you drill them on two opposite sides of the frame.

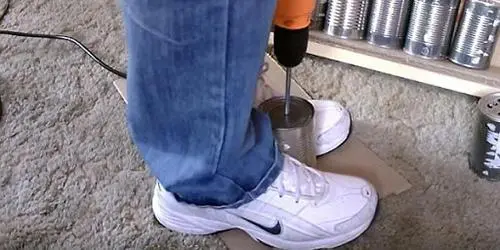
Don’t put the drill away yet! You will also need to drill holes in the tops and bottoms of the aluminum cans so that air can freely circulate inside. Make sure you don’t injure yourself—aluminum edges can be quite sharp. Once you’re done with drilling the cans, it’s time to paint them. One can of flat black paint should be enough. Give it time to completely dry before moving on to the next phase.
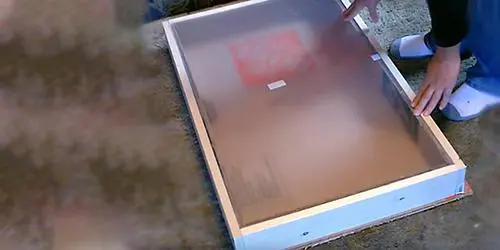
Once the cans are painted and dry, it’s time to put them into place. You need to put them inside the wooden frame and seal them together using heat-resistant silicone. As soon as all the cans are in place, it’s time to close the box. Use the sheet of Plexiglas and the same heat-resistant silicone tube, and make sure the silicone has dried completely before moving the solar panel.
Once the solar panel is ready, it’s time to put it into place in either the wall or the roof of the building. The two large holes cut at two opposite sides of the solar panel need to draw air from the inside of the building and then blow it back inside, so make sure they are properly positioned. It’s now time to attach the blower to one of the hoses; it will greatly improve the efficiency of your solar heater.
Where can you place the solar heater?
As I already said, this type of heater was originally used in animal shelters to provide them some comfort and increase productivity. The cold season brings along an important amount of energy loss; animals use extra energy to keep their body temperature in the right parameters instead of using it for producing eggs, milk, or meat.
However, some people brought this project to a whole new level by actually replacing a wall of the house with this type of solar heating panel. So it is up to you to test its efficiency in the particular area where you live and then decide!
You may also like:
 How To Make A Self-Watering Planter From A Water Cooler Bottle
This House Is Actually The Safest Place On Earth (Video)
Urbanites Moving To Rural Paradise Ruining It For The Locals
18 Plants That Should Never Be Planted Together


My dad actually did this similar panel set up in my house growing up in Union New Jersey in the 70’s. He used beer cans and soda cans popped the tops and bottoms out and painted black just like this. Only he had copper tubing going through the cans that somehow circulated water into a holding tank that was in the basement floor. My uncle actually was the one to break through the concrete floor and dig that huge hole for the holding tank that I think was an old oil tank that was cut to fit. Vermiculite was the insulation. He was a master carpenter and made fans in the floors with cabinets that concealed them with electric switches built into the cabinet to control the fan. A small woodstove in the cellar also used for Winter and that house was so hot!!! It was incredible what he accomplished. His name was Robert Henry Isaksen, also a retired Union Fire Department fire fighter who used his down time in the back of the house to spray his cans!!! True story. Rest in peace, my gifted and able bodied father. November 2, 1942-February 6, 2019.
He sounds like he was an amazing man… RIP
Wait but how do you set it up inside your house, to where it is soaking up sun, and both the intake and outtake are inside the house?
Hang it on your outside South facing wall. Would have to drill holes through the wall to run the tubes.
He sounds like he was an amazing man… RIP
The video shows you drilling holes in the frame to match the cans but the written directions say to drill them in both the top and bottom. Then it says “The two large holes cut at two opposite sides of the solar panel need to draw air from the inside of the building and then blow it back inside”. Can you please clarify.
Also, can I set this up inside the house on a sunny windowsill? I can’t drill holes in my house.
Thanks,
Amy