When you heat with wood, the chimney is the part of the system you never see and the part most likely to burn your house down. I learned to sweep my own flue the same way I learned most homestead skills: by watching someone who knew what they were doing, asking a lot of questions, and starting slow.
Cleaning a chimney isn’t complicated, but it is dirty, physical, and unforgiving of shortcuts. This guide walks you through how to safely clean your chimney yourself, from figuring out whether it actually needs it to disposing of the creosote when you’re done. It also covers the situations where the smart move is picking up the phone and calling a certified sweep.
Why Chimney Cleaning Matters
Every fire you build sends smoke, water vapor, and unburned gases up the flue. As that smoke cools, it condenses on the inside walls as creosote, a sticky, highly flammable residue.
According to University of Missouri Extension, creosote buildup is the main reason chimneys need cleaning, and a chimney fire can reach temperatures up to 2,000 degrees Fahrenheit. That kind of heat can crack clay tile liners and warp metal chimneys, opening a path for sparks to reach your attic or wall framing.
A clean flue also simply works better. Buildup narrows the passage, weakens your draft, and can push smoke and carbon monoxide back into the house instead of up and out.
How Often Should You Clean Your Chimney?
There’s no single calendar date that fits everyone. How fast creosote builds depends on how much you burn, what wood you burn, the type of stove or fireplace you have, and how you run it.
The baseline I follow is an inspection before every heating season and regular checks while I’m burning. If you run an airtight stove, Missouri Extension recommends checking the stovepipe at least once a month during the season.
The 1/8-Inch Rule
The industry rule of thumb is simple. The Chimney Safety Institute of America instructs sweeps to clean any chimney with 1/8 inch or more of buildup.
To check, shine a strong flashlight up the flue and scratch the wall with a pocketknife or a small screwdriver. If the groove you leave is as deep as the thickness of a nickel or deeper, it’s time to sweep.
Know the Three Stages of Creosote
Not all creosote is the same, and what you find decides whether this is a DIY job. Stage 1 is a dry, flaky soot that a brush knocks loose easily.
Stage 2 looks like crunchy, black flakes or puffy, porous deposits that take more scrubbing. Stage 3 is the dangerous one: a shiny, tar-like glaze that coats the flue like black candy and won’t come off with an ordinary brush.
If you find Stage 3 glaze, stop. It burns extremely hot, it usually needs chemical treatment or specialized rotary tools to remove, and it’s a clear sign your burning habits need to change.
When to Call a Professional Instead
I’m all for self-reliance, but knowing your limits is part of it. Call a certified chimney sweep if you find glazed Stage 3 creosote, cracked or missing flue tiles, loose bricks, or crumbling mortar.
You should also bring in a pro after any chimney fire, if your chimney has bends or offsets your brush can’t follow, or if you can’t safely reach the roof. A professional inspection once a year is cheap insurance even if you do your own sweeping in between.
The U.S. Fire Administration recommends having your chimney inspected and cleaned by a professional every year. I treat that annual visit as a second set of trained eyes, and I sweep myself as needed during heavy burning months.
Tools and Safety Gear You’ll Need
You don’t need a professional sweep’s full truck of gear, but you do need the right brush and the right protection. Skimping here is how people get hurt or end up with a living room coated in soot.
Brushes and Rods
Your brush has to match your flue’s size and shape, and the material matters. Use a wire chimney brush for clay tile masonry flues, and a poly chimney brush for stainless steel liners and factory-built metal chimneys, because wire bristles can scratch stainless.
You’ll also need enough fiberglass extension rods to reach the full height of your flue. A rotary system like the Gardus SootEater, which spins a flexible whip on a cordless drill, works well for cleaning from the bottom up and handles gentle bends.
Personal Protection
Soot is not just dirt. The EPA notes that wood smoke contains fine particles along with toxic compounds like benzene, formaldehyde, and polycyclic aromatic hydrocarbons, and that residue is exactly what you’re knocking loose.
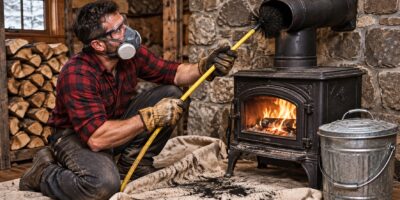
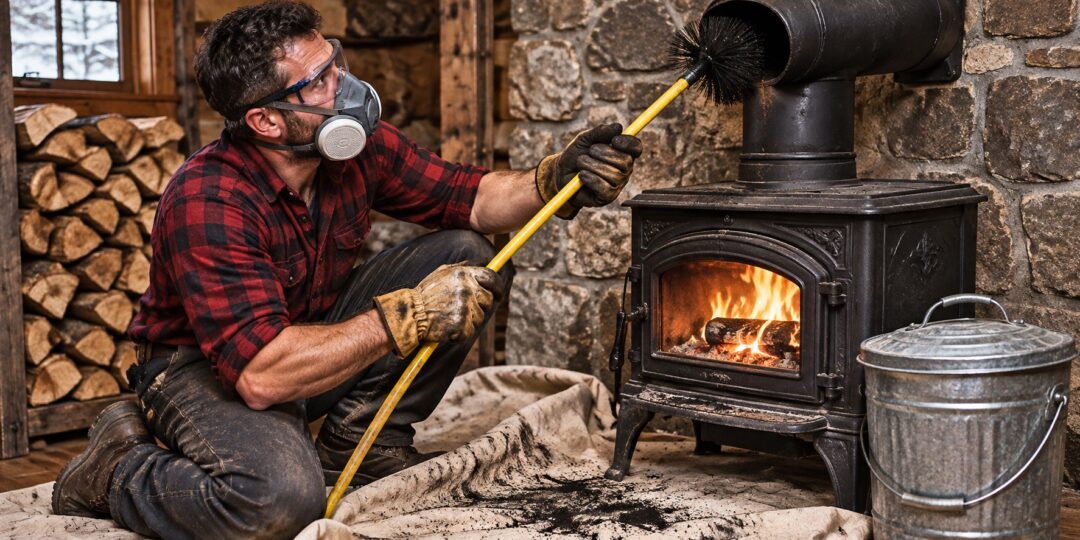
Wear a P100 or N95 respirator, sealed safety goggles, heavy work gloves, and old clothes you don’t mind throwing away. A hat keeps soot out of your hair, and long sleeves keep it off your skin.
Cleanup Gear
Missouri Extension specifically warns against using a household vacuum, because the fine dust can ruin the motor and pass right through the filter into your room. Use a shop vacuum with a fine-dust filter or a dedicated ash vacuum, and only on ash and soot that are completely cold.
Round out your kit with heavy drop cloths, wide painter’s or duct tape, a powerful flashlight, a bucket, and a metal ash can with a tight lid.
Before You Start: Prep Work
Let Everything Go Cold
Never sweep a chimney with a fire burning or with hot coals in the firebox. Ashes can hold live embers far longer than most people expect, so I let the stove sit cold for at least a full day before I start.
Plan your sweep for a dry, calm day. You’ll want daylight, decent weather if you’re going on the roof, and no plans to light a fire until you’ve inspected everything afterward.
Measure Your Flue
Measure the inside of your flue before you buy a brush. Round flues are sized by inside diameter, while square and rectangular clay tiles need both inside dimensions.
A brush that’s too small leaves creosote behind, and one that’s too big can jam. When in doubt, take your measurements to a stove shop and let them match the brush.
Seal Off the Room
For a fireplace, remove the damper plate if your design allows it and tape a damp sheet or heavy plastic tightly over the opening. For a wood stove, disconnect the stovepipe from the chimney thimble and cover the opening so soot can’t blow back into the house.
Lay drop cloths generously across the hearth and nearby floor, and move rugs and furniture out of the way. If your chimney has an outside cleanout door at the base, make sure it opens before you begin.
Step-by-Step: Cleaning Your Chimney
Step 1: Inspect From Below
Shine your flashlight up the flue and look for obstructions like bird nests, leaves, or fallen debris. Note how much buildup you see and what it looks like, and check for any cracked tiles or gaps.
Missouri Extension notes that the heaviest creosote usually collects in the upper third of the chimney, where the flue is coolest. If what you see is glazed or the liner looks damaged, stop here and call a pro.
Step 2: Choose Top-Down or Bottom-Up
Top-down sweeping means working from the roof and pushing the brush down the flue. It gives you a good look at the cap and crown, but it means working at height.
Bottom-up sweeping keeps your feet on the floor while you push rods up from the firebox or cleanout. It’s messier inside but much safer for most homesteaders, and it’s how I sweep my own stove chimney.
Step 3: Sweep the Flue
Attach the brush to the first rod and start working it through the flue with firm, steady up-and-down strokes. Add rods one at a time, scrubbing each section thoroughly before you move on, and keep the connections tight so you don’t lose a brush halfway up.
Listen as you work. A sudden change in sound or resistance can mean a crack, a separated joint, or a blockage, all of which deserve a closer look before you keep pushing.
Once you’ve reached the top, run the brush back down the full length a second time. Then let the dust settle for 15 to 30 minutes before you open anything up.
Step 4: Clean the Stovepipe
If you heat with a stove, the connector pipe needs cleaning too. Carry it outside, tape a bag over one end, and scrub it with a long-handled brush until the inside is clean.
While it’s apart, check each section for rust, pinholes, or thin spots. Stovepipe is cheap compared to what a failure costs, so replace any piece that looks questionable.
Step 5: Clean the Smoke Shelf and Firebox
For fireplaces, carefully remove your sheet and scoop out the soot and creosote that fell to the bottom. Don’t forget the smoke shelf just above the damper, which catches a surprising amount of debris.
Vacuum what’s left with your shop or ash vacuum, then use a stiff brush on the firebox walls. For stoves, clean out the firebox and check the baffle, gaskets, and door seal while you’re at it.
Step 6: Dispose of Soot and Creosote Safely
Creosote and soot are flammable, so treat them like hot ash even when they’re cold. The U.S. Fire Administration advises putting ashes in a metal container with a lid and keeping that container outside at least 10 feet from your home.
Never dump this material in a plastic trash can, a paper bag, or your compost pile. Check with your local waste authority on final disposal rules where you live.
Step 7: Reassemble and Inspect
Reconnect the stovepipe with the crimped ends pointing down toward the stove and secure each joint with sheet metal screws. Reinstall the damper plate, and make sure it opens and closes freely.
Before lighting a fire, take one more look up the flue to confirm it’s clear. Then build a small fire and watch the draft, making sure smoke goes up the chimney rather than into the room.
Ladder and Roof Safety
Falls are the real danger in chimney cleaning, not the soot. If your roof is steep, wet, icy, or high enough to make your stomach drop, sweep from below or hire a pro.
If you do go up, set your extension ladder properly. OSHA’s ladder safety guidance says to place the base a quarter of the working length away from the wall and to extend the ladder at least 3 feet above the roof edge.
Keep three points of contact while climbing, wear soft-soled boots with good grip, and use a roof safety harness kit anchored properly. Never go on the roof alone, and always have someone on the ground who knows where you are.
What to Do If You Have a Chimney Fire
A chimney fire often announces itself with a loud roaring sound, a strong hot smell, and dense smoke or sparks shooting from the top of the chimney. Some smolder quietly, which is why regular inspections matter.
If you suspect one, call 911 immediately and get everyone out. Missouri Extension’s wood stove guide also recommends closing the stove’s air controls and, if you can do so safely, discharging a multipurpose dry chemical extinguisher into the firebox, while avoiding water in the hot flue because it can crack the liner.
Keep a multipurpose fire extinguisher within easy reach of every stove. After any chimney fire, have a professional inspect the entire system before you burn again.
How to Keep Creosote From Building Up
The best chimney cleaning is the one you don’t have to do as often. Creosote comes from three main causes: wet wood, incomplete combustion, and cool flue surfaces.
Start with your firewood. The EPA recommends seasoning wood for at least six months and burning it at a moisture content below 20 percent, which you can check with an inexpensive firewood moisture meter.
Burn hot, not slow. Missouri Extension recommends keeping flue temperatures above 250 degrees Fahrenheit to stop creosote from condensing, and a magnetic stovepipe thermometer takes the guesswork out of it.
Avoid the overnight smolder with the air shut all the way down, which produces more creosote than anything else I’ve tried. Never burn trash, cardboard, painted or treated wood, or plywood, and install a working carbon monoxide alarm on every level of your home.
🔥 Cleaning Your Chimney Is Just One of the Forgotten Skills That Could Save Your Home
Knowing how to clean your chimney, maintain your wood stove, and heat your home safely without electricity isn’t just about saving money. It’s about being prepared when modern conveniences fail and you have nobody to rely on but yourself.
Our grandparents understood something many Americans have forgotten: the more you know how to do with your own two hands, the less you depend on systems you can’t control.
That’s exactly why we created Lost Skills of Independence.
This practical guide brings back the traditional knowledge and self-reliance skills that helped previous generations keep their homes running, provide for their families, and make the most of what they had.
Discover how to:
- Become more self-reliant: Rediscover practical, time-tested skills that reduce your dependence on outside services.
- Prepare for power outages: Build the knowledge and confidence to manage everyday challenges when electricity isn’t available.
- Save money around your homestead: Learn traditional approaches to maintaining, repairing, and making better use of what you already own.
- Strengthen your household’s resilience: Develop useful skills that can make a real difference during emergencies and unexpected disruptions.
- Preserve disappearing knowledge: Bring back the resourcefulness and independence that generations before us took for granted.
You don’t need to live completely off-grid to benefit from these skills. You just need to start learning them before you find yourself wishing you had.
Your chimney is only one part of keeping your home safe and functional. Imagine how much more confident you’d feel knowing you had an entire collection of practical, old-fashioned skills to fall back on.
Don’t wait for the next blackout, expensive repair, or emergency to discover what you don’t know.
👉 Discover Lost Skills of Independence Today
Take back the knowledge. Reduce your dependence. Build a more self-reliant future
Final Thoughts
Learning how to safely clean your chimney is one of those skills that pays off every single winter. It saves money, keeps your stove drawing well, and gives you a close look at a part of your home that most people ignore until something goes wrong.
Do the job carefully, protect your lungs and your footing, and know when a problem is bigger than a brush can fix. A clean, inspected chimney means you can sit by the fire on the coldest night of the year without that nagging worry in the back of your mind.
You may also like: 
Cleaning the Chimney: A Complete DIY Guide for Homeowners
How To Build A Small Root Cellar In Your Backyard With Only $400 (Video)
The Fall Homestead Checklist: 10 Tasks to Finish Before Winter
The #1 Rule to Make Your Woodstove Use Less Wood
How to Build a Pioneer Potato Clamp
Ranking the Best (and Worst) Firewood in the U.S.A
Homemade Window Cleaner: Simple Recipes That Actually Work