Paying store prices each time you want to edge a garden bed, line a fire pit, or shore up a wall makes no sense and I have some good news for you. There’s no need to lose cash for this. You can make your own bricks at home with materials you can find under your feet or pick up cheap at the hardware store.
In this article, I’ll show you four real ways to do it, walk you through the steps for each one, and tell you which methods are best for your land and the climate you live in.
People have been making bricks themselves for generations, back when you couldn’t run to the store every time you needed building material and you can do the same.
I’ll also tell you more about the crazy viral paper brick trick you might have seen online and why I think there’s no way to use it on your homestead.
Let’s get to it!
First, Test Your Soil
Before you mix anything, you need to test your soil. Three of the four methods I am going to share use soil from your own land, and the wrong soil will give you bricks that crack or crumble within a season.
Soil is made up of three main elements: sand, silt, and clay. This test helps you identify the ratio of these elements found in your soil.
A brick with plenty of sand holds its shape from the day you mold it to the day you lay it. A brick with too much silt will crack as it dries and crumble when it gets wet. Now, for clay, the balance is the most important. Too much clay and your bricks crack on the drying rack. Not enough and they crumble in your hand.
If you want to get the best bricks, you need soil that is mostly sand with a fair share of clay. Roughly 15 to 30% clay and 50% or more sand is the sweet spot.
If your soil is mostly clay, you can buy clean play sand and blend it in. If your soil is too sandy, dig deeper or borrow clay from a creek bank.
The best test is also the simplest one. It takes only 10 minutes and it tells you exactly the structure of your soil so you can adjust in order to get the perfect bricks.
If you want to try the mason jar soil test, you can find the step-by-step guide here →
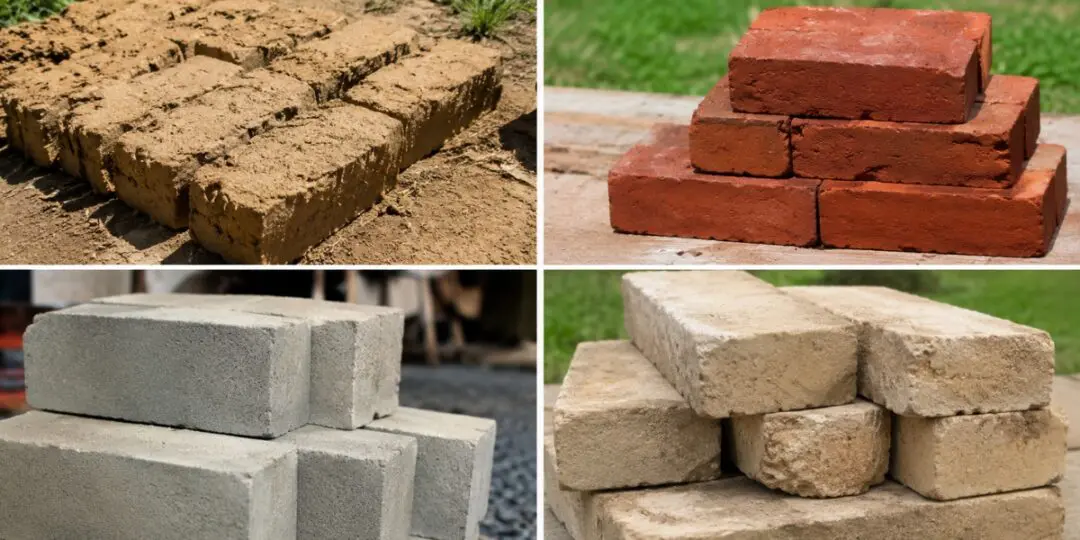
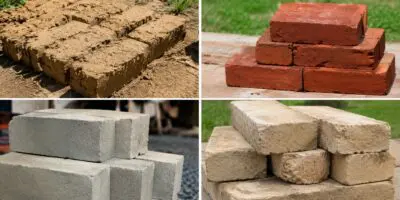
Adobe Bricks 
Adobe is the oldest brick type on this list and also the cheapest to make at home. For this one, you’re basically mixing wet mud into a shape and letting the sun bake it.
You’ll need a wooden mold, a wheelbarrow or a shallow pit for mixing, a shovel, soil, water, and a handful of straw if you have it. The straw is not strictly required, but it helps the brick hold together while it dries.
Build the mold out of 1×4 boards. A good size for a manageable brick is about 4 inches deep, 10 inches wide, and 14 inches long. That gives you a brick around 35 pounds, heavy enough to feel solid but light enough that you can carry one in each hand.
If you want to be efficient, you can build a mold with two or three slots side by side and pour multiple bricks at once.
Now to the work itself. Pick a long stretch of dry, hot weather to start, which usually means spring or summer. Soak a level patch of ground where you will lay the wet bricks out to dry, and sprinkle that area with sand or chopped straw so the bricks don’t stick.
Mix your soil with water in the wheelbarrow until you get a stiff, sticky mud. It should resemble mashed potatoes. Now is also the time to add the straw if you decided to use it.
Wet the inside of the mold to get the bricks out of the mold easily. Put your mud mixture into the mold, pack it into the corners with your hands, and strike the top flat with a scrap of wood. Lift the mold straight up. The brick should hold its shape.
Let the bricks lie flat for three days before you even think about touching them. After that, turn them up on edge so the bottoms can finish drying. In three to four weeks, they will be ready to handle and use.
I want to be straight with you about adobe. This type of brick works wonderfully for dry, sunny climates. If you live in Arizona or New Mexico, adobe is a great choice for building material.
But if you live where it rains hard or freezes every winter, your unprotected adobe bricks will turn back into mud in one season.
If you want to read another version of this method, the folks at New Mexico State University put together a guide called the ABCs of Making Adobe Bricks that is the best free resource I have found on the subject.
What to Do if Your Soil Is Rich in Clay
Ok, let’s say you try the soil test and you realize that what you have in your garden is mostly clay and you can’t use it for bricks. You might feel unlucky, but this is a blessing in disguise. Why do I say this? Because even though clay is not the best for making bricks, it’s an amazing material when you’re a homesteader. This is why I advise you to just buy some clay and try the following thing.
You can use the clay to make pots. Now try to think about how often you use pots. Are you using them almost every day, right? You use pots for cooking and storing food, and also you can use them to hold water or even create an irrigation system for your garden. Clay has many, many uses on a homestead and if you decide to make your own pots, be sure you’ll also save a lot of money.
Also, most American kitchens run exclusively on a mix of nonstick aluminum (Teflon) and plastic. Think about this: how healthy is that? We all know Teflon pans are toxic; we all know microplastics are dangerous, but many of us keep using them.
So, why poison your food every day when you can use clay pots? An unglazed or properly glazed clay pot is just baked earth. It’s all natural, no toxic stuff involved. You just use what nature gave you and make a good thing out of it.
One thing I realized along the way is that making your own clay pots is not even hard. You don’t need an oven or a pottery wheel to make some nice pots. People used to make pots with their own hands and you can do the same.
Another advantage of clay pots is that you can also sell them. This is one of the best ways to make some extra cash because there is a high demand for such products in today’s market.
See how to make your own clay pots. Find more here →
This is a complete guide with pictures that shows you everything from dry clay harvesting to shaping the pot and firing it.
Compressed Earth Blocks
This uses the same principle as the adobe bricks, but the difference lies in the pressure used when forming the bricks. Instead of slapping mud into a mold and waiting weeks for the sun to do the work, you pack a dry-ish mixture into a press, pull a lever, and out comes a dense, solid block that is ready to use much faster.
The classic press for this is called a CINVA Ram. It was invented in 1956 in Colombia and is still used all over the world. It is basically a steel box with a hand lever that crushes the soil down to about half its original volume.
You can buy one new from a few specialty companies in the United States, or you can find plans online and build one yourself if you have welding skills. A bought press will run you a couple thousand dollars. So, a homemade one might be the best option.
The soil mix is different from adobe. You want a drier mix and a little less clay, around 15 to 20%. Some folks add 5 to 8% Portland cement to the mix for extra strength and weather resistance.
Here is how the process works. Sift your soil to get rid of anything that isn’t dirt. Mix it with the cement, if you are using cement, until the color is even all the way through. Add water slowly. You want just enough that a handful squeezed in your fist holds its shape without leaving water on your palm.
Open the press, load the soil into the mold box, close it up, and pull the lever down. Most presses give you a block around 4 by 6 by 12 inches. Open the press and lift the block out carefully because it is still soft.
Stack the blocks on a flat surface in the shade and cover them with plastic sheeting. If you used cement, sprinkle the blocks with water two or three times a day for the first week. The slower they dry, the stronger they get. In three weeks, they are ready to use.
Compressed earth blocks are stronger than adobe and stand up better to weather, especially with the cement added in.
Build the Indestructible Amish Root Cellar
Since I mentioned that you can use these bricks to build root cellars, I also want to tell you more about what type of root cellar you can build with them. When you imagine a root cellar, you might see the image of a hillside earth-banked cellar. These are the most common ones that show up on the internet when you type “root cellar.”
The problem with it is that it’s hard to build and you need the right conditions, from soil type to material and actual location. If you don’t have a hill conveniently placed on your property, well, this one is not for you.
But owning a root cellar is essential for anyone who’s into self-sufficiency. After all, this is the best storage space for all your canned goods, cured meats, cheese, and any type of food you want to store for a long time.
The good news is that there is a solution that is perfect for anyone who lives on a small plot of land and doesn’t have enough space to build a regular root cellar. This root cellar is so effective in terms of space that you can even build it in your suburban garden. Even more, you don’t need a permit for it. Yes, you can start building it today and you won’t have any legal problems.
This type of root cellar comes straight from the Amish traditions. Obviously, they also have bigger root cellars, but the one I am talking about right now is used as an “emergency cellar.”
What I want you to know is that in reality you can make this Amish root cellar as big as you want. This is the beauty of it: you can modify it however you want so it suits your property and it is effective no matter what.
Here’s where the bricks come into play: they are used to make a protective “box” around the actual root cellar. This is meant to protect it against water and extreme temperatures. But, if you don’t have the bricks and still want to build the Amish root cellar, I want to tell you that this is completely possible. It will still work properly, but you’ll be missing that extra protection.
Here you can find more about this project and what makes it so different, yet efficient compared to your regular root cellar. The technique they use is revolutionary and inspired many people.
See the full step-by-step guide for the Amish emergency root cellar →
Soil-Cement Bricks 
This is the method I tried first, and it is still my favorite. Why? Because for this one you don’t need any expensive press or sunny weather. All you need is just some dirt, a little bag of Portland cement, a wooden mold, and a little bit of patience.
The idea behind this is simple and any of you can try it on your homestead.
You take some soil from your backyard, blend in some cement, mold the mix by hand into bricks, and let them slowly cure under plastic. The cement turns what would have been adobe into something a lot tougher and a lot more forgiving of bad weather. It still is not concrete, but it lasts so much longer than adobe.
When I did my first batch, I took two five-gallon buckets of soil from a spot near the chicken coop where the dirt was more sandy. I picked out all the roots and stones. Then I mixed in one part Portland cement to about ten parts soil by volume. Most of what I read suggested somewhere between 5 and 10 percent cement, so I split the difference.
I blended the soil and the cement dry, on a tarp, with a hoe. I kept turning it until the color was uniform. Then I added water slowly out of a watering can, mixing as I went, until I got a damp mix that held together when I squeezed it but didn’t ooze water.
My husband had built me a four-slot mold out of scrap 1×4 lumber. Brick size came out to about 4 by 4 by 8 inches, which is close to a regular store-bought brick. I wet the inside of the mold, filled it with the mix, packed each corner hard with my fist, and struck the top flat with a piece of wood. Lifted the mold straight up. Four bricks.
I did this on a flat piece of plywood under the porch roof so the bricks would be out of the sun and the rain. After 24 hours, I covered them all with a sheet of plastic and spritzed them with water twice a day for the first week. After two weeks, I uncovered them, and after four weeks I started using them.
A word of caution from my own experience. The first batch I made, I did not sift carefully enough, and there were a few small rocks in the mix. Two or three of those bricks cracked along the rock line within a month. So, please be more careful than I was.
Soil-cement bricks have done good work around my place. I have used them for raised bed walls and a low retaining wall behind the herb garden, and the bricks lining my fire pit.
Mine have been through three winters now and they are holding up just fine. One thing though: keep them off the bare ground. I set mine on a gravel base so water doesn’t sit underneath and I still think this is what made them last so long.
Concrete Bricks 
If you live where it rains a lot or where the ground freezes deep in winter, concrete bricks are the only ones that will last.
This is the most expensive method of the four presented because you are buying cement, sand, and gravel instead of simply digging dirt from your garden. On the other hand, this is also the most reliable method and you can lay these bricks wherever you want because you can be sure they last no matter what.
For this, you need to get a bag of Portland cement, clean sharp concrete sand (not play sand or beach sand), and clean small gravel from the hardware store. The basic recipe is one part cement, two parts sand, and three or four parts gravel, by volume. Go with one to two to three if you want strong bricks.
Mix the dry ingredients on a tarp or in a wheelbarrow until the color is uniform. Add water slowly until you get a workable but not soupy mix. You want it just wet enough to hold a shape when you scoop it.
Oil your mold so the bricks come out clean. Cooking oil works fine. Fill the mold, jiggle it to settle out the air pockets, and screed the top flat with a board. After 24 to 48 hours, the brick will be firm enough to remove from the mold.
Now the critical step that most folks skip. Concrete needs to stay damp while it cures. Keep your bricks out of direct sun and wind for at least the first week. You want to cover them with plastic sheeting and mist them with a spray bottle twice a day. After seven days, they are usable. After 28 days, they have reached their full strength.
And since you now know how to make the foundation layer of a shed, how would it be to also build the shed yourself?
This is a small project I actually tried, and this is how I built a new space that I now use to store my tools and gardening items.
When I started this project, I knew it was going to be a good one because it was suggested to me by Ron Melchiore. He told me where to find the plans and the full guide. That’s why I want to point you to the same source.
The self-sufficient community here in the U.S. is really big and keeps growing, but many of us use the same resources when it comes to our project.
Ron told me about Michael Major and his background at Boeing. He used to be a welder and he built aerospace components. Precision is non-negotiable here and this is why, when I heard about it, I was sure all of his projects are good and well tought. And I have to say that this is 100% true for all the projects that I tried from him.
Here’s where I found this shed project with full costs, materials, and the approximate time you need to finish your project. You can also scale it up and build it as big as you want.
A Few Words About Paper Bricks
Now and then I see somebody post a video about making bricks from old newspaper. The first time I saw it, I got curious enough to try one. I soaked a stack of old farm papers, mashed them into pulp, packed the wet pulp into a little press, and let the result dry on the porch.
What I ended up with was a paper log.
And this is what those paper bricks actually are. They’re not a building material.
And as with any log, you can use them as fuel. People who heat with wood stoves use them to stretch their firewood pile in the winter. They burn slow and put off decent heat. As a way to use old newspapers and cardboard, it is a nice project, and I will probably write about it down the road for the homesteaders who want a little extra warmth for free.
But you cannot build with them. A paper brick has no real strength, soaks up any moisture in the air, and falls apart the first time it gets rained on. If somebody tells you to wall in your garden with paper bricks, smile politely and move on.
Final Thoughts
Making bricks is a skill that sounds complicated, but as you just saw, it isn’t. You can try it once and see if it fits your style. For me, making my own bricks turned out to be a nice project that saved me some money.
Since this is the one I use, I also advise you to start with soil-cement. You don’t need expensive tools and you get a forgiving mix that can be molded into strong enough bricks that can be used in any weather.
You may also like: 
I Tanned a Hide With Nothing but Eggs and Animal Brain
These Are the ONLY 37 Foods You Need in Your Pantry (Video)
5 DIY Wax Projects for Your House
Leftover Firewood? Here’s What to Do With It
What Happens If You Boil Flour


