There is a high chance that you also have that one shed where you toss the things you don’t know where else to put. Broken tools, half-empty paint cans, bags of feed you forgot about, holiday decorations and these are just a few of the things I used to have in my shed.
I never thought twice about my shed until one spring when Mark and I were trying to figure out where to start seeds early. We didn’t yet have the budget for a proper greenhouse, and our windowsills were full of little plants. This was beautiful, but really inconvenient.
Then Mark looked at the shed and said, “What about that?”
This one question sent me down a rabbit hole. I started looking into what other homesteaders have done with their sheds, and I was shocked. People are turning their sheds into things that are very useful for a self-sufficient lifestyle and, at the same time, incredibly creative.
That’s how I decided to put together this guide so this information gets to more people like us. The first project, the greenhouse conversion, is one Mark and I actually built ourselves, so I’ll walk you through exactly how we did it. The rest are projects I’ve researched and, in some cases, ones I’m planning to tackle next, since now we have an actual greenhouse.
Greenhouse
This is the project we actually did. Mark and I spent two weekends on it and the total cost came in under $400, mostly because we used salvaged windows and leftover lumber. Ask around or use Craigslist if you want leftovers you can use for DIY projects.
According to Lapp Structures, turning an existing shed into a greenhouse is one of the most cost-effective ways to extend your growing season and garden year-round. We found that to be 100% true.
Here’s exactly what we did:
First, we checked the location
Our shed gets morning and midday sun, which is almost ideal. If yours sits in full shade, this project won’t work well, no matter what else you do. Your new greenhouse needs at least 6 hours of direct sunlight.
We opened it up for light
This was the most difficult part. We removed a section of the roof on the south-facing side and replaced it with clear polycarbonate panels. Mark cut the opening, we framed it with 2x4s, and screwed the panels down with rubber-washer roofing screws to keep water out. We also swapped the solid door for a glass storm door we found at a salvage yard for $30.
Ventilation is important
A greenhouse without airflow is the perfect breeding ground for mold. That’s why we installed a louvered vent on each side wall near the top and added a small exhaust fan on one end. The fan was about $25 at the hardware store and it runs off a basic extension cord. On hot days, we open the door and let the cross-breeze do the work, so there is no need to use power.
We sealed and insulated the walls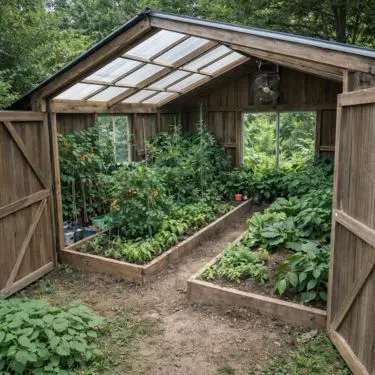
We covered every gap and crack we could find, then lined the interior walls with bubble-wrap insulation. It’s cheap, it lets light through, and it holds heat surprisingly well during the night when it’s colder. One important step is that we also used basic weather-stripping around the door and vents to keep drafts and pests out. Yes, it works incredibly well for both.
Next, the floor
For the floor, we laid down gravel. We pulled up the old plywood, leveled the dirt underneath, and spread about 3 inches of pea gravel. It drains well, keeps weeds down, and doesn’t hold moisture the way bare soil does.
Irrigation system
We ran a gutter off the new polycarbonate roof section into a 55-gallon rain barrel. From there, a gravity-fed drip line runs along the shelves. It’s not fancy, but it works and I don’t have to hand-water every day.
It worked so well that we kept thinking about it. All that free water hitting our roof every time it rained, and we were only catching a tiny fraction of it with one barrel and one gutter. We wanted to upgrade our homestead anyway, so we tried a new project.
So we took the same idea and scaled it up into a full rainwater catchment system for our property. Not just for the greenhouse anymore, but as a real, stable water source we can count on for the garden, the animals, and the homestead.
The whole thing started with that one barrel on a shed, and now we never worry about water during dry spells because this system has our back.
If you want to see how we went from one rain barrel to a complete system, click here and find everything you need to build your own
Organizing the space
Shelving made the biggest difference in terms of space. We built three tiers of shelving along the back wall using 2x4s and plywood. That tripled our growing area. We also hung hooks from the ceiling joists for hanging baskets and mounted a simple potting bench along one side wall from scrap lumber.
Heating
For cold months, we added heat and light. We filled two black 5-gallon buckets with water and set them in the sun during the day. They absorb heat and release it slowly at night. On the coldest nights, we run a small space heater on a thermostat. We also hung two LED grow lights above the top shelf for the weeks when daylight isn’t enough.
Last thing
It’s a great idea to have a thermometer and a humidity gauge. I used to check them every morning. Keeping the temperature between 60 and 80°F and the humidity below 70% has kept mold away and seedlings happy.
The whole setup was about $379 and it helped us start tomatoes, peppers, and herbs six weeks earlier than we ever could before. If you only do one project from this list, make it this one.
Chicken Coop
I know a lot of you already have coops, but if you plan on expanding or you’re getting started, a shed conversion saves you a ton of money compared to building a coop from scratch.
The main modifications:
- Elevate the shed on cinder blocks or landscape timbers. This keeps moisture out and also makes it harder for mice to climb up to the floor.
- Add roosting bars. Use 2x4s with the wide side up so their feet stay flat.
- Build or buy nesting boxes. One box for every 3 to 4 hens is the standard. Mount them lower than the roosts, or the hens will sleep in them instead of laying in them.
- Cut windows for ventilation and cover every opening with hardware cloth. Chicken wire is not a good idea because raccoons and weasels tear through it like it’s nothing.
- Add a pop door on one wall that leads to an outdoor run. A simple sliding door on a track works great and you can open and close it from the outside.
- Install drop boards under the roosts. These catch droppings overnight and make cleanup a 5-minute job instead of a 30-minute one. Scrape them into a compost bucket every morning.
👉 See the 10-Cent Pill Everyone Needs in Their Medicine Cabinet
I’ve been wanting to convert our second shed into a coop for our growing flock. The one we built from scratch three years ago is getting tight, and having a ready-made structure to work with would cut the build time in half.
Goat Barn
Goats are hard on buildings. If you have ever had goats, you already know this. They butt walls, chew on everything, and test every weak spot until something gives.
Here’s what a shed needs to survive goats:
- Line the interior walls with at least ½-inch plywood. Anything thinner and they’ll punch through it. Add extra studs at the corners so the plywood has a solid backing.
- Install electrical before you insulate. Run ground-fault-protected outlets and shielded light fixtures first, then insulate with a vapor barrier to keep moisture from building up inside the walls.
- Add a 2×4 railing along the walls for hanging feeders and water buckets. A kick plate at the doorways keeps bedding inside where it belongs.
- Use steel pen panels inside to create flexible kidding pens. You can reconfigure them as your herd changes.
- Go with double doors if you can swing it. They make it so much easier to clean with a wheelbarrow or small tractor.
Rabbit House
If you raise rabbits, you know that standard hutches don’t give them much room. A shed conversion changes that completely.
- Start with a structural check. No gaps, no rot, no holes. Rabbits chew the structure, and predators exploit every weakness. So be careful about this!
- Install a solid floor or place the shed on concrete or pavers. This prevents digging in and digging out.
- Replace windows with welded mesh panels (not chicken wire) so you can leave them open for airflow without rabbits escaping.
- Cut the main door in half to create a stable door. Open the top for ventilation while the bottom half keeps rabbits inside.
- Line the interior with plywood to protect the walls from chewing. Lay vinyl flooring over the floor for easy cleaning.
- Add a step-over barrier just inside the door, about 12 inches high. This stops rabbits from bolting when you walk in.
- Connect the shed to an outdoor run using a tunnel or attach a run directly to one wall. Rabbits need exercise and outdoor time.
I love the idea of this one. Rabbits in a converted shed get so much more space and interaction than they do in a cramped hutch tucked behind the barn.
The Amish Smokehouse 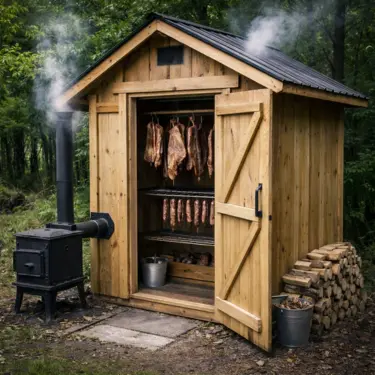
This one is on my wish list. Smoking and curing your own meat is one of those homestead skills that might feel like it belongs in another era for those outside our community, but we know that it’s completely practical today. Especially if you raise your own pigs or process deer during hunting season.
The basic concept: you take a small shed, add a wood stove piped into the back wall, and let the smoke do the work.
- Frame the shed with 2x4s and ½-inch plywood. A simple gable roof with overhang keeps rain off.
- Pipe a small wood stove into the back wall. The stove sits outside the shed and smoke travels in through the pipe. Adjust the pipe size to control how much smoke enters.
- Add ventilation openings near the top so smoke can exit slowly. This keeps the temperature stable and prevents buildup.
- Never use pressure-treated lumber. The chemicals in treated wood can leach into your food. Stick with untreated pine or cedar.
- Hang racks or hooks inside for meat and fish. When you’re not smoking, the space doubles as tool storage.
Mark has already earmarked an old shed panel stack behind the barn for this project. I have a feeling it’s happening this fall. Can’t wait!
If you want the full instructions with pictures, see the Amish smokehouse guide here.
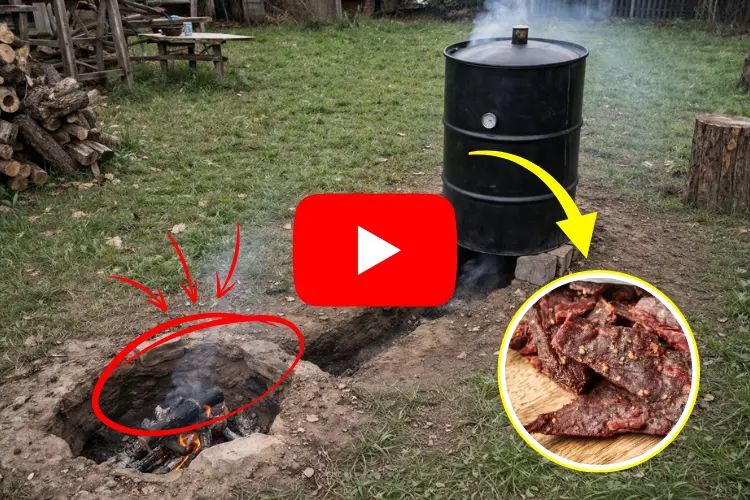
You don’t feel like starting a large-scale project? I want you to know that there are some easier ways to build a smokehouse. One that I tried is this DIY smokehouse in a barrel. All you have to do is turn modest, everyday items into something incredibly satisfying. Once you taste what comes out of this thing, you’ll never buy store-bought smoked meat again.
Click here to see how a barrel became the best smokehouse on my homestead.
Sauna
This one surprised me when I first came across it. A sauna? In a shed? But the more I read, the more it made sense. The structure is already there. You just need to insulate it, seal it, and add a heater.
👉 The 3 Layers of EMP Protection Most Americans Don’t Know About
The basics:
- Frame interior walls with furring strips to create insulation cavities. Drop the ceiling to about 7 feet to hold heat better.
- Pack the cavities with fiberglass insulation (R-13 to R-19 for walls, R-30 or more for the ceiling). Staple a 6-mil polyethylene vapor barrier on the warm side and add a foil reflective layer on the ceiling to bounce heat back.
- Line the interior with tongue-and-groove cedar, hemlock, or aspen. Don’t use pine or treated lumber. Both eliminate toxic chemicals when they heat up.
- Size your heater at about 1 kW per 45 cubic feet. For an 8x10x7-foot shed, that’s roughly a 12 kW heater. Run a 240V circuit and hire a licensed electrician for the wiring. For off-grid, a wood-burning stove with an insulated chimney works.
- Install a low intake vent near the floor and an adjustable exhaust vent near the ceiling for cross-ventilation. Add an outward-swinging door with tempered glass.
The total cost runs about $1,500 to $4,500, depending on your heater choice and how much material you already have. I’m not going to lie, this one tempts me. After a long day of chores in January, stepping into a hot sauna 30 feet from the back door sounds like a dream.
Final Thoughts
I’ve never believed a shed could turn into so many useful things. I was used to seeing the shed just as a space for storage, but now I know that it could entirely change the way you approach homesteading.
Most of the time, I used my shed just like a junk drawer because I was never storing useful things inside. It was just the stuff I was planning to get rid of anyway. And when one of my main goals when I decided to be self-sufficient was to have a more minimalist lifestyle, this “shed change” was a real eye-opener.
So, if you, too, have a shed that doesn’t have a real purpose for your homestead or backyard, you might want to try some of these projects.
You may also like: 
8 Off-Grid Projects I Regret Building on My Property
A Soup So Tough It Survived Two Years in a Man’s Coat Pocket (Video)
How to Keep Looters Off Your Property After a Disaster
Leaving Your Property Like This Might Get You Killed
How To Find An Underground Water Source On Your Property


beautiful ideas, beautiful folks!