
I’ve been making bone broth on this homestead for about eight years. I used the same old method every time. I toss the bones in a pot, cover with water, add some vinegar, and let it simmer on the stove for a full day. Sometimes it even took longer!
For eight years, I kept getting thin, watery broth that tasted fine but was never that rich, jiggly gel that everyone talks about. I gave up and told myself that this is how it was and people were maybe lying… Or maybe my bones weren’t good enough.
Turns out, the bones were fine. My method was the problem.
Last fall, I found a different approach, and it was the perfect time, right after slaughtering two pigs. I had more bones than I knew what to do with and I was tired of wasting a whole day babysitting a pot on the stove for poor results. So I started digging into the science and the history behind bone broth. What I found changed how I make it.
The broth I make now gels every time. It’s darker, richer, and has a depth of flavor my old method never came close to. And I don’t stand over the stove for 24 hours anymore.
This Is Why You Should Keep Making Bone Broth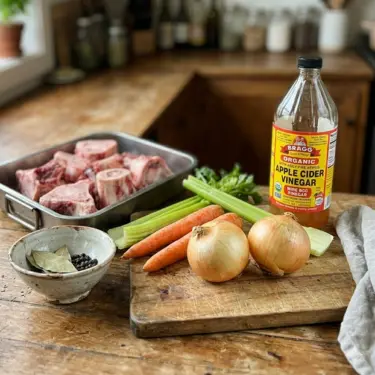
If you raise your own animals or hunt, you end up with a lot of bones. Backs, necks, knuckles, feet, marrow bones. Throwing them out feels wrong, and it should. There’s serious nutrition locked inside them.
Cleveland Clinic explains that when you cook bones low and slow, the collagen breaks down into amino acids that support your gut lining, your joints, and your immune system. Here’s what that gets you:
- Amino acids help repair and protect your gut and joints.
- Minerals like calcium, magnesium, and potassium keep your body hydrated and functioning.
- 8 to 10 grams of protein per cup.
You won’t get that from the stuff in a carton at the grocery store.
This isn’t new knowledge either. Bronze Age communities in Austria boiled meat scraps down into concentrated tablets for nourishment. People have been extracting everything they can from bones for thousands of years. We’re just catching up to what they already knew.
At some point, I started looking into how older generations preserved food and I realized that we’ve lost a lot of knowledge. Sure, I know how to make bone broth, how to water-bath my tomatoes, how to cure pork, or how to smoke venison, but when you are living on a homestead, this isn’t enough. Life on a homestead can change in an instant and you know that very well. When all you consume is what you produce, things can be unpredictable. And you need to prepare.
Some foods can last 5, 10, or even 25 years on a shelf in your pantry and all of this without refrigeration or canning. These foods were used to feed entire populations during the wars and famines and those people used preservation methods most of us have never heard of.
What surprised me is that these traditional preservation methods are not hard or complicated; most of them are just forgotten.
👉 Click here and see the recipe for a 2,400-calorie survival bar you can make at home
What I Was Doing Wrong (and You Might Be Too)
My old method had three BIG problems I didn’t even realize were problems.
- I boiled it too hard. I always brought the pot to a rolling boil and then turned it down, but my “simmer” was still too aggressive. Collagen starts to unwind around 135 to 145°F and turns into gelatin between 160 and 175°F. But if you push past 200°F for hours, you actually break that gelatin apart. You destroy the thing that makes broth gel.
- I used too much water. I’d fill the pot until the bones were swimming. More water means a more diluted broth. You want the bones just barely covered.
- I never cut the bones! I threw whole bones and knuckles in the pot and expected the collagen to magically escape through solid bone. Cutting or cracking bones into 2 to 3-inch pieces reveals more surface area, which means more collagen and minerals get into your broth faster.
The NEW Bone Broth Recipe (Step by Step)
This approach combines a few steps that most bone broth recipes skip: blanching, roasting, an acid soak, and a long oven instead of stovetop.
It works with beef, pork, chicken, venison, or a mix of whatever you’ve got.
What you need
Bones (7 to 8 pounds): Use a mix. Knuckles, marrow bones, oxtail, necks, backs, and feet give you the best combination of gelatin and flavor. If you’re using beef, ask your butcher to saw the large bones into 2 to 3-inch sections, or do it yourself with a bone saw. Chicken feet are gelatin gold if you can get them.
Cold water: About 8 to 9 cups. Less than you think. You want just enough to cover the bones.
Apple cider vinegar or lemon juice (2 tablespoons): The acid pulls more minerals out of the bones. You won’t taste it in the finished broth.
Vegetables: 1 to 2 onions, 2 carrots, 2 celery stalks, all roughly chopped; don’t waste time on chopping them. These are for flavor, not presentation.
Seasonings: 2 bay leaves, a few whole peppercorns. I sometimes throw in a handful of parsley stems or a sprig of thyme. Don’t add salt yet. It concentrates during the long cook and you can always add the salt later when you use the broth.
Equipment: A Dutch oven or heavy stock pot that can go from stovetop to oven. A roasting pan. A fine-mesh strainer or cheesecloth.
Here’s How I Make It
Step 1: Blanch the bones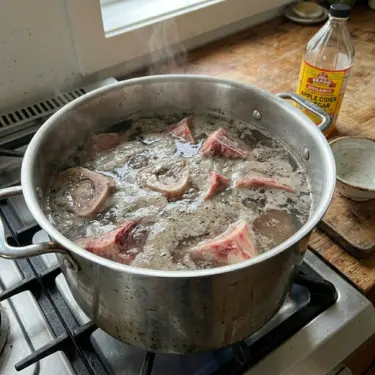
Put all your bones in the stock pot and cover with cold water. Bring it to a boil and let it simmer for 20 minutes. You’ll see a gray foam rise to the surface. That’s blood and bits of protein.
Since you don’t want that in your final product, you’ll have to drain everything. After that, rinse the bones under running water.
I skipped this step for years because it felt like extra work. The difference it makes in the final flavor is huge. If you’ve ever had broth with a murky, slightly funky taste, this is probably why.
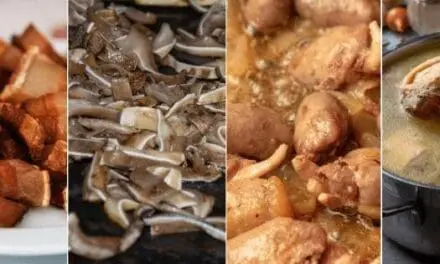
Step 2: Roast the bones
Set your oven to 425°F. Spread the blanched bones on a baking sheet in a single layer and roast for 20 to 30 minutes. Flip them once halfway through.
You’re looking for a deep brown color on the surfaces. That browning creates caramelized flavors that give the broth its richness and sweetness. My old stovetop method never had this, and I could always tell something was missing. This was it for sure.
Step 3: Acid soak
Transfer the roasted bones to your Dutch oven.
Cover with cold water (just enough to cover, no more) and add your 2 tablespoons of vinegar or lemon juice. Let this sit at room temperature for 30 to 60 minutes.
👉 How to Store 100 Gallons of Water in a Space the Size of a Closet
The acid will start pulling calcium and magnesium out of the bones before you even turn on the heat. Chinese medicine traditions and West African cooking have used vinegar and palm wine in bone broths for centuries for exactly this reason.
Step 4: Add your aromatics
Drop in the onions, carrots, celery, bay leaves, and peppercorns. Make sure the bones are just covered with water. Leave about an inch of space at the top.
Bring everything to a gentle simmer on the stovetop. You’ll see some foam rise. Skim it off with a spoon. This takes about 5 minutes.
Step 5: Into the oven
Preheat your oven to 180°F. If your oven’s lowest setting is 170 or 200, that works too. Anything between 160 and 200°F is fine.
Put the lid on your Dutch oven and slide it into the oven.
At this temperature range, the collagen melts slowly and evenly into gelatin without being destroyed by high heat.
Now you have two options for how long to cook it.
Step 6: Choose your timing
First one: Leave the pot in the oven for 12 to 18 hours. I usually start it after lunch and pull it out the next morning. This makes great broth.
Second one: Pull the pot out after 8 hours and leave it on the counter with the lid on. Let it cool for 8 to 10 hours. As the broth cools slowly, minerals and gelatin keep leaching out of the bones into the liquid. It’s a second extraction that happens while you sleep. I picked this up from an old Mexican cooking technique, and it made a noticeable difference.
After the rest, put the pot back in the oven at 180°F for another 4 to 6 hours. When you pull it out, bring it to a rolling boil on the stovetop for 5 minutes before straining. That boil is a safety step to kill any bacteria that might have developed during the rest.
Step 7: Strain, chill, and store
Fish out the big bones with tongs. Pour the broth through a fine-mesh strainer or cheesecloth into a large bowl or another pot. Toss the vegetables and bone fragments.
Let the broth cool, then refrigerate it overnight.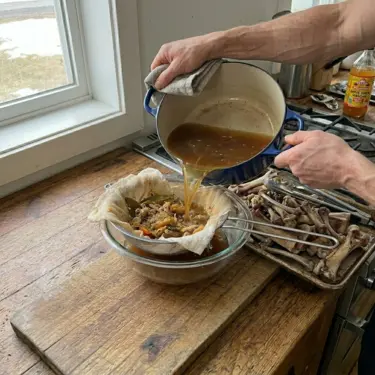
The next morning is the moment of truth. Open the fridge and give the container a little shake. If you did everything right, it should jiggle like Jell-O. That’s pure gelatin.
You’ll also see a layer of fat on top. Scrape it off and save it for cooking. That’s good fat, especially if it came from pastured animals.
👉 Why You Should Bury a Trash Can in Your Backyard
For storage:
- Fridge: about 5 days
- Freezer: 4 to 6 months in jars or containers (leave headspace so the glass doesn’t crack)
- Pressure canning: shelf-stable if you follow USDA guidelines
I pour some into ice cube trays too. Those frozen cubes are perfect for loosening the stuck bits from a hot pan or adding flavor to rice and beans without thawing a whole jar.
Why This Works Better
I’ve made broth both ways enough times to know the difference isn’t subtle.
- Blanching gives you a clean-tasting broth without that cloudy, off flavor.
- Roasting adds a depth that stovetop broth just doesn’t have.
- The acid soak pulls more minerals out of the bones before the heat even starts.
- The low oven keeps the temperature in the sweet spot where collagen becomes gelatin without falling apart.
And then there’s the practical side. I don’t babysit a pot on the stove. I don’t worry about it boiling over at 2 a.m. I put it in the oven and go handle other things. On a homestead where the to-do list never ends, this is important.
What I’ve Learned
Feet and joints are the best. Marrow bones add richness, but knuckles, necks, and feet are where the gelatin lives. If your broth isn’t gelling, add more of these next time.
Don’t salt during the cooking. Salt concentrates over 12 to 18 hours and you’ll end up with broth that is too salty to use. Season when you’re actually cooking with the broth.
The pressure cooker shortcut. When I’m short on time, I pressure cook the blanched and roasted bones with vinegar for 2 to 3 hours, then transfer to the oven at 180°F for another 3 to 4 hours. Not quite as good as the full method, but close, and it cuts the time in half.
Use it in everything. I cook rice in it. I braise greens in it. I reduce it down thick and use it like a sauce. I sometimes drink it for collagen.
Making bone broth started as a way to stop wasting bones. This was my main concern, but the more I got into it, the more I realized I was building something closer to a home pharmacy.
Bone broth is pure gold for your health. It keeps your gut healthy, it keeps your joints strong and without pain, and since I started cooking with it, I swear I’ve stopped getting sick that often.
The thing with bone broth is that it works more like a preemptive measure. It won’t help you with a toothache at 11 pm when the dentist doesn’t open until Monday. Or a chest cold that’s been hanging on for two weeks.
And when you do get to see a doctor, the bill alone is enough to make you think twice about going back. A hundred dollars just to sit in a waiting room for two hours so someone can tell you to take ibuprofen and rest. Meanwhile, the nearest hospital is 1 hour away, in the best scenario, and charges like you’re made of money.
That’s how I came across Dr. Maybell Nieves. She’s a surgeon in Venezuela who kept treating patients after their hospitals ran out of electricity, running water, and medicine. She figured out how to handle infections, respiratory problems, heart issues, and dozens of other everyday health situations using whatever she had on hand. Most of her methods don’t even need medical training to follow.
👉 Click here to see what Dr. Nieves did when the medical system around her collapsed
Try This Method on Your Next Batch
I indeed wasted some time making thin broth, but this was the way that allowed me to become curious and learn more. That’s how I stumbled across the method presented in this article.
I tried it, and everything changed. Maybe this happens to you too. You read my article and decide to try a new way to make bone broth. If you use this method, please let me know in the comments.
I’d be really glad if you shared your experience with the other readers and me. We all can learn something from this!
You may also like: 
9 Foods You Can Forage For Free Near Your House
The Mucus Buster That Clears Your Chest in Minutes (Video)
Dutch Oven Recipes Cowboys Survived On
Canning Bone Broth That Lasts For More Than 2 Years
Shelf-Stable Foods That Kept Coal Miners Alive During the Great Depression


Way too much time and work. I make broth in an instant pot its simple and always gels.