Anyone who raises chickens is familiar with the usual list of daily, weekly and monthly chores. Clean and check the waterer, clean and refill the feeder, harvest the eggs, clean the coop and every morning and evening, lock up the coop. It can get wearying, especially when it’s raining or winter. But there are ways to automate some things, especially the chicken coop door.
In case you don’t have a chicken coop yet, but you want to change this, check out this guide and see how to build a DIY chicken coop in one day. This is one of the most efficient methods we have found and is all based on the old Amish knowledge. 👉 Click here to get access to the whole step-by-step guide.
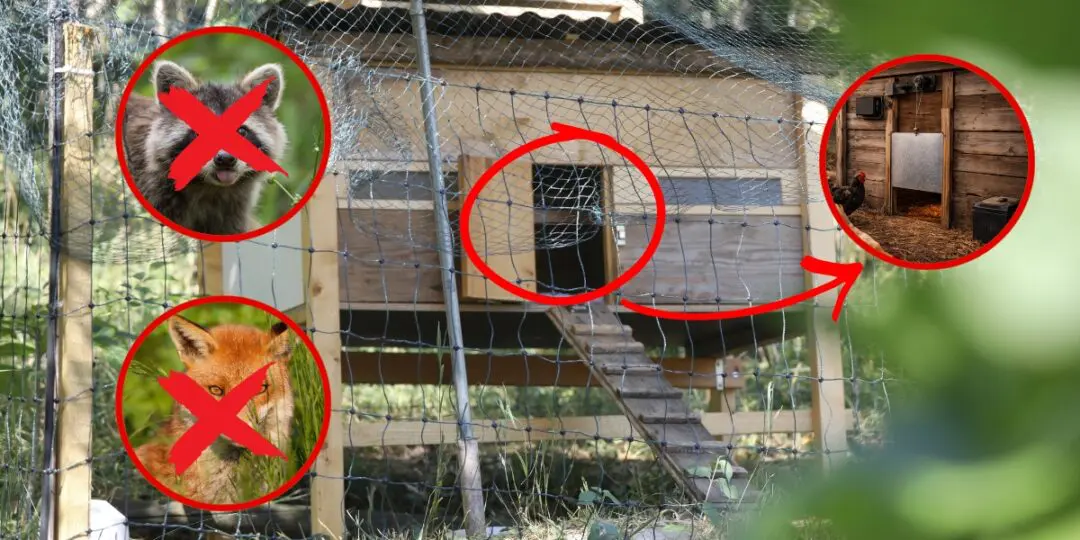
The Coop Door Can be the Weak Link
Most animals that prey on chickens are nocturnal, roaming around at night looking for opportunities. Even animals active during the day learn that the chickens are congregated in the coop through the night. The result is that many of us are up before dawn and heading out after dusk to unlock and lock our coops. That’s assuming we remember. But there’s a simple and inexpensive solution.
The Automatic Chicken Coop Door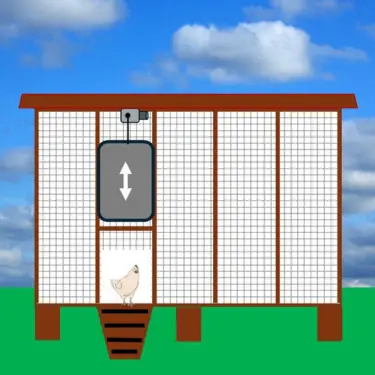
For not a lot of money, you can install an automatic chicken coop door that works either on a timer, wirelessly, or with a day/night detector. All of them will automatically open and close the door, and when properly designed, keep it locked in place.
We’ll get into step-by-step detail later in the article. In the meantime, here are some of the basic materials you need to think about:
Related: Best Automatic Chicken Coop Door Opener: Stress-Free Flock Keeping
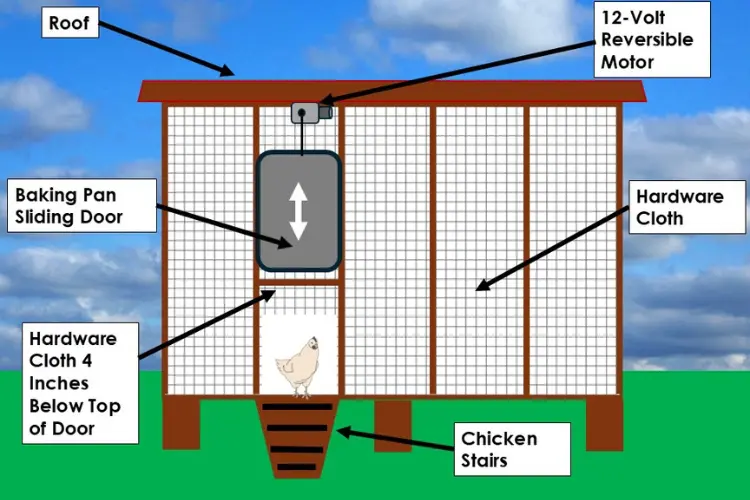
It Starts with a Shallow Baking Pan
We’re trying to do this frugally, but even then, an inexpensive, rimmed and ridged baking pan can make the perfect door for your automatic setup. For one, it’s metal as opposed to plastic or wood. Plastic isn’t always that strong and wood eventually splits and rots. A metal baking pan can be painted and repainted and will last for years.
You’ll Also Need a Small, Motorized Winch and a 12-Volt Battery
You can buy these online for about $25 USD. We’re using a 12-volt motor, which will run on a car battery. The battery charge will actually last a long time because the motor is only activated twice a day for seconds at a time. You’ll also need a small spool to attach to the motor to wind and unwind the next part.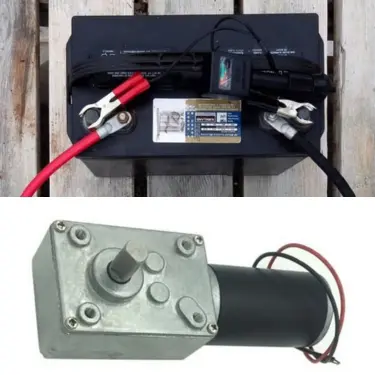
A Thin Galvanized Cable is Important
Rope and string rots and chains rust, use a thin, galvanized cable on your winch to raise and lower your door.
Choose Your Timer
You can activate your door wirelessly, with a timer of a day/night sensor that automatically reads dawn and dusk and opens and closes the door. We prefer the day/night sensor but that’s up to you.
Hardware Cloth
You can use this to contain the entire chicken coop, but you’ll need to cut it to fit your sliding door frame that we’ll talk about later.
Building the Automatic Door
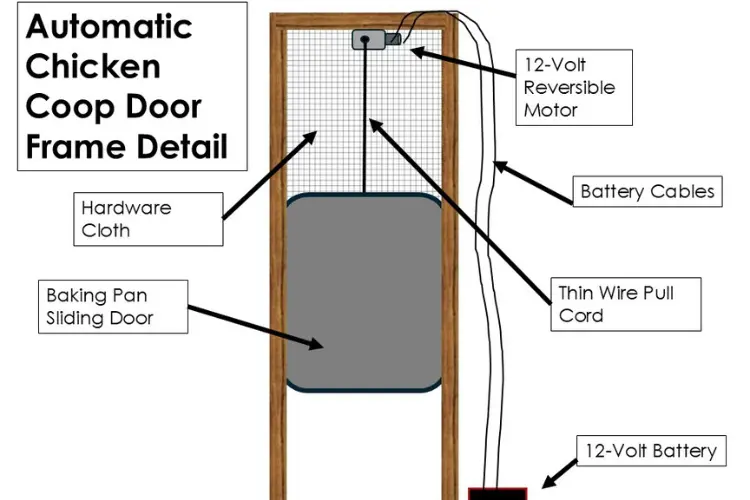
Below is an infographic demonstrating the basic setup. The most critical component is the door assembly. In general, the coop is a standard design using a fine mesh metal hardware cloth to contain the chickens.
Here’s the specifics for the door:
Materials:
- 2 – 2x4x8’s
- 2 – 2×4’s the width of your sliding door minus ½ an inch
- Hardware cloth
- 12-volt winch motor – reversible
- Various mounting brackets for the motor
- 8 feet of thin, galvanized cable
- Cable clips
- 12-volt battery
- 2 – 8 foot Wires or cables from the battery to the motor
- Day/night sensitive on/off switch (wireless or timer optional)
- Screws or nails to assemble the 2×4 frame
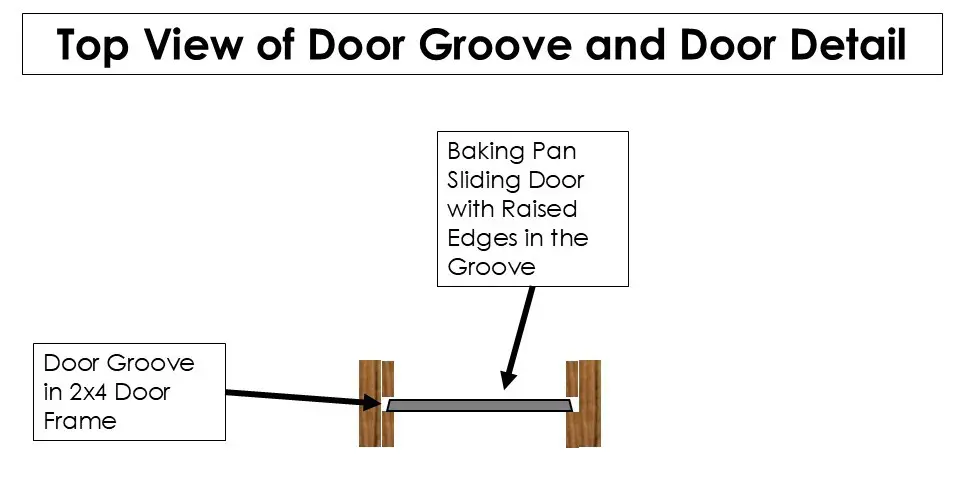
The basic idea is that the baking pan slides up and down in a groove in the 2×4 frame. Here are the step-by-step instructions.
- Cut a ¼ inch groove down the center of both 8-foot 2x4s. This will be the slot that the baking pan door will slide up and down in as the door is raised and lowered. Here’s a top view of how that looks:
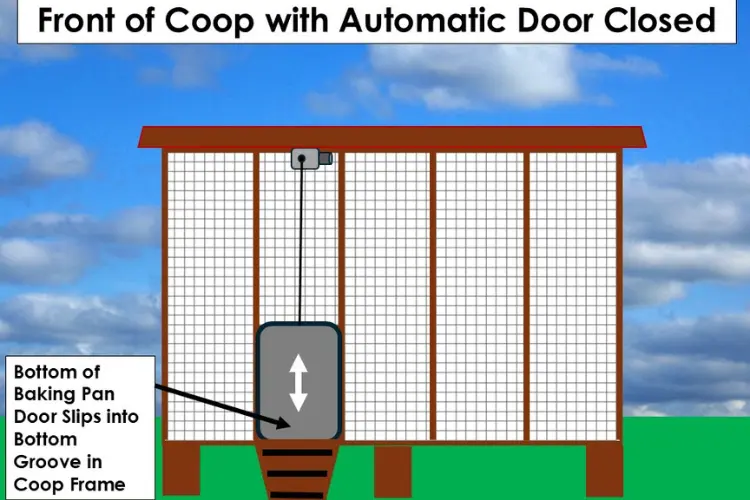
- Assemble the door frame with screws after cutting the shorter 2×4 lengths to the size of your baking pan door. Remember that you should make it ½ inch wider than the door so you can allow room for the grooves. Also, remember to insert your door into the grooves before final assembly of the door frame.
- Cut your fine mesh hardware cloth to fit the door frame, allowing for 4 inches of the mesh to extend below the top of the door when closed. This will help prevent predators from trying to paw through any gaps.
- Attach the spool to the motor shaft and affix the motor to the top of the frame with the spool centered at the top.
- Wind your wire cable around the spool, attaching the end to the spool.
- Wire your automatic day/night timer to the motor with the sensor facing the sky.
- Drill a hole in the top ridge of the pan and attach the cable.
- Wire the motor to the battery.
- Test your door and make any adjustments to the timing so the door raises and lowers only enough to effectively open and close.
But sometimes the automatic door is not enough too keep your chickens safe. Depending on where you live, predators can also attack during the day, not just at night. In this case, the automatic door would do just half of the job.
If you are wondering what happens to the other half, well, we have prepared some simple solutions for you that will keep your flock safe, so you will no longer need to worry. In this guide, you will see how to build the most efficient automatic traps with materials you already have in your shed.
- DIY wire snare for bigger predators,
- Bucket traps for smaller predators,
- Trap-systems for predatory birds.
You can get access to full instructions with pictures for all of these. 👉 Click here and keep your chickens safe forever!
Other Automatic Additions
While the automatic coop door can save you from waking up before dawn and remembering to close it at night, there are other automatic additions you can consider while you’re upgrading your coop.
√ A Wireless Camera
Something like a Ring camera or other wireless camera that connects to your wireless mobile phone can make it easy to check on conditions in your coop to see how things are doing. If you position it properly, you can also keep an eye on water levels in the waterer and feed levels. It mostly gives you the reassurance that things are okay in the coop, no matter where you are.
√ Automatic Waterers and Feeders
There are waterers and feeders that dispense water and/or food automatically. This is helpful, particularly if you’re traveling and away or during inclement weather when you may be less inclined to head out to the coop.
√ Waterer Heaters
These are low-wattage heaters that keep the water in a chicken waterer thawed during winter. They can also be run off of the same 12-volt battery you’re using for your automatic door because they draw such a small amount of power.
√ Motion-Activated Solar Lights
Lights attached around the coop and pointed away can deter predators. The motion activation detects movement, and the solar panel keeps them powered.
It’s Not Hard
A lot of these automatic coop features can be installed in a day or less. How automated you make your coop is up to you, but if there’s one thing that can help and protect your chickens, it’s the idea of an automatic coop door.
You may also like: 
Join Our Homesteading WhatsApp Community!
This Secret Amish Recipe Will Keep Your Chickens Healthy All Year Long (Video)
10 Things I Wish I Knew About My Chickens Before Spring
I Fed Stinging Nettles to My Chickens, and This Happened
Why Are My Chickens Eating Their Own Eggs?


Can you add to this article how to attach it to a solar powered small battery? I have a chicken door that is solar and goes to a USB-C cable. I would love to be able to do the same thing with this fascinating homemade chicken door.