I was maybe ten years old the first time I saw my grandfather put a coffee can into a fence post hole. He didn’t explain what he was doing. He just did it, tapped the post down on top and moved on to the next one.
I remember thinking this was one of his weird habits, like the way he’d spit on his hands before grabbing the axe. Years later, I’m out building my own fence line and I catch myself reaching for a coffee can without even thinking about it.
In reality, my grandpa wasn’t being strange. Actually, he was a genius. And it turns out, farmers all over the country were using coffee cans, the exact same way, for generations. There’s a good reason behind this strange method, and by the end of this article, you’ll know exactly how to use this trick on your own homestead.
How It All Started
So here’s something a lot of people don’t know. Back during the Great Depression, folks in the country had every reason not to trust banks. Banks were shutting down overnight, taking people’s life savings with them. So farmers did what they knew best: they improvised. They’d grab a coffee can or a mason jar, stuff it with coins or whatever cash they had, and bury it right under a fence post. Just pull the post out, drop the can in, and set the post back on top. Nobody would ever think to dig there, and they could keep an eye on the spot from their kitchen window.
My uncle once told me about pulling out a rotten post on the old family property and finding a rusted can with silver coins inside. This kind of thing happened all across farm country.
Nowadays, nobody’s stuffing cash in coffee cans anymore, but the instinct behind it, protecting what you have when the system fails you, that hasn’t changed one bit. Banks failed back then and they can start failing again at any moment. Inflation is eating your savings, supply chains are breaking down, and grocery prices are making you feel like you’re being robbed in broad daylight.
Your grandfather prepared with what he had. The question is, what are you doing right now to prepare?
But now, let’s see how to use coffee cans on your homestead.
The Fence Posts Problem and What You Can Do About It
If you’ve ever grabbed a fence post and it just kind of… wiggled, it’s because of rot. This happens when moisture gets into the wood, either from the ground or from rain soaking in at the top. Once fungi move in, the whole pole starts going down. I’ve seen cedar posts give out in five years flat when the drainage was bad.
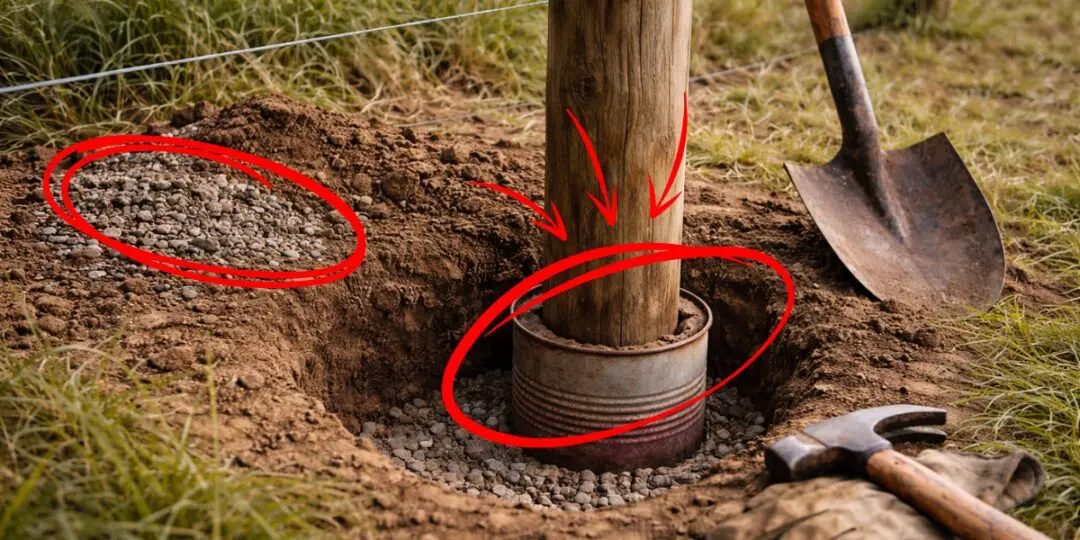
The whole game is keeping water away from the wood. Especially the base and the top, where the grain is wide open. The best thing you can do today is treat the bottom of your posts with something like Cuprinol, which is a wood preservative with copper naphthenate. You can grab it at any hardware store. Throwing some gravel in the bottom of the hole helps too, keeps the post from just sitting in a puddle down there.
This is also where the coffee cans enter the picture. Farmers figured out a bunch of clever ways to use them to shield posts from rain.
The Drip-Feed Trick That Keeps Posts Standing for Decades
This is one of my favorites. Once your posts are in and the wire is up, you let everything dry out for a week or two. Never skip this step; it’s essential.
After everything is dry, you take a coffee can that fits over the top of the post, nail it there, and poke a couple of small holes in the bottom of the can. Fill it up with wood preservative and you’re all set. Over the next few weeks, the substances will slowly drip down through the top of the post and work their way deep into the wood.
Now, the old guys used waste motor oil for this. And yeah, it worked, but motor oil is loaded with toxins that can end up in your soil. If you asked me, I would say: not worth it. Grab a real wood preservative instead. Same protection, and you’re not messing up your land.
Coffee Cans as Post Caps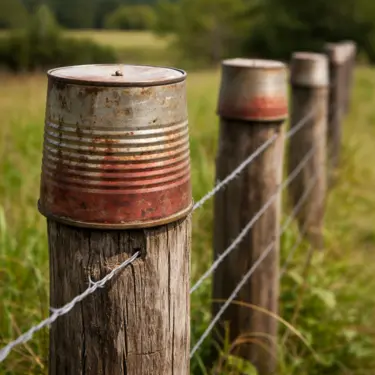
If you ever go for a drive through old farm country, you’ll still see this. A whole line of fence posts with beat-up coffee cans flipped upside down on top is not an unusual sight. It can look kind of rough, I’ll be honest, but here’s the thing: it still works really well. The cans send rainwater right off the top, so the water never sits on the wood. This single little move can buy your fence a bunch of extra years.
How to DIY:
- Clean your cans and file down the sharp edges.
- Flip them upside down on the post tops.
- Tap a nail in to hold them if they’re wobbly.
Look, if you want something nicer looking, you can bevel the tops of your posts with a saw or grab some caps from the store, but if you’re like me and you’d rather spend nothing, coffee cans get the job done. I stuck them on my garden fence last spring and those posts have been dry through some pretty bad weather.
Dip the Base Before You Set It
This takes just two minutes and it’s one of the smartest things you can do. Before the post goes into the ground, dip the bottom end in a coffee can filled with wood preservative and let it soak. The bottom is the part that’s going to sit in damp earth for years and years, so a little love upfront goes a long way.
- Fill a coffee can with copper naphthenate preservative.
- Stand the post in it so the bottom 8 to 12 inches are submerged.
- Give it a few minutes, then pull it out and let it dry on a tarp.
- Set it in the hole with gravel at the bottom for drainage.
I did this with every post on my goat pasture fence. That was over five years ago, and every single one is still rock solid. Honestly, it’s one of those things I wish someone had told me about sooner.
Digging and Stashing Supplies
Old fencers down in the Texas Hill Country used to head out with just two things: an iron bar and a coffee can. See, out there, the ground is mostly limestone, so you can’t just dig a clean hole with a posthole digger. You have to chip through rock first. They’d break it up with the bar, then scoop the loose pieces out with the can. It fits down into a narrow post hole so much easier than a shovel, and your back will thank you at the end of the day. Even if your soil isn’t that rocky, it just makes the whole job faster.
And here’s a little something I started doing that puts a modern twist on the buried-can tradition. Instead of hiding money, I keep a coffee can buried near my fence line with repair supplies inside. Galvanized nails, wire staples, a roll of repair wire, and a small pair of pliers wrapped in a rag. I just dig a shallow hole about a foot from the post, drop the can in, cover it with a flat rock, and mark the spot with a painted stone. When something breaks while I’m out checking on the animals, I don’t have to haul myself all the way back to the barn. Everything’s right there.

Your Fence-Building Checklist
Alright, here’s everything in order so you can just follow along:
- Gather your supplies: treated posts, gravel, copper naphthenate preservative, a handful of coffee cans, nails, a digging bar, a posthole digger, and fencing hardware.
- Dip the base: let each post soak in a can of preservative for a few minutes before it goes in the ground.
- Dig the holes: use a digging bar and a coffee can to clear out rocks and dirt, go one-third the post length deep, add six inches of gravel at the bottom.
- Set the posts: drop the post in, get it nice and straight, pack the soil tight.
- Treat the tops: nail a can on, punch holes, fill with preservative, and remove after a few weeks.
- Cap the posts: flip a clean can on top to shed rain, or bevel with a saw.
- Stash supplies: bury a can of repair gear near your main posts for quick fixes.
If you deal with hard freezes, go a little deeper with your posts. Follow these steps and your fence should outlast just about anything the weather throws at it.
Final Thoughts
Next time you finish a can of coffee, don’t toss it. Rinse it out and throw it in the barn or the shed. You’d be surprised how often it comes in handy when you’re out working on fences, garden beds, or just about any project around the property. It costs you nothing, it takes up barely any space, and when you need it, you’ll be glad it’s there. Sometimes the most useful tools on a homestead are the ones nobody thinks to keep.
And that’s the thing about homesteading. The small stuff adds up. Treating a post before it goes in the ground. Capping it with something that costs nothing. A trick your grandfather never bothered to explain because he just expected you to figure it out the way he did.
And you know what, our future is starting to loook more like what your grandfather prepared for. You feel it every time you buy groceries, every time the power flickers, every time something costs more than it did last month. You’ve been meaning to get more prepared, more self-sufficient, more ahead of the curve. But somehow it keeps getting pushed to next week, next month, next season.
A coffee can on a fence post is a good starting point, but this is just one trick. No Grid Survival Projects gives you over 70 more. Step-by-step, affordable DIY projects for water, power, food preservation, home security, and off-grid communication. All laid out with detailed instructions, photos, material lists, and walkthroughs so you can actually get the job done.
👉 Click here to get your copy of No Grid Survival Projects before they’re gone.

You may also like: 
Join Our Homesteading WhatsApp Community!
How To Build An Endless Hot Water System Without Electricity (Video)
How I Made a Solar Herb Dryer with Scrap Materials
The Pioneer Way to Dig a Well by Hand (No Equipment Needed)
Shelf-Stable Foods That Kept Coal Miners Alive During the Great Depression


