
Have you ever wondered what the structure of your garden soil is? It would help when making decisions on what and where you might plant, as well as amending the structure of your soil.
This test is so easy that I recommend doing it each year before creating a garden plan. The results of the test could determine how much fertilizer you use or what changes you should make to the soil depending on what you plan to grow in your garden.
It comes down to the number of various particles and components that make up your soil. The shapes and sizes of each group of particles determine the soil’s structure and how well it will work for growing your garden. A good understanding of the soil and its components will lead to a more successful year of growth.
Understanding the Basic Components of Soil
 Most soil contains 3 components; sand, silt, and clay. And, each region and area will have a different structure of these 3 components.
In fact, different areas within your own property could vary quite a bit from one area to another.
Clay – This is the smallest of the 3 mineral components. It consists of tiny and flat particles that fit together and often creates the biggest area of soil in many areas.
Clay consists of necessary nutrients and works well as storing water. So, having a large amount of clay can work in your favor, unless you have an abundance of rain in a season. It’s also a cooler soil that takes longer to warm up in the spring.
Sand – The largest particle making up soil is sand. These particles are round, which allows more space between particles. As a result, water will drain more quickly from sandy soil, than one of more clay. Another downside is that the nutrients drain right along with it. For gardens with a large amount of sand, it will require more fertilizer and water than soil consisting of more clay.
Silt – The size of silt particles is between clay and sand, but closer to clay. Soil that consists of a large amount of silt is typically found along riverbanks. This soil feels smooth while moist, yet powdery when it’s dry.
A good combination of all 3 of these particles is referred to as loam soil. And, it’s the best type of soil for gardening. To obtain loam, you need to know what you currently have, so you can make adjustments.
So, grab a mason jar…
The Mason Jar Soil Test
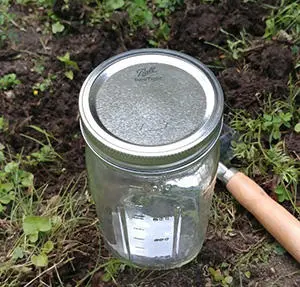
Start with a clean and empty jar, such as a mason jar, including the lid. It could be either quart or pint size. You just need a jar with lid, soil, and water.
#1. Fill the jar halfway with soil.
#2. Add water. Fill to about 1” from the top and put the lid on.
#3. Shake the contents for a few minutes.
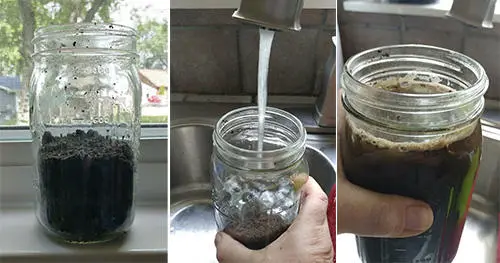
#4. Set the jar aside for a few hours. As the content settles, it will separate into layers of silt, sand, and clay.

What you should see in a few hours:
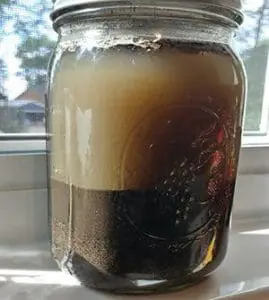 At the bottom, you will see the heaviest layer, consisting of sand and rocks;
- The next layer will consist of silt;
- Next will be the layer of clay;
You should also see some organic matter floating at the water’s surface. Also, keep in mind that the color of the soil is indicative of the amount of organic material within it. The lighter it is, the less there will be. Dark soil holds more organic matter and will warm quicker in the spring.
Reading the Results
Once you have done the test, you need to know what it all means and if you have the desired loam soil.
- Loam – 40% sand, 40% silt, and 20% clay;
- Silty Clay Loam – 60% silt, 30% clay, and 10% sand;
- Sandy Loam – 65% sand, 20% silt, and 15% clay;
- Silty Loam – 65% silt, 20% sand, and 15% clay;
So, knowing that loam soil is an idea, what amendments could you do to achieve it?
Sandy Soil – A good way to amend a sandy soil is to add compost or manure. This is probably the fastest way to get it to a loamy state. However, both compost and manure contain significant amounts of salt, and high levels of salt can be damaging to plants. So, if you already have high levels of salt in the soil, such as seaside gardens, use a plant-only based compost.
Silty Soil – You can amend silty soil by tilling in 1” Cocopeat to break up clay particles to help with aeration, 2” of Perlite to help with drainage, and 4” of compost to help with water retention.
Clay Soil – For the same reasons as above with silty soil, till in the same ingredients, but adjust the amount to 1” Cocopeat, 4” of Perlite, and 6” of compost.
My test resulted in about 50% sand, 40% silt, and maybe 10% clay. So, I have fairly good soil in that area. But, to get my perfect soil, I would do a combination of the sandy and silty soil amendments listed above. Or, because it’s so close to the desired loam, I could just add fertilizer and water more often.
However, the area I tested is where we normally put a few annuals. We plan on planting a large produce garden on the other side of the house next year, and that will most likely have a completely different test result. Therefore, it’s important to do a different test for every area you intend to plant a garden.
Hopefully, this helps in getting you closer to the perfect soil for your garden. No more excuses! Well, except for maybe pesky critters that you will need to keep at bay.
You may also like:
What Happens If You Bury Toilet Paper In Your Backyard? (Video)
How to “Winterize” Your Pipes and Prevent Damage
Homesteading After 60 What You Need To Know
How To Make A Mini Root Cellar In Your Backyard In Less Than Two Hours


You say fill the jar halfway with soil. Should this be a plug, going down a few inches? I’m assuming you don’t want just top soil.
I don’t think you need to use a plug. You can just take a little soil from your garden and test it. Basically, it is about testing the soil in which you want to plant and does not require a certain depth. It is necessary for the soil to cover the seeds in such a way as to take root. There are some plants that can be planted in a certain type of soil.
I would say yes take a plug as the roots will grow down into more than just the topsoil, whatever that exactly is. Also factor in how deep you cultivate it.
Honestly get a rototiller and some manure and forget about this.
Put a drop of dish soap in the jar – helps it separate a little easier 😉