I got into all these beeswax projects purely by accident. I was trying to find a way to use less plastic. I was tired of plastic bags, plastic sheets, and all the plastic stuff you use on a daily basis in the kitchen.
This is how I stumbled upon a guide that was explaining that you can use beeswax to make your own food wraps. I told myself that this sounds like exactly what I was looking for. And I was right. I stopped wasting money on plastic food wrap since then!
It’s so funny when I think back about it because after this project, more wax projects “appeared” in my life and some of them were even introduced by my lovely husband.
Now, I want to present you with some of the DIY projects with wax that I find essential on a homestead. I’ll also explain to you how to do the food wraps, and some others that I believe will make you want to grow your own bees in the backyard.
Natural Beeswax Furniture Polish and Wood Finish
This one is all Mark, my husband. He builds a lot of our furniture and he’s particular about how he finishes it. Store-bought polishes annoyed him because most are full of synthetic stuff that wears off in weeks. That’s how he decided to make his own beeswax polish.
Wood dries out and cracks when it sits in moisture and sun. A beeswax-and-oil polish soaks into the grain, adds a soft shine, and creates a water-repellent layer that holds up. Research from Polymers showed that beeswax polish improves wood’s structure, boosts water resistance, and even adds antibacterial properties.
What you need:
1 oz (about 30 g) beeswax pellets or grated beeswax
6 tablespoons food-grade mineral oil or fractionated coconut oil
A few drops of lemon or lavender essential oil (optional)
A heat-proof jar, a saucepan, and a clean glass jar with a lid
Note: Mineral oil doesn’t go rancid, so the polish lasts. Olive oil or unrefined coconut oil smell nice but can spoil if you don’t use the polish fast.
How to make it:
- Set up a double boiler. A few inches of water in a saucepan and a heat-proof jar sitting inside. Bring the water to a simmer.
- Drop the beeswax into the jar and let it melt. It goes fast since the melting point is low. Don’t crank the heat to rush it.
- Once the wax is liquid, pour in your oil and stir until combined. Mark uses a 1-to-4 ratio (wax to oil) for cutting boards, so it stays soft, and a 1-to-3 ratio for furniture where he wants a firmer finish.
- Pull it off the heat and stir in essential oil if you want. We usually pick lemon, but the choice is yours.
- Pour the polish into your storage jar and let it cool.
To use it, scoop a small amount onto a lint-free cloth and rub it into the wood. Give it 20 to 30 minutes to soak in, then buff with a clean cloth. You’ll see the grain pop and feel the surface go smooth without getting slippery. Reapply every few months or whenever the wood looks dry.
Last year, we bought a dining table from a big-box store. Looked great in the showroom and it was exactly what I was looking for. Within two years, the veneer was peeling, the joints wobbled, and one leg had a crack running up the inside that you couldn’t see unless you flipped it over. That table cost us close to $500, and it didn’t even last!
Meanwhile, a little side table Mark built from scrap oak we had in our garage is still sitting on our porch. It’s been rained on, sat on, used as a plant stand, and knocked over by the dog. It’s still standing there in good shape, not bothered by anything.
Maybe you had the same experience with expensive store-bought furniture. Most of it is not built to last because they want you to keep buying their products.
When you make your own furniture, you are the one deciding the materials and how you want to build the piece. You are the one deciding if it’s going to last 5 years or 25+ years.
Mark learned a lot of the stuff he knows now from a set of woodworking plans he found online years ago, a collection called TedsWoodworking. It’s over 16,000 plans, all with step-by-step instructions, cut lists, and materials lists. He started with a basic bookshelf, then a workbench, and then moved on to the kitchen table we eat at every night.
👉 Check out TedsWoodworking here
DIY Beeswax Food Wraps
This is my first wax project, and oh, how proud I was about it. And I still make a fresh batch every few months because they wear out and I also like the process.
The process of this one is very simple. You coat cotton fabric with beeswax, and it becomes a reusable, washable wrap that keeps food fresh. People have been doing versions of this since at least 700 BC! What I liked most was that the antimicrobial properties slow down spoilage. This perk makes the beeswax wrap more than just a physical barrier. 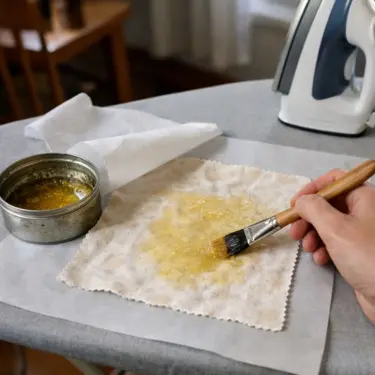
Materials:
100% cotton fabric, pre-washed and cut into squares (I do 12 x 12 inches). Use pinking shears so the edges don’t fray.
1/4 cup beeswax pellets (more for larger wraps)
1 tablespoon jojoba or coconut oil for flexibility (optional, but I always add it)
1 tablespoon pine resin or powdered gum rosin for tackiness (also optional, but it helps the wrap cling)
Two sheets of parchment paper, bigger than your fabric
A paintbrush, an iron, and an ironing board
How I do it:
- Lay parchment paper on your ironing board, set your fabric square on top, then cover with the second sheet of parchment. You’re making a sandwich.
- Melt your beeswax (with the resin and oil if you’re using them) in a clean can sitting in a pot of hot water. Bring it to a boil, drop the heat to low, and stir with a wooden spoon until everything melts.
- Lift the top parchment and spread a thin layer of wax across the fabric. Move fast because beeswax cools quickly. Don’t worry if it looks uneven.
- Put the top parchment back and press with a hot iron, moving from the center out. The heat remelts the wax and pushes it through the fabric. Keep the wax inside the parchment, trust me. I once let it seep past the edge and spent 20 minutes scraping my iron.
- Peel the fabric off while it’s still warm and check for dry spots. If you see any, add a bit more wax and iron again.
- Let it cool, then trim the edges with pinking shears.
Your wraps won’t cling like plastic wrap, but the warmth of your hands softens the wax enough to mold it around a bowl or a piece of cheese. I use mine for half-cut avocados, leftover bowls, and bread. They work great!
👉 THIS Organic Gardening Secret Grows You Up To 10 Times The Plants, In Half The Time
To clean, wash them in cold soapy water and air-dry. Hot water melts the wax right off, so don’t do that!
When the wraps start losing their grip after a few months, just lay them between fresh parchment and iron them again.
Wax Fire Starters
These take about 15 minutes to make, and they perform incredibly well for such a simple DIY project. One of these little wax pucks burns hot and long enough to help you light up even the most stubborn wood.
Materials: 
About 1 cup of beeswax, paraffin, or old candle ends
Combustible filler: sawdust, dryer lint, shredded paper, cotton balls, dried pine needles, or ground corn cobs
A muffin tin with paper liners, or an old egg carton
A glass jar and a saucepan for your double boiler
How to make them:
- Fill each muffin cup or egg carton section with your filler. I like mixing sawdust and dryer lint. Make sure some material sticks up above where the wax line will be, so you have something to light.
- Melt your wax in a jar set in simmering water.
- Pour the melted wax over the filler until it’s soaked through.
- Let them cool and harden. Pop them out and store them in a sealed tin or bag.
Instructions to use them: Tuck the puck in fire-starting material, light the exposed filler, and step back.
The wax melts and feeds the flame for several minutes. This is enough time to add the wood above it. I made a batch of these last fall and we used them all winter in our wood stove.
You can add a few drops of pine or cinnamon essential oil to the wax if you want a nice smell when they ignite, but that’s just for fun. Follow the same rules as always: double boiler, stay close, don’t overheat.
Waterproofing Cloth or Canvas
This last one was Mark’s idea. He needed a waterproof cover for the tools he stores outside and didn’t want to buy a cheap tarp that would get destroyed easily. That’s how he decided to wax a piece of heavy canvas, and I helped because the ironing part needed four hands.
Now, a little bit of history. Waxed cloth is the original raincoat. Before modern synthetics, people rubbed beeswax into cotton and canvas to make it shed water. Sailors used it, cowboys used it, and it works just as well now, so why not use it too?
What you need: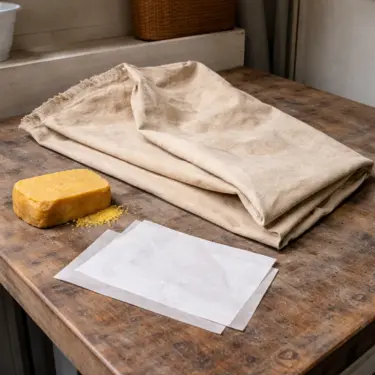
100% cotton or canvas fabric, pre-washed
A beeswax block or pellets (about 1 oz per square foot of fabric)
An iron and an ironing board
Parchment paper
If you want even more waterproofness, mix equal parts beeswax, pine rosin, and a small amount of linseed oil. That’s closer to what they used in the 1800s, and it holds up even better.
How we did it:
- Cut your fabric to size and iron it smooth. Lay it on a sheet of parchment paper.
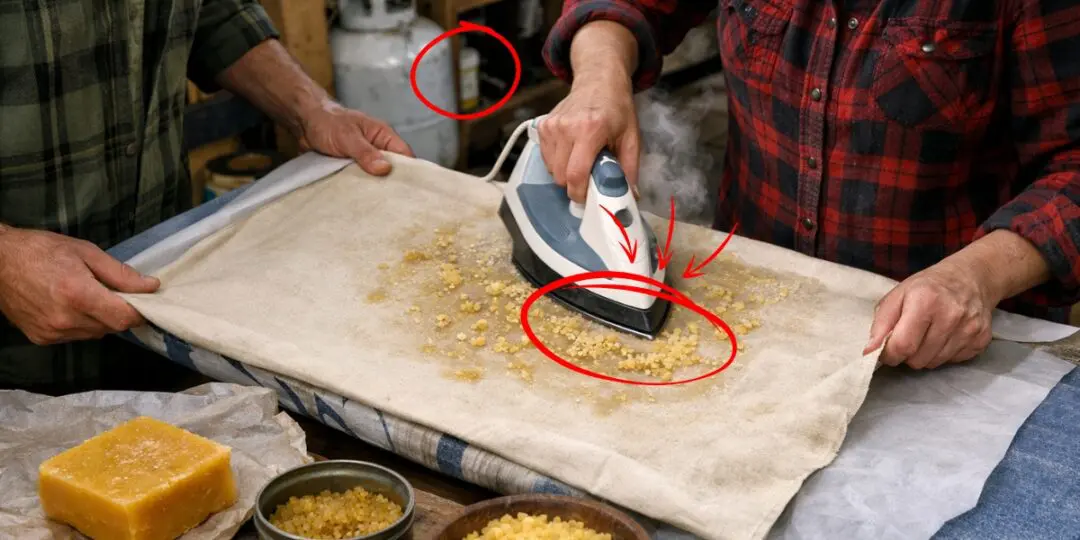
- Rub the beeswax block across the fabric, pressing hard. Cover the whole surface. If you’re using pellets, sprinkle them evenly instead. Mark went back and forth in rows, just like when he mows the lawn.
- Cover the fabric with another sheet of parchment and run a hot iron slowly over it. The wax melts and soaks into the fibers. Go over dry spots again.
- Flip the fabric and do the other side. Rub, cover, iron. This is where the second person helps, because someone can hold the fabric taut while the other irons. We traded off and it went twice as fast.
- Hang the fabric to cool. Sprinkle some water on the surface. It should bead right up. If any spots soak through, add more wax and iron that section again.
The fabric will feel stiff at first. Crumple it up a few times with your hands and it will start to loosen up. Don’t put it into the washing machine because the heat and agitation remove the wax. Instead, brush off the dirt or wipe it down with a damp cloth.
Mark’s canvas has been outside through rain, snow, and summer heat for over a year. He re-waxes it once a year. It takes about 20 minutes and it’s good for another round.
Hand-Poured Beeswax Candles
I started making candles because paraffin-made ones gave me headaches. That chemical smell and the black soot on the jar rim were enough to push me toward beeswax. It turned out to be a pretty good idea. Beeswax burns slower, drips less, puts off almost no smoke, and smells faintly like honey.
What you need:
1 pound beeswax pellets or chunks
1/2 cup coconut oil or cocoa butter (optional, but prevents tunneling in jar candles)
Cotton or wooden wicks with wick tabs
Glass jars, tin cans, or thrifted teacups for containers
A double boiler setup
Essential oil, if you want scent (about 1 teaspoon per pound of wax)
👉 Do THIS With Your Dead Batteries and You’ll Get FREE Extra Energy
How to make them:
- Set up your double boiler: water in a stock pot, mason jar, or pouring pitcher inside. Add the beeswax and coconut oil or cocoa butter to the jar.
- Heat the water to a gentle boil and let the wax melt. Stir now and then. If you have a thermometer, keep it below 175°F.
- While the wax melts, prep your containers. Stick the wick tab to the bottom center of each jar with hot glue or a wick sticker. Wrap the top of the wick around a pencil resting across the jar opening to keep it upright. I learned early that an off-center wick ruins the whole candle, so take a second to get it right.
- Once the wax is melted, take it off the heat and stir in your essential oil if you’re using any. Be careful and don’t use too much essential oil! Three to four drops are enough.
- Pour the wax into your jars, leaving a little room at the top. Hold the wick steady as you pour.
- Let the candles cool without moving them. Trim the wicks to about 1/4 inch once the wax sets. Give them 24 to 48 hours to cure before you light them.
The coconut oil trick matters for jar candles. Without it, beeswax is hard enough to tunnel straight down around the wick instead of melting across the top. For taper candles, skip the oil so the wax stays firm.
And keep those wicks trimmed to 1/4 inch every time you light up. Long wicks smoke and create build-up at the tip.
Before You Start
Wax is flammable. Always melt it in a double boiler or a jar sitting in a pot of water. Never use direct heat, never walk away while it’s melting, and keep a fire extinguisher close. Work near an open window or flip on a vent. I’ve never had an incident, but I also never skip these steps.
Wrapping It Up
From my experience, working with beeswax is something every homesteader should try at least once. Besides the practical aspect, there is also something therapeutic about all of this. It slows things down in a good way. My mood always improves when I do a little project like the ones listed above.
Even more, most of these projects take less than an hour and cost next to nothing, especially if you source your wax from a local beekeeper.
We get ours from a guy two towns over, who sells it in big blocks at the farmers’ market. If you don’t have someone nearby, store-bought pellets work fine too. The one I recommend in the article is the closest version of what you can get from the local market.
You may also like:
Join Our Homesteading WhatsApp Community!
How To Wax Cheese For Long Term Storage
What Happens When You Pour Honey Over Meat (Video)
Have You Been Using Fake Honey?
Why Growing Bees Is Easier Than You Think
How to Make a Perfect Bee Pollen Smoothie


