We’re all facing some interesting food issues these past few years and many of us have taken this as a prompt to go ahead and start looking back at what others have done during times of food shortages. Producing your own food is a very satisfying endeavor though some are hesitant to work with meat. Whether it’s a nervousness about the slaughter process or they’re concerned that pathogens may be an issue in already-processed meats, it can be a daunting task.
So, let’s make it a little easier on you!
Picking a Meat
I generally advise red meat as your first project when it comes to pressure canning meat. Why? Red meat is very forgiving of botched attempts (and everyone will have a few of those, even following these instructions) and generally holds itself well for a few hours until you realize that something is wrong and have it for dinner that night.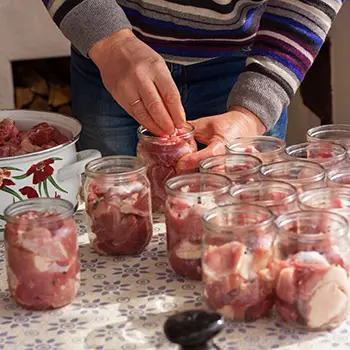
But which red meat? That all depends on what you have available. If you have a hunter in the family, there’s a good chance that your freezers are overflowing with venison. That’s okay; ours are, too. Using last year’s venison to experiment with canning, especially right before hunting season, is a great way to proof your method and free-up freezer space.
No hunter in the family? Look for on-sale hamburgers or boneless steaks. This can be the stuff that needs to be used today or tomorrow. That’s perfect for your new project.
The Actual Canning Process
Whether you’re working with a hot pack or processing raw hardly matters. Pints will pressurize for 75 minutes at 11-14 pounds (depending on your altitude) while Quarts will take around 90 minutes. This is with a standard wide-mouth Ball (or similar) jar.
Beyond this, it is impossible for me to give you information directly regarding your specific canner. A dial canner will work slightly differently than a digital canner, and if you have non-standard jars (or older jars), you’ll need to adjust your time and pressure weight for those as well. I strongly recommend looking into your owner’s manual (if you picked up your canner second-hand or you simply cannot find it, look up the model number online – most owner’s manuals are available in PDF format across thousands of different websites) and following the directions that you find there. Some older canners will require some fidgety numbers and may be dangerous if assumed otherwise.
Safety First
Beyond anything else, I have to remind you to be careful while pressure canning. Examine your jars well before use. Do not put cold or boiling hot jars into the press. Always make sure they are the appropriate temperature per your machine’s guidebook.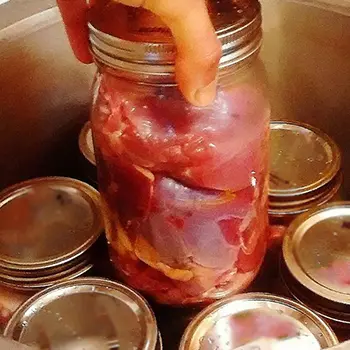
If your jar lids seem to be off a little bit, go ahead and remove them from the process.
Do a quick safety check with your pressure canner before you use it. This includes if you’re using a pressure cooker for this, as some people who have a ton of experience doing this may decide to do. A small test batch of something other than your canning meat is ideal; even if it’s just a jar of soup. This gives you the chance to assure that your hard work isn’t going to go to waste.
Great Big Mistakes
The worst mistake that you can make is putting a chipped, cracked, or otherwise compromised jar into a pressure canner and it happens all the time. It’s the number one cause of shattered jars. Run your hands over your jars and around their openings before you put them in the canner, just to save yourself the heartbreak of opening the lid and finding a pile of glass and meat at the bottom.
Another big mistake is cutting down on the sodium within your recipes. Remember that this sodium is keep your food from developing mold and other illnesses, like botulism, that may not be 100% proof when it comes to the home canning process. After all; professional companies sometimes have problems. You can, too. Though many recipes are very sodium heavy, it is necessary to keep your project, and your family, safe.
Last but not least is the issue with pressure canners exploding. While this generally doesn’t happen as much as it used to due to internal check systems and a lot of protective barriers, it can still theoretically happen if jars start bursting.
Related: Canning Mistakes Even The Most Advanced Homesteaders Make
If your pressure canner starts thudding or you hear glass bursting, do not try to go and save the project. Leave the room. Take all occupants out of the room and hide behind something thick and heavy; such as a mattress or a bookcase full of books. Pressure canner explosions are no laughing matter and can send glass and metal, as well as hot food, all over a room. Sometimes, glass bits can even penetrate thin interior walls.
Should your pressure canner make it but you know you’ve heard something shatter within, allow the pressure valve to relieve itself fully and wait for the end-cycle ding. Give it another 5-10 minutes before approaching it and, if you have one handy, wear an apron and safety glasses to open the device.
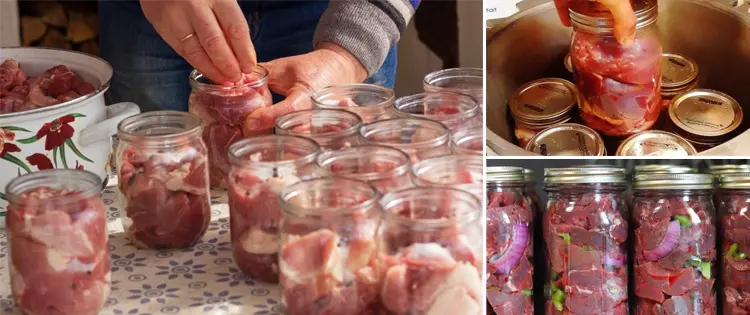
A Recipe for Success – Chunked Venison (Sliced Also Works)
- 1/2 Tsp of Non-Iodized Salt Per Pint Jar
- Pint Jars
- Rings
- Lids
- Use meat that is no larger than 1″ square or 2″ long if strips that are 1/4″ wide/thick.
- Pack cans tightly up to 1″ away from the lid.
- Proceed to use the canner as your instructions specify.
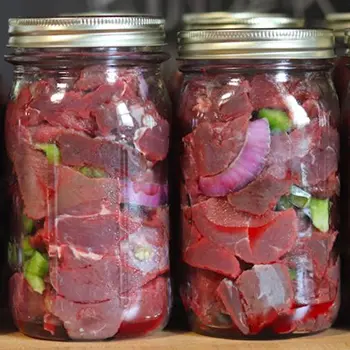
- These jars should keep for approximately 1-2 years on shelves.
If you want to do this with beef, the same standard applies to beef trim sizing. However, you should double your salt. Marinades are not recommended for this procedure, but other FULLY. DRIED. spices and herbs are a great idea. We don’t recommend anything wet simply due to the potential for spoilage but often use powdered sage and powdered rosemary in ours.
Final Thought
Now, time for the legalese. I cannot condone nor confirm that any of these recipes are safe or that your pressure canner will allow you to perform these recipes as described above. I don’t know anything about your particular equipment, so if you choose to follow these recipes: that is your choice. Please don’t sue me if your jars break because the advice above conflicts with that of your owner’s manual.
However, I will say that I’ve tried these recipes and found them fantastic for my family. I can’t recommend them enough on a personal level and I certainly hope that your equipment does allow you the option to enjoy this with us.
All in all, canning meat is a wonderful way to keep your family in essential protein no matter what is going on at the grocery store today, tomorrow, or in the far future. We highly recommend learning this talent along with canning everything else that’s usually on your menu: vegetables, fruits, even bread essentials, desserts, or protein-packed vegetarian entrees. Watch here in the future for more canning talk and for more suggestions on how you can create a pantry that is cold-proof, heat-proof, and starvation-proof.
You may also like:
20 Foods That Can Last 20 Years
An Insanely Effective Way to Build a 5 Year Food Stockpile (Video)
How to Keep Eggs Fresh for Months with Mineral Oil
The Lost SuperFoods: Book Review
10 Canning Recipes From The Amish
Makin’ Bacon: How to Dry Cure Pork Belly


Do we have to sign up? Is there a link to join?
Pressure canning meats or other low-acid foods needs to be taken seriously. Up-to-date, approved methods and equipment must be used to ensure a safe product and safe operation. It is heat and sufficient pressure and time that make low-acid foods safe, not the adding of sodium when you are pressure canning. Also, pressure cookers (not the same as pressure canners!) should never be used to can foods, as there is no way to determine how many pounds of pressure are being produced or what temperature the food has reached in order to eliminate all bacteria, molds, and yeasts, the microorganisms that cause food spoilage. Foods must reach at least 240 F. and be held there for a sufficient amount of time in order to do this. Water boils at 212 F. at sea level, and is not sufficient heat to kill all spoilage organisms, including botulism, that can develop in low-acid foods.
Modern pressure canners are very safe to use when manufacturer’s directions and proper care are followed by the operator. It would be fairly difficult to cause one to explode unless a total lack of common sense and failure to follow precautions and directions prevailed. Botulism kills and is a real danger in improperly processed low-acid vegetables and meats. Please follow modern approved methods, using modern equipment.
You are so right! I came here to point out that the comment in the article regarding salt is not true. Salt will not prevent the botulism toxin from developing. Only proper processing at 240 using a tested recipe can insure that any spores present are killed.