Everyone has heard of beef jerky – salty, chewy, and delicious. It makes for the perfect hiking snack or a way to sneak in that little bit of extra protein.
In fact, jerky is so great that most meat-eating cultures around the world have developed their own varieties of jerky, each made in their own way. From regular American-style beef jerky to South African Biltong, there is a surprisingly wide array of ways to preserve meat for long-term storage.
One of the more interesting and least talked about is the Mexican tradition of Machaca.
Not often made outside of Mexico, Machaca can be a great way to preserve those extra cuts of meat that you have leftover after butchering. Instead of turning them into ground meat for burgers or sausages, why not try and emulate North Mexican ranchers and make your very own Machaca at home?
What Is Machaca & Why Is It Different From Regular Jerky?
Machaca is the Mexican reply to regular jerky and is the somewhat ancient method of preserving those large cuts of meat that just won’t get tender no matter what you do.
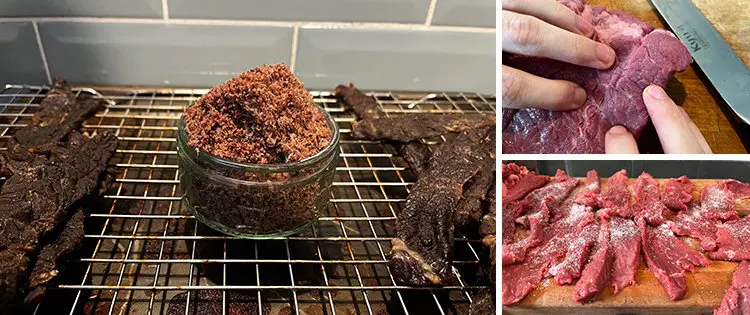
The meat, which was sometimes mixed with ground chilies and other spices, was traditionally dried and dehydrated by leaving it out under the hot sun, usually on drying racks. From there, the meat was pounded using rocks to break it apart and tenderize it, eventually shredding it into fine pieces. It was then stored away from the air and kept in this almost powdered form.
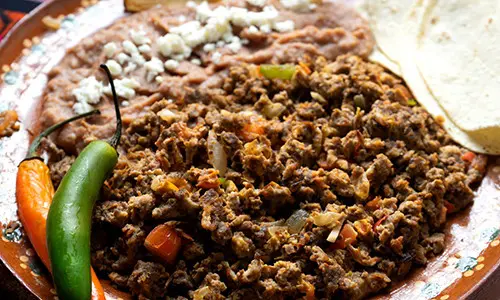
To use it, the Machaca is rehydrated with some water and then cooked until it swells back into a sort of ground beef consistency and then used in all kinds of different recipes.
So how do you make it at home? Just how easy is it to make some Machaca using meat from your own homestead?
What You’ll Need
To make Machaca, you will first need a cut of meat to dry. Meat destined to be made into Machaca tended to be those large cuts filled with loads of connective tissue and usually pretty unappetizing without long, slow cook times.
Pork shoulder, beef top sirloin, and any other cut you wouldn’t particularly want to make a steak out of are all great cuts for turning into Machaca.
Other than that, plenty of salt and whatever spices you plan on using are all you need. A lot of Machaca was made using nothing other than salt to help the drying process, but adding in fresh chilies like Poblanos was also very common.
First, though, you need to cut your meat.
Related: Makin’ Bacon: How to Dry Cure Pork Belly
How To Cut Meat For Machaca
The critical part of making Machaca is cutting it properly first.
Most likely, the meat you are using will be incredibly tough and filled with connective tissue, so you want to cut it to minimize any of that chewiness in the final product. This means cutting it across the grain.
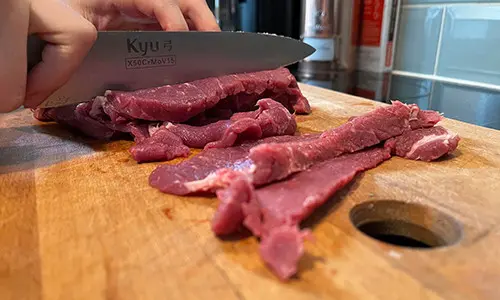
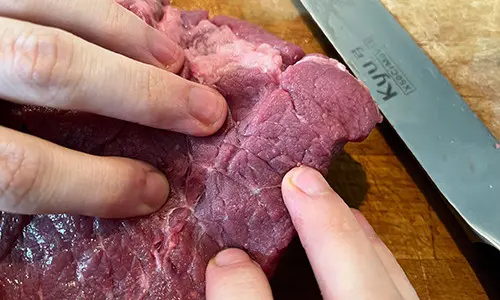
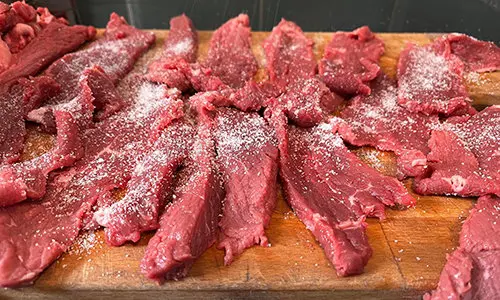
To find the grain, just pull the hunk of meat slightly apart, and the lines of the muscle fibers should make themselves clear. Then, just cut across all of the fibers rather than between them. This will create a softer, easier texture in the finished Machaca. Other than that, just make sure to slice the meat as thin as you possibly can, as this will help to speed the drying process.
After that, you want to salt your meat liberally with coarse salt, like kosher salt. The exact salt ratio is actually not entirely critical unless you plan on leaving this meat out on your counter for long-term winter storage.
There are a lot of calculators out there for working out the ideal salt ratio for preserving meat, but the joy of using something like kosher salt is that it is able to guide you into how much you need visually. Just sprinkle kosher salt so that it covers the entirety of both sides of your meat, and that should probably be enough salt to saturate it completely. Remember that you will eventually be adding water back to the meat to rehydrate it for cooking, so it will probably not taste as salty as it might look!
Drying The Machaca
This is surprisingly easy, even if you lack a dehydrator.
While a dehydrator would obviously make the whole process go a lot faster, as it is able to put out consistent heat and provide its own ventilation, you can also pretty easily do it with a home oven.
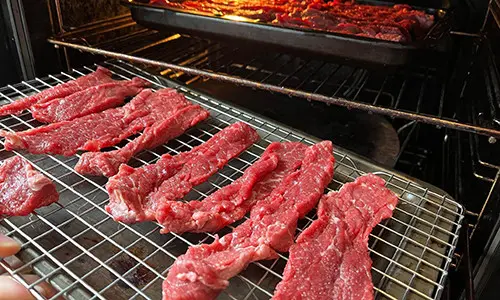
Just set your oven to the lowest possible temperature that it can steadily maintain. On most home ovens, that is around 200 Fahrenheit, though lower is better. Place all of your meat in a single layer on a rack over a baking sheet and stick it in the oven, ideally with the door cracked open just a little bit to help moisture escape.
After 30 minutes, flip the meat over, and do it again after another 30 minutes. From there, just check it every 15-30 minutes by taking a piece of meat and gently bending it.
When it is done, it should be darkened considerably and be almost in danger of cracking when you bend it completely.
Related: The 10-Dollar Jerky Maker

Blitzing It
Once thoroughly dried, you want to blitz your meat into pieces for storage totally. The traditional way to do this is with a rock on a hard surface, though a meat mallet will also do.
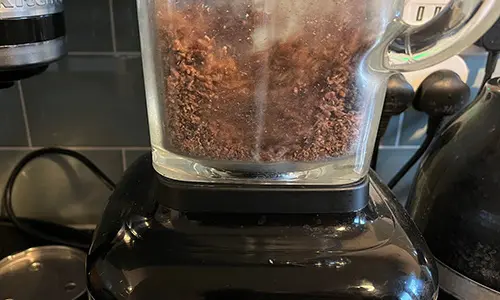
If you don’t want to do all of that hard work, though, you can also just throw the whole pile of dried meat pieces into a good high-powered blender and blend until it has the consistency of fine, slightly damp sand.

This is also a great time to consider seasonings – if you want to add dried cumin, dried garlic, or other spices like black pepper to the meat, putting it in the blender along with the meat is a great way to help incorporate those flavors. Some of the spices you might use could get scorched if put in the oven for as long as the Machaca takes to dehydrate.
How To Store Your Machaca
Machaca was originally designed to be kept in an airtight vessel and used as a meat replacement for the long winter months or while out on the ranches in Northern Mexico.
This recipe will produce a pretty typical Machaca that will last for a few days if kept away from the air and eaten while on the go.

To really help increase its ability to last forever, you will want to increase the salt amount considerably. If you are looking for a shelf-stable product that is able to just sit out on the counter indefinitely, you will want to salt it like traditional salt pork or salt beef. This means literally caking it in salt and storing it in even more salt in its vessel.
These days, however, salting it moderately and keeping it in the fridge makes for a much tastier product that is able to be rehydrated and mixed with some onions, tomatoes, peppers, and other seasonings to make for a delicious family meal, so long as you serve it with some tortillas as well.
You may also like:
 How to Dry Can Beans and Rice for 20+ Years Shelf Life
The ‘Superweed’ That Saved Large Communities During The Great Depression (Video)
8 Dangerous Mistakes To Avoid When Storing Your Food
When You Should Eat Roadkill And When You Should Not
Recipes I Made From The Lost Super Foods Book: Canned Hamburger Meat


