
There was a time when you could purchase good jerky, but not anymore. Today it is illegal to sell jerky unless it has been raised to a temperature of 160 deg. for “health” reasons. The FDA has mandated that the meat used for jerky must be cooked to a state of “well done” before it is dried.
Unfortunately, this turns something that was once a basic highly nutritious food source for Native Americans, Trappers, Prospectors, and Explorers into not much more than flavored shoe leather.
I grew up in farm country and we made jerky every summer. We cut and seasoned our meat and then pinned the thin strips to the clothes line in the hot summer sun to let it dry. The whole process was a family affair with mom sternly warning us that “that stuff better be off the line come wash day or there’ll be heck to pay!” It took about 4 or 5 days before the jerky was ready, but to a 10 year old that was an eternity.
This project came about from my desire to turn back the clock and create the jerky that I grew up loving. No soy sauce, no sugar, no genuine artificial Smoke Flavoring, and no preservatives other than a bit of salt. I wanted to dry the meat at a low temperature (under 120 F.) like we did when I was a kid, but we are not allowed to have a clothes line where I live lest the neighbors complain.
I looked at all the commercial food dehydrators and they seemed to be rather limited – toys really. They used little trays that would hold 5 or 6 strips of meat, they were noisy little affairs with their fans and fancy thermostats, and boy were they expensive. I wanted something quiet, efficient, and inexpensive – no, I wanted it CHEAP.
I wanted to make enough jerky at one time to last a couple of weeks. Nothing I found even came close to what I wanted, so I set to work to build my own. The simple dehydrator from here is the result.
Some of the major features are:
- It can be built by anyone who can use a screwdriver, pliers, and a pair of scissors.
- The heat source is a standard 100 watt incandescent light bulb available at just about any store for a couple of dollars.
- Though it only takes up one square foot of floor space it will easily dry 8 or more pounds of meat at one time.
- As long as it is used in an area where the daytime temperature averages between 65 and 90 deg F. it will safely and efficiently dry the jerky without cooking it.
- The cost to build this wonderful device is between $10 and $15 – quite a bargain.
Related: DIY Stove Made From Used Tire Rims
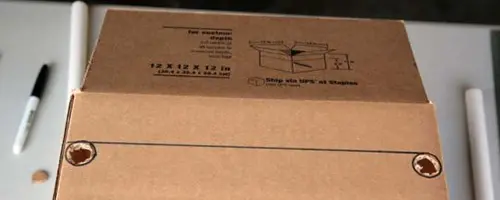
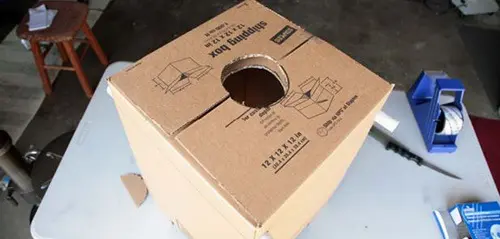
The parts list suggests a box from Staples, but any box of the same dimensions is fine. I’ve even used a very heavy-duty box from U-Haul.
Start by laying the box flat on a table. Do not fold any of the flaps until told to do so. Orient the box so that the flaps are at the top and bottom.
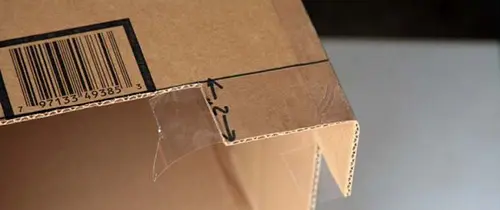
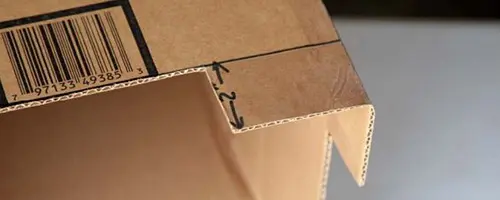
- On the bottom set of flaps, using a pencil or marker draw a line 2” up from the bottom edge.
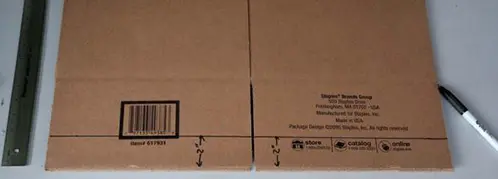
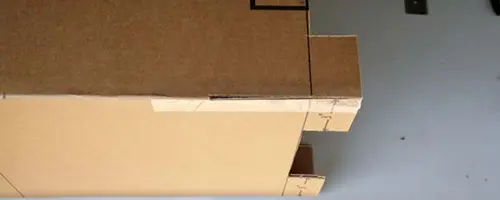
- Measure in 3” along the bottom from each corner of the box and draw a vertical line as shown in the photo below. This will partition the bottom edge into 3 parts on each flap.
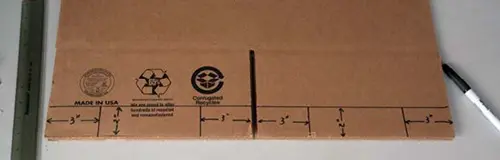
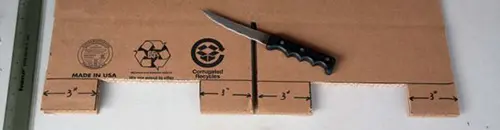
- Cut out the 6” wide section in the centre between the 3” corners. Since all sides of the box are the same size, you can leave the box folded flat and use the markings on one side to cut through both sets of flaps. See photo below.
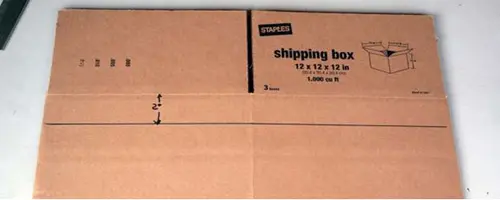
- Move to the top set of flaps. Draw a line 2” below the point where the flaps fold. Turn the box over and do the same on the other side.
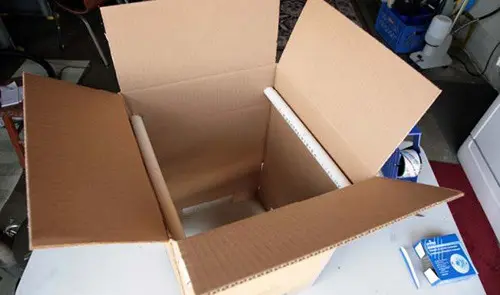
- Open the box and fold the top flaps to the centre of the box like you are closing it to help hold the box square. Using a strip of 2” wide heavy-duty packaging tape about 8” long, tape all four corners of the bottom flaps as shown in the photo below. The bottom flaps will act as the legs of the jerky drier.
- After all 4 corners have been taped along the vertical corners of the box, cut a 9” or 10” length of 2” wide tape and wrap it around the 3” corners trying to maintain about the same amount of excess tape on each end as shown below.
- Fold the loose ends of the tape over the edges and press to the back side of the 3” legs. This will reinforce the corners so that it will support a significant amount of weight. Repeat step 6 and 7 until all 4 corners have been reinforced.
- At the top of the box, use a length of the ½” PVC pipe to mark a circle just below the 2” line that you drew in step 4, and as close to the edge of the box as possible.
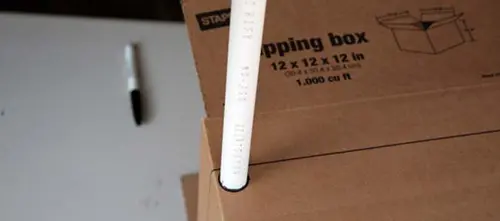
- Mark both edges of the side of the box then turn the box to the side opposite the one you just marked and mark the same circles on this side also. Then cut out the circles, staying inside each circle. You should end up with 4 holes in the box, two on the front and two on the back that are directly across from each other.
- Push the two 15” lengths of PVC pipe through the holes you just cut in the above step. Make sure that there is an equal amount of excess pipe sticking out of each side of the box. These will be used to support the skewers that hold the jerky as it dries.
- Close all 4 flaps of the box. Use the 4” electrical box as a template to draw a 4” diameter circle in the centre on top of the box as shown in the two photos below. Using a sharp knife, cut out the circle on the top flaps you just marked.
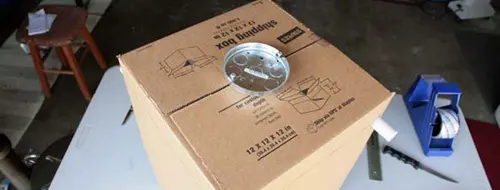
- Now close the top flaps again and use the circle you just cut to mark and cut the inner flaps.
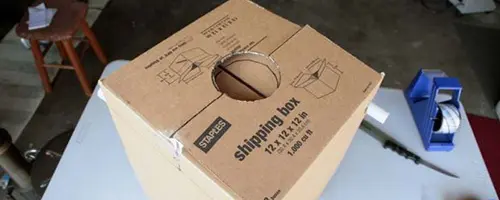
- This completes the construction of the box.
Any low temperature heat source will work, however, it is convenient to use a regular incandescent light bulb as a heat source. A 100-watt light bulb is the best choice for this size of drier if it is to be used indoors or when the daytime temperatures are averaging between 65 and 90 deg F. It is best if the light bulb used as the heat source is horizontal rather than vertical.
This will leave more clearance between the drying meat and the heat source so that the meat that is hanging directly over the bulb is not cooked. The easiest way to do this is to use a “Trouble Light” or “Work Light”. These are available for around $10 from Home Depot, Lowe’s, or just about any hardware or automotive supply store.
If you choose to use a Work Light like the one shown, try to find one with a metal cage and reflector rather than plastic. It will stand up better. Also, make sure that it is designed for incandescent light bulbs and not Florescent lamps. You want the heat generated by the hot filament in the incandescent bulb.
If you can’t find a Trouble or Work Light like the one shown above, or you are feeling adventurous you can make your own inexpensive heat source from off the shelf parts available from Home Depot or Lowe’s hardware centers.
Place your heat source on a cookie sheet, foil, or newspaper to catch any drips. I’m using a 12”x 18” commercial style ½ sheet baking pan which works well for the size box we are using.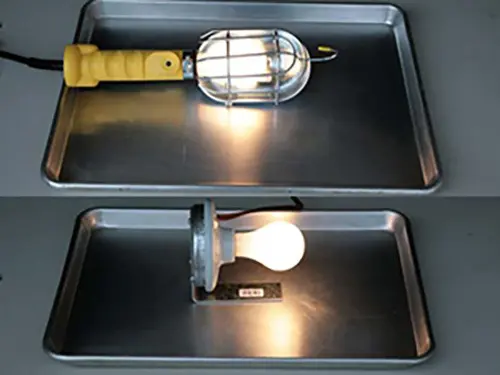
Place your box assembly over the heat source which should be centered in the bottom of the box.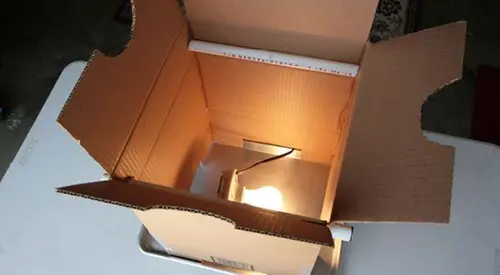
Now hang your skewers of meat between the PVC pipe supports.
Continue hanging meat until the box is full or you run out of meat. Try to keep the meat slices from sticking together. It is OK if the edges touch here and there, but it’s best if the warm air is free to circulate freely around every piece. This is a very efficient way to make jerky. The amount of meat shown below is about 8 lbs. You could probably squeeze in another pound without much problem.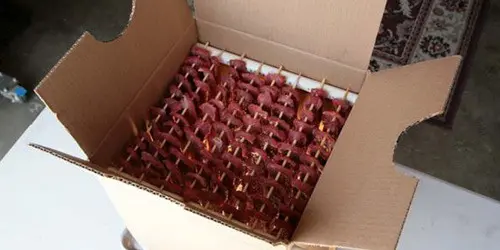
Close the box and put a small weight on the top to keep it closed. In the picture below I’m using a paper clip to hold the upper and lower flaps together to keep the box closed rather than a weight. The Jerky will take 48 to 72 hours to dry depending on how thick the meat was cut and how many pounds of meat you are drying. Thinner slices will dry faster. Drying fewer pounds of meat at a time will also speed up the process somewhat.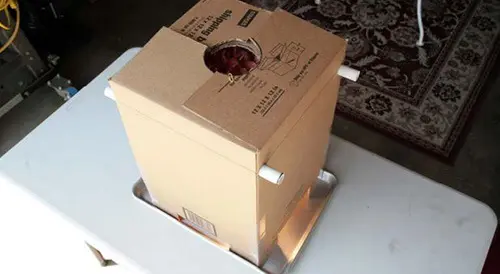
Finished jerky.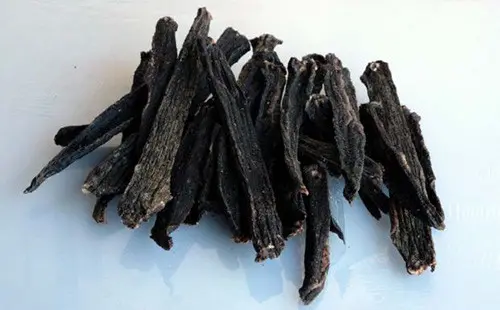
I’ve always preferred a simple dry seasoning mix and that is what is used here. It always tastes wonderful and I find that I never really tire of the flavor. This is also the best approach if the jerky is to be used to make pemmican. Since pemmican is usually used as the primary source of nutrition while backpacking, you want a simple flavor that you will look forward to eating every day.
I’ve tried the soy sauce and brown sugar recipes, but find that they are often a bit overpowering – OK for snack now and then, but not something you can eat day-in and day-out with relish. Jerky recipes abound on the internet.
I encourage you to experiment and find what you like best.
This article was written by Lex Rooker and first appeared on justmeat.co .
You may also like:
 DIY Mini Greenhouse For Year-Round Vegetables
100+ Long Lasting Foods that Can be Stored Without Refrigeration (Video)
How To Build Your Own Wall Hanging Can Rotator
How to Make Emergency Survival Bread
Five Ways Our Life Is Better Living Off The Grid


I made a LARGE dehydrator from a broken upright freezer and a hot plate for heat , 4″ computer fans for ventilation, thermometer thru the front door and a vent from a hot water heater. Works great!!!
That’s sounds great, how do you build it..
Can turkey or chicken be dried safely with this method?
Yes, I did it and both turkey and chicken meat ended up perfectly
Thanks for this post, brings back memories! I remember when I was a kid, my mother dried meat with something similar to this. All good Teresa, it’s safe. you can do all kinds of meat
Why is it black? Is that normal? Bacteria won’t grow on the meat during this method?
It’s OK Laura, just keep the meat/box away from flies during the process. I covered the vents for air flow with a fly screen.
You mention a parts list, however, I don’t see one in the article…is it at one of the links?
Thanks
I found it in the original article from justmeat. But you don’t need an actual “list” since this is a simple project and all of the items are in the photos.
This is great! I live in tornado alley, so food storage is important. Being diabetic, meat and veggies are the main items to eat, especially if there’s a chance I might not be able to get my medications. I have a lot stored, but have been looking at ways to preserve meat. I was not happy with the recipes I found with sugar, ‘natural smoke flavor’ and soy sauce. This jerky maker/method is perfect. I do have one question. Because tornados bring rain, I plan to put my jerky in vacuum sealed bags. It protects it from water, takes up less room and I can put a lot in my emergency bag. Do you have any thoughts or suggestions?
I would also like to point out that the site recommends pinning the articles to read later. If there is an emergency, you may not have access to the internet. I am storing articles on my laptop. With a solar charger, I have access to all the info if I need it.
Thank you so much for this site!
It is not recommended to vacuum pack anything with over 17% moisture content, as it can breed bacteria. Vacuum sealing would not likely be recommended for this.
I live in Las Vegas, where summer temps run 100-115 degrees daily, and +/- 80 overnight. Could this be done without the light bulb source? What do you think would happen if this was done using a glass box, similar to a cold frame? I’m guessing there must be a means to stop insects, while providing for moisture to escape while the mean is dehydrating.
I think this would work fine. When I lived in Vegas, we would dry things in my car dashboard. As long as you have a means for the moisture to escape, and keep the flies/insects off of it. I am betting it would work great. Though, you may even, due to the extreme temps, have to limit the exposure of sunlight.
What I mean is, it will be 100 – 115 outside, but in the glass box, it will be almost cooking temperatures, so less might be more. You want to dry the meat, not cook it. Good idea, though! Good luck
Incandescent light bulb? They are illegal and can’t be found
The reason for the 4″ hole in top I could not find in this article.
So I am guessing that the 4″ hole in the top is for ventilation?
If that is the case, would it not take less time to cure if the hole was smaller?