Beans and rice, a significant staple in a prepper’s pantry…or, should be. And, if the 2020 pandemic has shown us anything, it’s that we can never be too prepared for shortages of any kind. Prepping or pandemic aside though, I just happen to love having beans and rice in the house. There are so many things you can do with them.
In addition to the many recipes you can use beans and rice in, there’s my dog. Every once in a while, he needs to go on a very strict diet for his digestive system, and that includes mostly rice. Unfortunately, he hit one of those times in the last couple weeks, and sure enough rice was the latest shortage in the stores in my area.
So in this article, I will be letting you know a very simple way to dry can rice and beans to last you for at least 20 years on the shelf. And as soon as the shortage is over, I will be doing a much larger batch than I currently am able to do for this demonstration and article.
Sure, you could store the beans and rice in plastic storage bins. But that won’t prevent bugs and larvae from getting in eventually. In fact, when you open the bags and boxes of beans and rice before dry canning, inspect them thoroughly. However, this process will kill off unseen bugs or larvae that you might miss.
Related: 20 Foods That Can Last 20 Years
Supplies for Dry Canning Beans and Rice
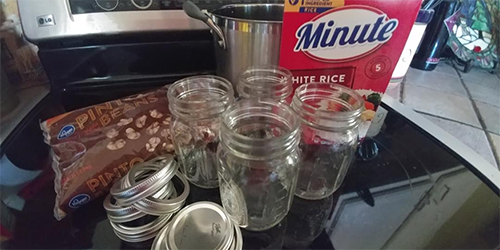
Not only is the process quite simple, but the supply list is quite short. Here is what you will need or want:
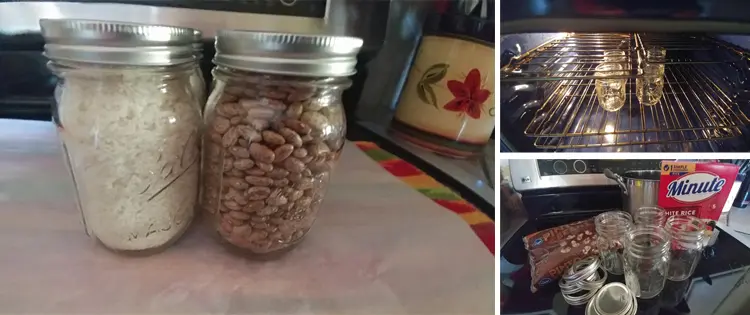
- Dry Beans – any type of dry beans, or a variety
- Rice – any type of rice will work
- Canning Jars and lids – whatever size you prefer
- Funnel – not necessary, but might make it easier
- Oven.
I need instant white rice for my dog, so that’s what we typically purchase. But it could be long grain, brown, flavored, instant or long cook. It doesn’t matter, any type can be dry canned.
For the beans, I love all beans, but I’m using pinto beans for this demonstration. I will also do this with black beans, and split peas in the future, because I use both quite often. You could also do some jars of mixed beans for bean soups.
It’s also good to know too, that both rice and beans can be purchased in bulk. So, if you want dozens of jars of each, no problem. Just know that if you are in an area similar to mine right now, you might have to wait until the shortages are over, before you can do large batches.
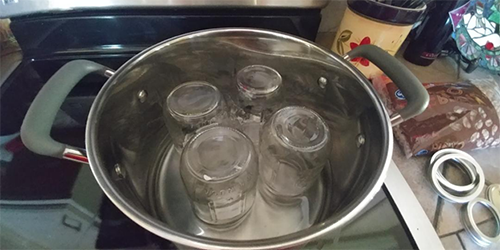
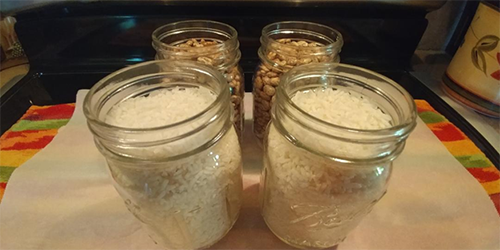
Step 1
Place the jars into a pot with about 1” of water and a splash of vinegar for a steam bath (about 15 minutes), to sterilize them. Let them steam for about 15 minutes, with the cover on the pot.
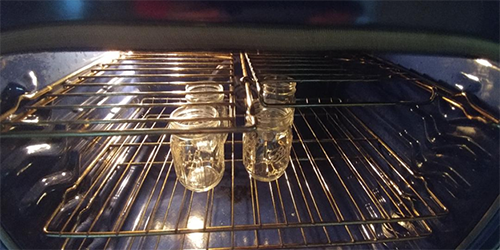
Step 2
Thoroughly dry the jars by first wiping them with a clean cloth, then placing them in the oven at 220° until they are thoroughly dry (about 30 minutes). Let the jars cool down completely before the next step.
Step 3
Fill the jars with the rice or beans, with about ¾ air space at the top. Make sure that the rice and beans are not wet or moist at all. If there is any moisture, it will start to cook in the next step, which defeats the entire purpose of dry canning. It will also wipe out the main perk of all the work, because it will not result in a good shelf life.
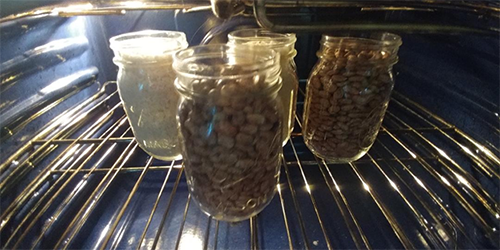
Step 4
Place the jars (without lids) in the oven at 220° for about 60-90 minutes, depending on the size of the jars. The larger the jar, the longer the time.
You can place the lids in a small pan and then place the pan in the oven for the last 15 minutes, which will sterilize them, as well as heat them up for a good seal.
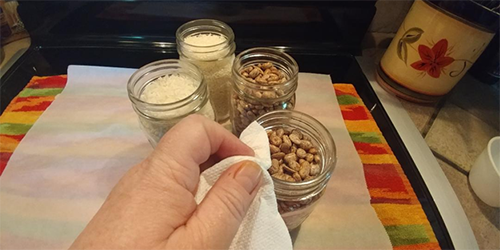
Step 5
Pull the jars out of the oven, one at a time if you have a large batch. Wipe the rim of the jar to make sure you don’t have any debri on it, that could prevent an appropriate seal from taking hold.
Step 6
Tighten the lids securely, and place the jars aside. Wait for the popping to begin! The seals will start to pop, but if they have not popped (center of lid’s dome pops down) then you don’t have a seal. You should start the process again, if they have not sealed after 12 hours.
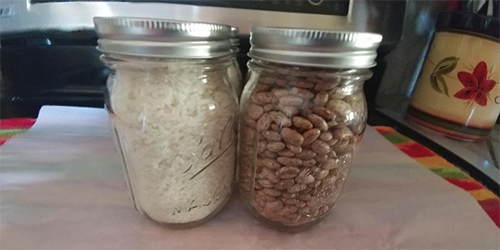
Now that the beans and rice have been dry canned, you can store the unopened jars for at least 20 years. Some people swear that they have had success for up to 30 years.
Other items you could dry can include the following: dry pasta, dry oats, dry flour, dry spices, baking soda, baking powder.
You can even dry-can some baking mixes, as long as they don’t contain any nuts, shortening, oils, or brown sugar.
This article first appeared on AskAPrepper.
You may also like:

The Only Food That Grows Almost Faster Than You Can Eat It (Video)
Canning Mistakes Even The Most Advanced Homesteaders Make
Recipes I Made From The Lost Super Foods Book: Canned Hamburger Meat
10 Recipes From “The Great Depression” To Survive The Next One


I love this!
I’ve been doing this for years. I also dry can flour. But I can buy in bulk and dry can it, so if I don’t use it, it won’t go rancid on me, or worse…..have critters in it.
Have you actually USED the canned beans? I had a batch of beans that had been used as pie weights, and tried to cook them. Ruined a batch of soup because they would not cook! Pressure canning seems like it would cook the beans in a non-water environment and render them useless.
Hello Gaylene. You are not pressure canning beans when you put them in the oven. You are doing this to kill all the critters that could possibly be in there. I have many times done this and it works great.
I think the bake time is way too long. I’ve heard that 30 mins will suffice.
You said that any size canning jar can be used. Does this include half-gallon canning jars? Thanks.
I’ve also oven canned for years after reading an article about it in Backwoods Home magazine. The instructions I read and follow are to place dry goods in jars, any jar with a wax seal can be used and they don’t have to be new lids either, bake at 200 degrees for one hour, remove jars one at a time, wipe rim with wet cloth or paper towel, then seal with lid and let rest to seal. It works great and I’ve used almonds, stuffing mix, popcorn, oatmeal, wheat berries, etc that were all over ten years old and just as fresh as when I canned them. It’s a fantastic way to preserve dry goods for both long term storage and just to keep stuff from going rancid if you can’t eat it in time. It’s also a great way to reuse spaghetti jars, etc.