A simple DIY intruder detection system could save your life. This article will detail the construction of a pressure pad alarm. Humans and large animals are heavy enough to activate the alarm, warning you of their approach.
Throughout military history, the element of surprise has been a highly valued position. If you can launch an attack on an unprepared enemy, your chances of victory are exponentially higher. To avoid being caught unawares, armies sent out scouts and had guards patrolling the surrounding area. I just need to mention Pearl Harbor to drive this point home.
Avoiding a surprise attack is paramount. What holds true for the military holds doubly true for individuals. And let’s face facts, small homesteads can’t post sentries or patrol far and wide every day. Besides, we all need to get some sleep. But how do you maintain vigilance and preparedness while asleep?
The only way is to maintain a system of intruder detection. There are a variety of ways to do this. Ranging from analog and mechanical solutions to extremely high tech systems.
The DIY pressure pad is proposed as a highly effective, easy to make, low-tech solution. Correctly used, it will give you ample warning of an unwanted individual’s presence.
A Simple Idea
I want to start off by explaining the concept and then the components that make up the system. Mentioning what I gave used, but also adding what you can use. The components I used fall to the higher end of the price spectrum, but you can use much cheaper components.
Next, I want to mention some of the capabilities not pictured, but that can be easily added to create more complex systems.
Concept
The system is based on the very simple idea of a closed circuit that causes an alarm to blare noise or to switch on a light. (A closed-circuit refers to a completed circuit in which current flows.)
But instead of a standard switch to close the circuit, we use a DIY pressure pad. The pressure pad is constructed in such a way that when weight is applied, it closes the circuit, causing the alarm to ring or light to glow.
This article shows a simple pressure pad construction. But, you can theoretically build larger pressure pads with varying degrees of sensitivity.
Components
Electrical Circuitry
First of all, is that I have opted for 12V DC. This makes the system more versatile and safe. 12V DC at low amperes cannot harm humans. At high ampere’s, it can cause overheated wires, burns to hands, and start a fire, but our system doesn’t use components that can easily cause that kind of damage.
A word of warning though. If your hands are wet and you are earthed very well, 12V or 24V at relatively high ampere’s could cause muscle contractions, and this is dangerous to your heart. Maintain a clean and dry workspace. Wear insulated shoes and gloves. Never Ever work on a live circuit. Always disconnect from the power source before you touch it with your hands.
Secondly is that 12V DC components are readily available. You can use automotive 12V globes, including LED. You can also use automotive horns or other types of 12V alarm speakers/beepers/buzzers or horns to make noise with. Many auto spare shops sell these, including DIY electronic stores.
Thirdly is that you can use standard 12V LED lights and a transformer/LED driver for your system while incorporating a 12V battery backup, or base the system entirely on 12V batteries.
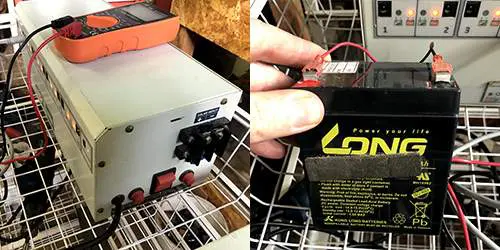
Fourthly is that 12V is a popular voltage in the solar electricity space. Many solar battery chargers and systems utilize 12V or 24V. Most of the components used in this article will work on 24V and 12V seamlessly. I use a 12V gate motor battery as a power back-up in my system, but you could use other small 12V batteries like those used in small motorbikes or home alarm systems.
Lastly, and this applies to a post SHTF scenario, is that you can construct this system from parts stripped out of a car. You could conceivably find yourself in a small town hiding out an abandoned house and build this system with components harvested from a car standing in the driveway.
I will also mention that an electrical spark can be used to ignite a fire or detonate explosives. This could be a handy little piece of information.
The Electrical Circuitry Components I have Opted for:
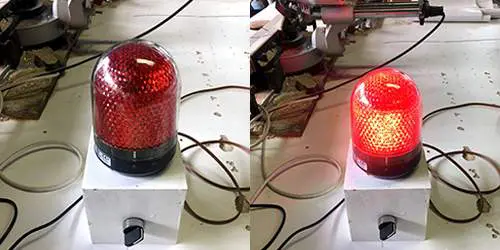
- 12V/24V Signal light with alarm.
- The three-position turn switch, allows me to toggle between “light only” and “light and alarm” mode.
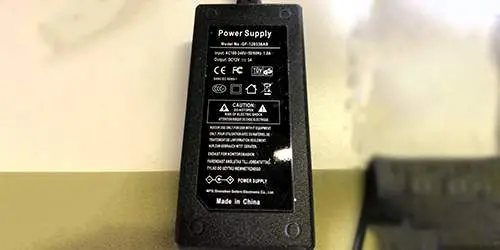
- 12V power supply.
- 12V battery.
- The battery charger that runs on Solar or Standard power.
- 14 gauge, 2pin/2core flexible wire. 12V/24V DC rating for running the circuit to the pressure pad.
Alarm Light and Turn Switch
Battery Charger with Solar and Electrical Input, 12V Battery
12V Power Supply
Pressure Pad
The basic concept behind the pressure pad is two pieces of conductive material separated by an insulating material that can be compressed.
Also, the conductive material or the compressed material must be such that it allows the conductive materials to make contact with each other when pressure is applied.
This sounds wordy and complicated, but once you have had a look at the photos, you will understand perfectly. Also, the basic idea is that whatever you use, it must just be able to close the circuit when pressure is applied.
The Components I Used For The Pressure Pad:
I have opted for two pieces of tinfoil cut into A4 size squares.
I have then used an A4 file sleeve as housing or enclosure
Also, I used a 4mm foam/sponge. This is about 3/16 inch.
Clear Buff tape or Sellotape
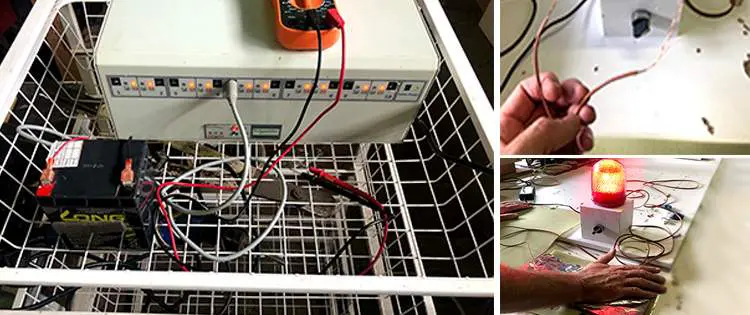
How To Make:
The first order of business is to make the circuit. Connect the light, horn/buzzer to the power supply so that when you switch the power supply on, the buzzer and light both come on.
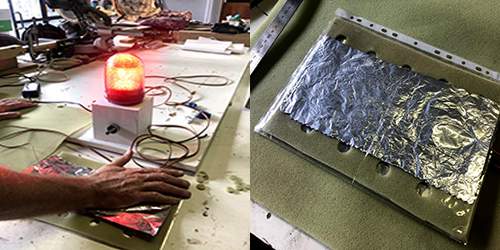
System Active
Next, you must cut the circuit and install the wires you are planning to run to the pressure pad. I suggest that you test your pressure pad wiring before attaching it to the pressure pad.
Incorporate Twin Core Wire into Circuit and Test
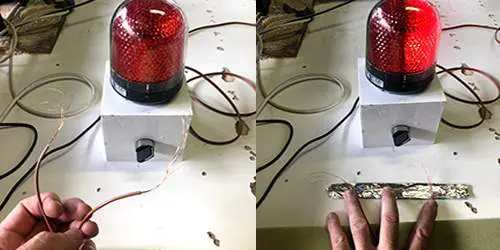
The pressure pad itself consists of 2 x A4 sheets of tinfoil. I have attached the electrical wiring to the tinfoil using buff-tape but would recommend duct-tape.
Attach Wire to Foil and Punch holes in Foam, Tests Circuit and Sleeve
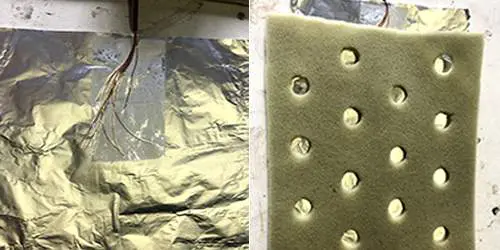

Cut the foam/sponge to size, and punch holes in it. I used a half-inch tube at 2-inch intervals. Place the sponge in the file sleeve and then place the two tinfoil sheets on either side of the foam. Larger holes spaced closer together will increase the pad’s sensitivity, while smaller holes spaced at larger intervals will decrease sensitivity.
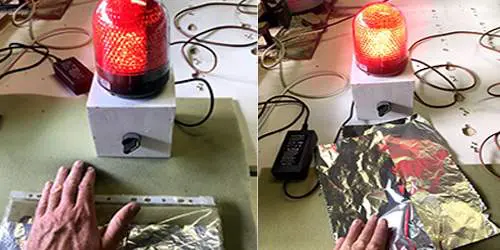
When you lay it flat, pressure from your hand should cause the foil sheets to touch, closing the circuit and causing your alarm to go ring out.
The above procedure is to familiarise you with the concept of the pressure pad and how to wire it so that the alarm will go off.
Pressure Pad Activating Alarm
Applications
The basic system mentioned above can be used under front door welcome mats, mats deliberately placed in front of tool-sheds or rooms or doors or anywhere you would need advance warning of someone’s approach. You obviously need to cover the pad with something soft like a mat and hide the wiring.
You could also place it behind your vehicle’s wheels, and it will warn you if someone is pushing or moving your car, bike, small tractor, ATV or even bicycle.
Also, you can easily manufacture a waterproof one. Simply use silicone to seal the opening. Waterproof units can be buried in the garden, just outside a window, or under a path leading to your home. You could bury it in your driveway to have advanced warning of vehicles approaching.
I have used a file sleeve to show the concept, but you can use a tarp, refuse bag, self-made mylar bags, or even discarded plastic dog food packaging.
Use appropriate wiring. While you can run long lengths, after a certain distance the resistance will become too high for your system to function. I would limit the distance between alarm and pad to around 50 to 100 yards. You can test your system and see how far you can go while maintaining workability.
Do’s and Dont’s
First, make sure the surface beneath the pressure pad is flat and hard.
Make sure the substrate or material above the pad is soft and pliable. Even leaves or a thin layer of stone or soil can be used.
Make sure outdoor units are waterproof.
Test your system regularly.
Do not use batteries or power supplies that provide too high amp’s, as this will heat wires and could cause damage to the insulation or even burnt wiring.
Be sure to hide/bury the wiring between the pressure pad and the alarm.
Modifications and Expansions
Your current system only buzzes when someone or something is actively closing the circuit.
You could incorporate buzzers or relay switches that once activated, will keep buzzing or lighting until they are reset.
Relay switches activate a circuit. This means that you will incorporate the relay switch into the actual alarm/detection circuit to which your light or buzzer is currently connected. Closing the circuit will activate the relay switch, which will, in turn, activate the light on or cause the buzzer to go off. The light or buzzer will then remain on until you manually reset the system.
Note that this means you need to remove the alarm from its current circuit and connect it to the relay switch.
Relay switches can be bought separately, or you can buy alarm/buzzer lights that have relays incorporated into them.
If this sounds complicated, or you are unfamiliar with electrical components, I suggest that you start with the basic system, and work your way up from there.
You could use a single power source to power multiple circuits, and connect a light bulb into each individual circuit. This could warn you of a breach, and indicate which circuit is active. I would construct a small control panel with lights and switches that I can use to monitor and control the system.
Have fun and Stay Safe
Once you have mastered the basics, and trust me, this is very easy, you can get creative and expand this system into a low-tech yet highly effective intruder detection system.
Have fun and stay safe.
You may also like:
How To Secure Your Homestead Against Intruders
New Invention 12X More Efficient Than Solar Panels (Video)
How To Build A Small Storage Shed From Pallets
30 Survival Uses For Wood Ashes You Never Thought Of
The Best Places In America To Start Your Homestead
50 Off the Grid Homesteading Tips and Tricks


Where does one buy all the components for this?
Are there premade ones available for purchase?
I think you can find all the components on eBay or Amazon. You can also try in a store where you can buy electronic components. I’m sure that someone from the store will help you with the details