Rats and mice are more than a nuisance. They are a genuine health hazard, a structural risk, and a food security threat that homesteaders and preppers need to take seriously regardless of how rural or well-maintained their property is.
On the health side, rodents are documented carriers of over 35 diseases transmissible to humans, either directly through contact with their urine, droppings, saliva, or bites, or indirectly through the fleas, ticks, and mites they carry. Hantavirus pulmonary syndrome, caused by inhaling dust contaminated with deer mouse droppings, is fatal in roughly 38 percent of confirmed cases in the United States according to the Centers for Disease Control and Prevention. Leptospirosis, spread through water or soil contaminated with rodent urine, can cause kidney and liver failure. Salmonella from rodent droppings contaminating food preparation surfaces causes severe gastrointestinal illness. Rat-bite fever, transmitted through bites or scratches, requires antibiotic treatment and can be serious if untreated. These are not exotic risks. They occur regularly in rural and suburban settings across North America wherever rodents have access to living spaces or food storage.
On the structural side, rodents gnaw constantly to wear down their continuously growing incisors, and they do not distinguish between wood, insulation, and electrical wiring. Gnawed wiring inside walls is a documented cause of house fires and is particularly dangerous because the damage is invisible until it causes a problem. A mouse can squeeze through a gap the size of a dime. A rat can fit through a hole the size of a quarter. Once inside a wall cavity they have access to wiring throughout the structure.
On the food security side, a single mouse can contaminate far more food than it consumes through droppings and urine. A rodent infestation in a pantry or grain storage area can render a significant portion of a stored food supply unsafe to eat without any obvious visible sign of the contamination.
Understanding these stakes is the starting point for thinking about rodent control strategically rather than reactively. There are also real considerations around how traps are built, placed, and used that affect both their effectiveness and the safety of children and pets in the home. The two trap designs that follow address different situations and priorities.
Know What You Are Dealing With Before You Build a Trap
The correct trap size, placement height, bait, and handling precautions all depend on which rodent species you are actually dealing with. The four most common pest rodents in North American homes and homesteads are house mice, deer mice, Norway rats, and roof rats, and they behave differently enough that misidentifying them leads to traps placed in the wrong locations, sized incorrectly, or positioned at the wrong height.
- House mice (Mus musculus) are the most common indoor rodent pest. Adults weigh half an ounce to one ounce and are typically dusty gray-brown with a lighter belly. Their droppings are rod-shaped and roughly a quarter inch long. They nest at ground level and in wall cavities and are most active at night. They are curious and less neophobic than rats, meaning they will investigate new objects in their environment relatively quickly. Standard mousetraps sized for Mus musculus are appropriate.
- Deer mice (Peromyscus maniculatus) are found throughout rural North America and are the primary reservoir species for hantavirus in the United States and Canada. They are slightly smaller than house mice with a distinctly bicolored appearance: brown on top with a sharply defined white underside, and a white-bottomed tail. If you find deer mice in your home, the cleanup protocol matters as much as the trapping. Before cleaning any area where deer mice have been active, ventilate the space for at least 30 minutes. Wear rubber or plastic gloves. Do not sweep or vacuum droppings dry, as this aerosolizes the virus. Spray the area with a disinfectant solution of one and a half cups of bleach per gallon of water, allow it to soak for five minutes, then wipe up with paper towels and double-bag all waste. Wash hands thoroughly after removing gloves.
- Norway rats (Rattus norvegicus), also called brown rats or sewer rats, are large, heavy-bodied rodents weighing up to a pound. They are brown or gray with a blunt snout, small ears, and a tail shorter than their body length. They burrow and nest at or below ground level, along foundations, under concrete slabs, and in basement walls. They are cautious and strongly neophobic, often taking a week or more to approach a new trap even when well baited. Standard rat traps sized for Norway rats are significantly larger than mousetraps, and placement at ground level along walls and in burrow entrances is most effective.
- Roof rats (Rattus rattus), also called black rats, are sleeker and lighter than Norway rats with a longer tail than body length, large ears, and a pointed snout. They are climbers and nest above ground in trees, attics, wall voids, and upper shelving. If you are finding evidence in upper areas of your home, attic insulation disturbance, droppings along rafters or shelf tops, gnawing on stored items in high locations, you are likely dealing with roof rats rather than Norway rats, and trap placement needs to be elevated accordingly.
Confirming your species before building or purchasing traps saves time and increases catch rates significantly.
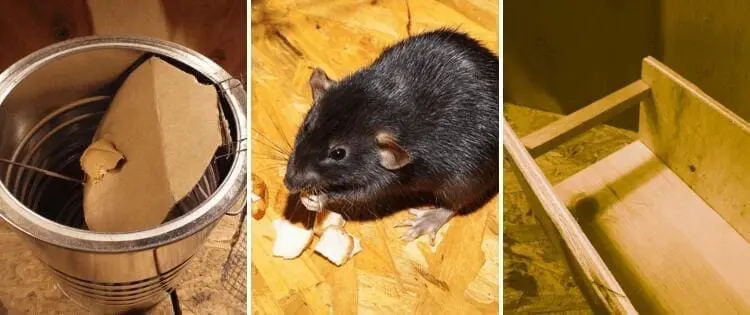
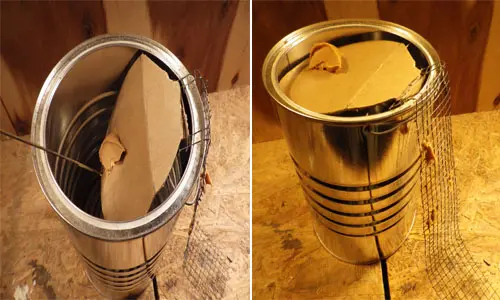
Option 1: The Harmless Rat Trap Bucket
This is a truly harmless rat trap and it’s one of the projects I learned from this guide. This trap captures the mouse or rat alive in a bucket and will harm no pet or child. What makes the trap work is a piece of cardboard on the top of the trap that is loosely supported and hinged.
A stairway of sorts made from a strip of wire mesh or fencer wire allows the mouse or rat to get to the top of the bucket with almonds stuck into peanut butter along its length to entice them to the top.
When they get to the top a large collection of almonds stuck to the end of the lid with peanut butter can be seen.
The mouse or rat moves onto the hinged cardboard and their weight causes the cardboard lid to collapse at the seam trapping the rodent in the bucket. Some gravel in the bottom of the bucket keeps it from tipping if numerous rodents are captured and active. The cardboard lid pops up back into place to enclose the rodents.
Related: Easy DIY Garden Pest Killer You Can Make At Home
The size of the bucket depends on the size of the pest. A large coffee can will work for mice, but you may need to consider a 5-gallon bucket for rats.
It’s a very safe harmless rat trap because there are no springs to snap a bar shut. The only downside is you have to figure out how to dispatch a live mouse or rat in your bucket.
If lethal control is your goal rather than catch-and-release, you need a method that is both practical and as humane as possible. Drowning is the method most commonly suggested for bucket traps, but it is worth being direct about what that involves: drowning is a slow method of death that causes significant distress to the animal over a period of minutes, and it is considered inhumane by most veterinary and animal welfare organizations. It is also illegal to cause unnecessary suffering to animals in many jurisdictions, including under wildlife protection legislation in several states and provinces, even for pest species.
More humane lethal options for a rodent captured alive in a bucket include CO2 exposure using dry ice placed in a sealed bag inside a larger sealed container, which causes rapid unconsciousness followed by death, or a swift physical dispatch using a firm blow to the back of the skull with a hard object. Neither option is pleasant to carry out, but both cause significantly less suffering than drowning and are completed in seconds rather than minutes.
If you are not prepared to carry out a humane dispatch and do not have a practical release site, a snap trap that kills instantly is likely a more humane overall system than a live capture trap that results in drowning. Match your trap choice to what you are genuinely prepared to do with the animal afterward.
I know it’s only February, but time flies, especially when you’re a homesteader. Spring is just around the corner, so I highly recommend grabbing a pack of these NON-GMO pest-repellent seeds and planting them now before they sell out again.
Building the Harmless Rat Trap Bucket
We’re going to build a basic bucket harmless rat trap from a tall coffee can. You can upsize the concept to a 5-gallon bucker for larger rats. They both work with the same concept.
Equipment: 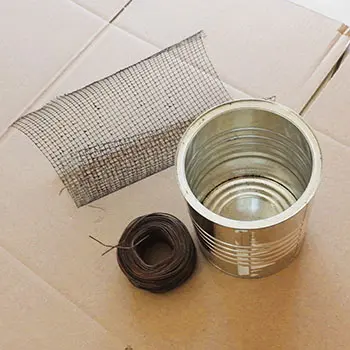
- Drill and drill bits
- Scissors
Supplies:
- A tall coffee can or 5-gallon bucket
- A large sheet of corrugated cardboard
- Fencer wire or a fence wire will the mouse or rat climb to the top
- Bailing wire (This will be the support for the cardboard hinge)
- Duct tape to attach the hinges to the buckets
- Gravel to add some weight to the bottom of the bucket so it won’t tip
Directions:
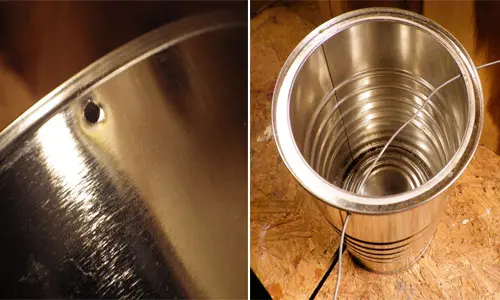
Drill 2 16th-inch holes ¼ inch from the top of the bucket about ¼ around the rim.
Thread the baling wire through the holes bring it to the back of the bucket and twist tight. You want a taut wire.
Cut the cardboard into a circle that’s about 1/8 inch smaller than the opening. Make sure it doesn’t rest on the rim.
Next, leave a 2-inch-wide tab sticking out about 2 inches. Then, fold the tab so you can tape it to the top inside of the bucket.
Set the cardboard on top and mark where the support wire touches the lid.
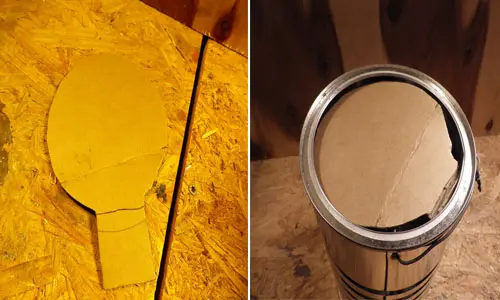
Fold the cardboard back and forth to create a hinge. Tape the cardboard tab to the inside of the bucket so it rests on the wire support.
Next, test the lid by gently pressing on the edge of the cardboard to ensure it moves properly. Cut the wire ladder to about 2 inches wide and tape it to the top of the bucket where you attached the lid.
Related: 9 Signs You’ve Got Rats
Add about an inch of gravel to the bottom of the bucket. Then, smear some peanut butter and stick almonds on the ladder in spots leading to the top.
Spread peanut butter on the far edge of the cardboard, away from the hinge. Place the bucket in the problem area and check it periodically. If needed, partially fill the bucket with water, keeping it no more than 1/3 full.
If You Are Using This Trap for Catch-and-Release: What to Do Next
The bucket trap works well as a live capture device, but the catch-and-release portion requires more planning than simply driving to a field and opening the bucket. Done incorrectly, you will find the same rodents back in your home within days.
- How far away is far enough: Research on house mouse home range and homing behavior consistently shows that mice released less than two miles from the capture site frequently find their way back, particularly if released in terrain without significant barriers. For reliable relocation, transport mice a minimum of two miles from the capture site in a direction that crosses a significant natural barrier such as a river, a large open field, or a forested area that provides food and cover for the relocated animal while breaking its connection to your home range. For rats, which have larger home ranges and stronger navigational ability, three miles minimum is a more appropriate distance.
- Do not release near another home or building: Relocating a rodent problem to a neighbor’s property or an outbuilding is not a solution. Release in genuine wild habitat: a brushy field edge, a woodland margin, or a riparian area that offers cover and natural food sources.
- Protective equipment for handling the bucket: Never reach bare-handed into a bucket containing a live rodent. Even a mouse can bite when cornered, and as established above, rodent bites and scratches carry genuine disease risk. Wear thick rubber or leather gloves for the transfer. To move the animal from the bucket to a release container for transport, place a lidded box or a second bucket over the open top of the trap bucket and carefully invert both together so the rodent transfers to the transport container. Secure the lid before transport.
- Check the trap frequently: A live capture trap that is not checked regularly causes unnecessary suffering to the captured animal. In hot weather a rodent trapped in an enclosed bucket can die of heat stress within hours. In cold weather, hypothermia is a risk for a small animal with no insulation. Check the bucket trap at least twice daily: once in the early morning and once at dusk, which bracket the periods of highest rodent activity and minimize the time any captured animal spends confined.
- Consider whether catch-and-release is appropriate for your situation: Live release is a reasonable choice for a single captured mouse or rat in a low-infestation situation. In a significant infestation involving multiple animals, the logistics of repeated transport releases become impractical quickly, and the time between checks during which captured animals suffer increases with trap frequency. Be honest about whether this method is genuinely humane in your specific situation or whether a quicker lethal method would actually cause less total suffering.
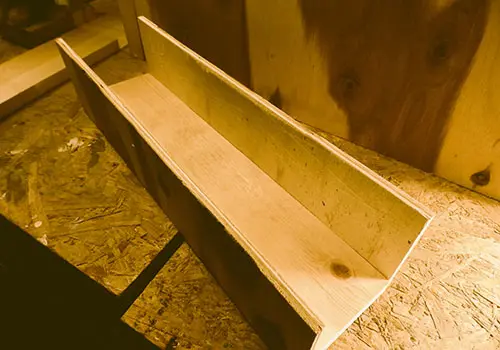
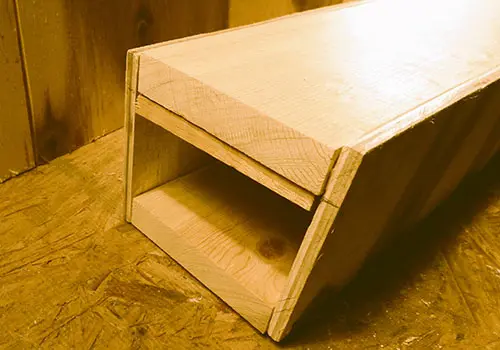
Option 2: The Enclosed Box
This harmless rat trap creates an enclosure around a traditional sprig-powered mouse or rat trap. It keeps the trap enclosed from pets and kids. It’s a way to make a dangerous trap harmless.
The key is to have an enclosed wooden box that is deep enough to keep a dog’s long nose or a kid’s small arm or foot from reaching the trap but can still allow a mouse or rat to enter. Kids typically know and respect the traps, but dogs and cats are another story.
Building the Enclosed Box
For anyone troubled by killing live mice, this offers a quick solution with a sprig trap that’s safe for pets and kids. Here’s what you need to do:
Equipment:
- Saw
- Drill and drill bits
- Hammer or screwdriver
- Tape measure and pencil
Supplies:
- Nails or screws
- 3 foot long 1×4
- 4×1 sheet of ¼ plywood
- A ½ by ½ piece of wood 4 inches long
- A hinge
- Mouse traps or rat traps (The average rat trap is 4×11” and the average mousetrap is 3 7/8×1 13/16. The box can hold either one large rat trap or two smaller mouse traps side by side)
Directions:
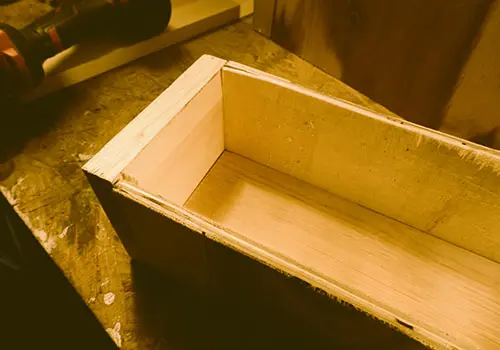
Cut the 3-foot long 1×4 so you have two pieces each 18 inches long. This will form the top and bottom of the box.
Cut the plywood into two pieces 18 inches long and 4 inches wide. This will form the sides of the box.
Cut a piece of 1/4 into a square 4 ¾ x 4 1/8. This will be the back of the box.
Drill holes along the sides of the plywood and either nail or screw the sides to the 1×4’s.
Drill holes around the edges of the end cap and either nail or screw it to form the back of the box.
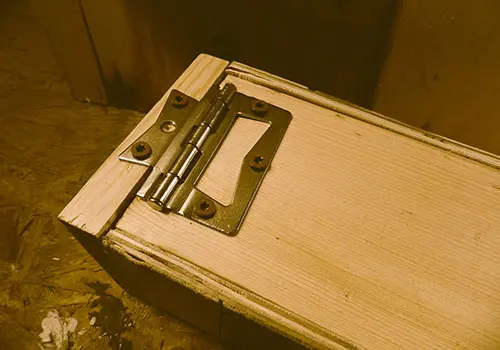
Install the crossbar at the front of the box to support the hinged lid.
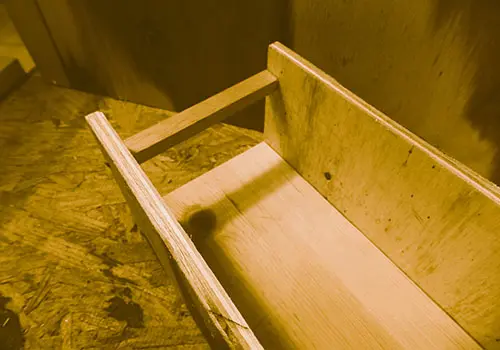
Attach the hinge to the top 1×4 at the back of the box so it will open and close.
Place the trap or traps in the back of the box and use peanut butter as bait.
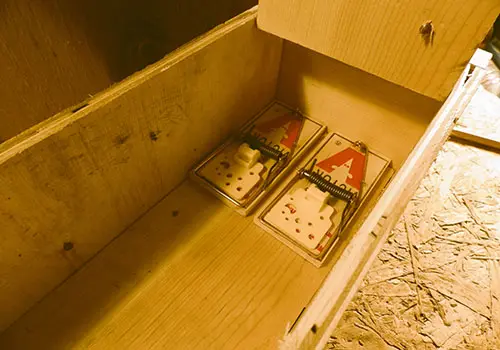
Load the traps lower the lid and place them in the location where you have the infestation.
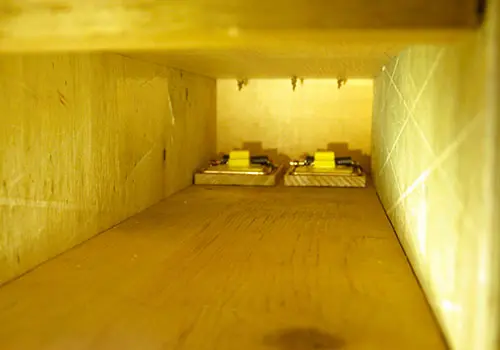
It helps to put down a trail of almonds leading to the box and some almonds in the box leading to the trap.
Trap Placement: Where You Put the Trap Matters as Much as the Trap Itself
A well-built trap placed incorrectly will catch very little. Rodents are creatures of habit with strong instincts that determine where they travel and how they respond to new objects in their environment. Understanding these instincts lets you work with them rather than against them.
- Travel along walls: Rodents, particularly rats, are thigmotactic, meaning they instinctively keep their bodies in contact with a surface when moving through unfamiliar or open areas. They almost always travel along the edges of rooms, along walls, along pipes and beams, and through gaps and tunnels rather than across open floor space. The most productive trap placement is flush against a wall, in a corner, or along any structural edge that shows signs of rodent activity. Signs include dark grease marks along the wall where rodent fur repeatedly contacts the surface, droppings concentrated along a specific path, and gnaw marks.
- Trap orientation: Place snap traps and the enclosed box trap perpendicular to the wall with the trigger or bait end positioned closest to the wall. A rodent traveling along the wall will encounter the bait end first rather than the trap mechanism end, which improves trigger contact significantly.
- Placement height for roof rats: If you are dealing with roof rats, traps placed at ground level will underperform. Secure traps along rafters, on top of wall plates, on shelving edges, or along any elevated horizontal surface that shows signs of travel. Use baling wire or zip ties to secure the trap so it cannot fall when triggered.
- Reduce neophobia before setting the trap: Both rats and mice are cautious of new objects placed in their environment, with Norway rats being particularly wary. For best results, place the unset trap in the target location with bait for two to three days before setting it. Allow the rodent to take the bait and become comfortable with the trap’s presence before activating it. This pre-baiting step dramatically increases initial catch rates, particularly for rats.
- Number of traps: Most people set too few traps and space them too far apart. For an active infestation, place traps every two to three feet along known travel routes rather than one or two traps in the most obvious spots. A higher trap density shortens the time to resolution and prevents trap-shy rodents from learning to avoid a single trap location.
- Check and reset traps frequently: Traps should be checked at minimum once every 24 hours and reset immediately after a catch. A trap that holds a dead rodent for several days becomes a contamination point and may deter other rodents from approaching the area. Remove captured rodents wearing gloves, bag them in a sealed plastic bag, and dispose of them in the trash. Do not handle rodents barehanded regardless of species.
- Keep placement consistent: Once you have established trap locations that are producing catches, do not move them. Rodents use the same routes repeatedly and a trap in an established travel corridor will keep producing results. Only move a trap that has produced zero catches after five to seven days of placement.
Bait Selection: What Actually Works and Why
Peanut butter is the most commonly recommended rodent bait and for good reason: it is highly aromatic, attractive to both rats and mice, and its sticky consistency means rodents cannot remove it from the trigger without applying enough force to set off the trap. For most situations in most seasons, peanut butter alone is an effective bait. That said, bait selection can be refined based on species, season, and what the rodents in your specific situation are already eating.
- For house mice: Mice are not the cheese-loving animals of cartoon fame. They are primarily seed and grain eaters with a preference for high-fat, high-calorie foods. Peanut butter, hazelnut spread, and small pieces of chocolate work well. Nesting materials can be effective lures for mice during colder months when they are actively building nests: a small piece of cotton ball or yarn attached to the trigger alongside a food bait can increase catch rates in autumn and winter. A piece of dry dog kibble pressed into peanut butter is a durable bait option that does not dry out as quickly as peanut butter alone.
- For Norway rats: Rats are omnivores with broader food preferences than mice and are more cautious about unfamiliar baits. Effective baits include peanut butter, pieces of dried meat or jerky, bacon, dried fruit, and in pantry situations, whatever food the rats have already been consuming since familiar food reduces neophobia. Fresh bait is more aromatic and more effective than bait that has dried out and lost its scent. Replace bait every two to three days regardless of whether the trap has been triggered.
- For roof rats: Roof rats tend toward a more frugivorous diet than Norway rats, preferring fruits, nuts, seeds, and plant material. Peanut butter works, but dried fruit, small pieces of fresh fruit pressed into peanut butter, or pieces of nut are often more effective. Roof rats in a particular location will have established food preferences based on what is available in that environment, and matching the bait to what they are already eating in your specific setting improves results.
- Seasonal bait considerations: In late summer and autumn, rodents are instinctively focused on calorie-dense foods in preparation for winter. High-fat baits including peanut butter, nut pieces, and dried meat are particularly effective in this period. In spring, when natural food sources are more available outdoors, bait competition is higher and fresh, highly aromatic baits outperform older or dried-out ones. Replace bait more frequently in warm weather since it dries out faster and loses its aromatic draw.
- Bait placement: For snap traps and the enclosed box trap, apply a small amount of bait, roughly the size of a pea, directly to the trigger mechanism. Avoid overloading the trigger with bait, as a large amount allows a rodent to feed without applying enough weight or pressure to trigger the trap. For the bucket trap, apply bait along the wire ladder in small amounts leading to the main bait at the far end of the hinged lid. The ladder bait draws the rodent upward while the main bait at the tipping point provides the final incentive to move out onto the unsupported cardboard.
- Non-target animal considerations: If the trap is placed outdoors or in a space accessible to wildlife, choose baits that are less attractive to birds and squirrels. Peanut butter is aromatic enough to attract non-target animals, particularly squirrels. The enclosed box trap design in Option 2 reduces this risk significantly since the access opening is sized for rodents. For any outdoor trapping, check traps more frequently and be prepared to release non-target animals if the trap design allows it.
Exclusion and Sanitation: The Only Long-Term Solution
Trapping is a control measure, not a solution. As long as your home or outbuildings have entry points rodents can use and food sources they can access, new rodents will move in to replace the ones you trap. Exclusion, physically preventing rodents from entering, combined with sanitation, eliminating the food and harborage that attracts them, is the only approach that breaks the cycle rather than managing it indefinitely.
Exclusion: sealing entry points
Begin with a systematic inspection of the exterior of your home and any outbuildings you want to protect. You are looking for any gap, crack, or hole larger than a quarter inch for mice or a half inch for rats. Pay particular attention to the following areas: where pipes, conduits, and cables enter the building through the foundation or walls; gaps around the base of doors, particularly garage doors and exterior basement doors; where the sill plate meets the foundation; vents and soffit openings; gaps around window frames; and any area where two different building materials meet and have separated slightly with age or settling.
Seal identified entry points with materials rodents cannot gnaw through. Steel wool packed tightly into gaps and secured with caulk is effective for irregular openings. Hardware cloth, a woven wire mesh with quarter-inch openings, cut to size and fastened with screws and washers is the right solution for larger openings and vents. Expanding foam alone is not sufficient since rodents can gnaw through cured foam readily. Expanding foam used as a backing material behind hardware cloth is a reasonable combination. Metal kick plates installed along the base of doors reduce the gap that rodents exploit. Check door sweeps on all exterior doors and replace any that have gaps or damage.
Exclusion work done thoroughly is a one-time investment that pays returns indefinitely. A home that rodents physically cannot enter does not require ongoing trapping.
Sanitation: removing what attracts them
Rodents do not move into a space because they enjoy the architecture. They move in because food, water, or shelter is available. Removing those resources makes your property significantly less attractive.
Store all food, including pet food, livestock feed, birdseed, and human food in hard-sided containers with tight-fitting lids. Cardboard boxes and paper or plastic bags offer no barrier to a rodent. Metal trash cans with locking lids, heavy plastic bins with snap lids, and glass containers with rubber-sealed lids are all appropriate. Never leave pet food out overnight. Clean up spilled feed around chicken coops, rabbit hutches, and livestock areas daily since these are among the most common attractants for rats in a homestead setting.
Eliminate harborage around the exterior of buildings. Woodpiles stored directly against the foundation, deep leaf litter along walls, dense ground cover within a few feet of the building, and stored equipment or junk piles all provide nesting and shelter opportunities. Move woodpiles at least 18 inches from the building on a raised rack. Maintain a clear zone of short grass or gravel around the building perimeter. Store equipment and materials in an organized way that allows you to see and access all areas rather than creating hidden voids.
Compost management matters significantly on a homestead. An open compost pile is a food source and a potential nesting site. Use a sealed or enclosed compost system, turn compost regularly, and avoid adding cooked food, meat, dairy, or oily materials that are particularly attractive to rodents.
When DIY Trapping Is Not Enough – Knowing When to Call a Professional
The two trap designs in this article are appropriate and effective for low-level rodent activity: one or two mice that have found their way inside, early signs of a rat investigating an outbuilding, a periodic intrusion that your exclusion work has not fully resolved yet. There are situations where DIY trapping is not sufficient and where professional pest control is the right call. Recognizing those situations early saves time, money, and the ongoing health exposure of a persistent infestation.
Signs that the infestation has exceeded DIY management:
You are catching rodents consistently in multiple traps over a period of weeks with no reduction in activity. This indicates a population large enough that trapping cannot reduce it faster than it reproduces. A single female mouse can produce five to ten litters per year of five to six pups each. A Norway rat can produce four to six litters of six to twelve pups per year. An established colony grows faster than periodic trapping by a single householder can address.
You are finding droppings in multiple areas of the home simultaneously, indicating movement through wall cavities and across multiple zones rather than a localized entry point you can address.
You are finding evidence of rodents inside walls, in the attic, or in the crawl space but cannot locate entry points from your own exterior inspection.
You are experiencing repeated reinfestation after exclusion work, indicating a structural entry point you have not identified.
You find evidence of rodents in a space where food is prepared, stored at scale, or where vulnerable people live, including infant areas or spaces used by immunocompromised household members, where the health risk of ongoing exposure is elevated.
What to look for in a professional pest control operator:
Not all pest control companies use the same approach, and the default approach of many conventional operators is immediate deployment of rodenticide bait stations, which solves the immediate problem while creating secondary poisoning risks for raptors, foxes, coyotes, and domestic pets that consume poisoned rodents. This is worth asking about directly before hiring.
Ask the operator whether they use Integrated Pest Management, or IPM, as their primary approach. IPM-based operators prioritize exclusion and habitat modification as the foundation of their program, using lethal control as a component of that program rather than the entire program. Ask specifically what exclusion work they will perform, not just what baiting or trapping they will do. A pest control service that installs bait stations and leaves without conducting an exclusion inspection has addressed the symptom but not the cause.
Ask whether they use first-generation or second-generation anticoagulant rodenticides if they use rodenticides at all. Second-generation anticoagulants such as brodifacoum and bromadiolone are significantly more toxic and persist longer in carcasses, creating substantially higher secondary poisoning risk for wildlife and pets. First-generation products such as diphacinone are less persistent. Some IPM operators use non-anticoagulant rodenticides or avoid rodenticides entirely in favor of mechanical trapping combined with thorough exclusion, which is the approach least likely to cause non-target harm.
Get a written scope of work before agreeing to service, including what inspections will be performed, what entry points will be sealed and with what materials, what trapping or baiting will be deployed and where, and what follow-up visits are included. A professional rodent remediation that does not include exclusion work is not a complete service.
You may also like: 
Plant These To Keep The Pests Away
DIY Automatic Backyard Traps and Alarms for Looters and Intruders (Video)
Ingenious Ways To Keep The Critters Out Of Your Pantry
Stop Making These Dangerous Pest Control Mistakes
15 Things You Should Teach Your Children That Can Save Their Lives


Nice article and thanks for it.
I’m so glad my mice trap and poison days are over. After various attempts with traps, we opted for poison (which we hate, because of the possible knock-on harmful effect.)
Since we got our two cats, we rarely have mice and rats problems. No more losses in our chicken and goat feed, no more damage to electrical cables, no more mice droppings falling from the roof, etc.
And a bonus of the cats – they are super cute.
Francois