Finding yourself with many bricks after completing basic home renovations is not uncommon. Why not put that pile of bricks sitting up in a corner to good use instead?
Yes, we are not even kidding here! Read this article until the end to learn 6 ways to use old bricks.
Bricks could never go out of date.
Those old bricks lying around your yard can be put to various creative purposes. You can decorate your yard or have something useful; either way, none of the bricks would go to waste.
So, without further ado, let’s start with 6 ways to use old bricks in your home.
Create a Brick Path
Making Outlines: Using paint or sand, outline the path you want to replace with bricks. It is handy to decide the seating area, ending, and starting point first.
Dig the Path: Shave the lawn flat and dig it up to 20 cm deep between the marked lines. Make sure to cut edges vertically along the lines marked earlier. For a finished look, use a landscape edging tool.
Filling the Excavated Part: Using a hand tamper, fill out the area you have just excavated with damp sand. Smooth out the surface using a level plank.
Setting up Bricks: Place bricks one at a time in the sand. Using a hammer, whack each brick firmly into the sand and do not leave any vacant space in between any brick. However, if any extra space prevails, fill it out with sand.
Final Touches: Using damp soil, fill out the outer boundaries. When you are done, sweep out the pathway from extra sand into left-out joints if available.

Planters with Candle Holders
Selection of Bricks: Making planters and candle holders from old bricks is one of the easiest ways to reuse them. In this case, you do not need any additional tools; just a few bricks with two circular holes would be more than enough for this project.
Resurfacing Bricks: If you prefer, you can paint the brick in your favorite color or just leave it as it is. You can plant succulents or any other tiny plants in one hole.
Final Touches: Meanwhile, a tea candle can be placed in the other hole. You can skip the candle holder part if you are going to use this brick as an outdoor planter.
Related: 10 DIY Projects You Need On Your Property Now More Than Ever

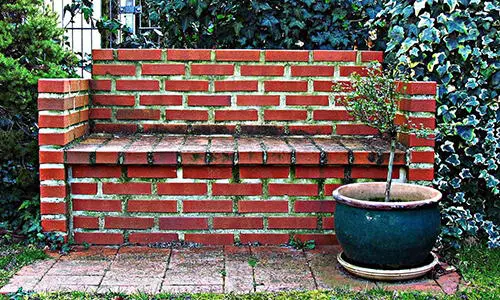
Garden Bench
Preparations: Start with using a shovel to level the area you will build your bench on. Make sure the whole area is clean and leveled out.
Making Boundaries: Line the bricks in two parallel lines until the desired length is achieved. Using horizontally placed bricks close the boundary and repeat stacking up bricks until your preferred height. Place a hardboard on the top where you can later place a mattress.
Prepare the Back Rest (if you want this): For the backrest, elevate the bricks at the back much higher than the bench body itself.
Painting the Finished Product: This step is optional, however, as you will have this brick bench outdoors, it is better to have it painted. You can try painting it white if you have thought of placing it beside your swimming pool. Otherwise, you can leave it as it is with its rustic touch.
Final Touches: To make the bench look presentable, you must decorate it after production. The bench could be topped with a gray mattress backed by colorful pillows.
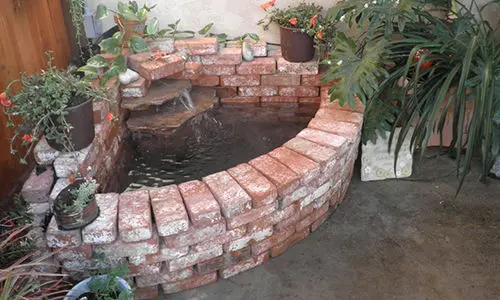
Brick Waterfall
Deciding the Shape: Using chalk or paint, mark the shape you would give your waterfall pond. Usually, a corner waterfall pond is much more feasible because you can easily set them up in a corner.
Setting up Bricks: Using mortar paste, line the bricks in the Corner to make them into a 4 inch box. Add a liner as well in this time so no water would flow out from there. You can order one from a home depot near you.
Install a Pond Pump: Order a pond pump from Home Depot according to your preferred specs. Getting one that can pump up to 4 feet is better. Along this pond pump, purchase a 3/4″ tubing (transparent) to connect to the pump from a Home Depot.
Finalizing the Setup: Stack the brick inside to hold the liner in place and support the weight of the water. For a much-refined look, trim the extra lining lying outside. In order to reduce the amount of debris that could block the pump, place the pump at the bottom of a brick.
Decoration: Top up the whole setup with colorful pebbles or tiny succulent planters. If you intend to have fish in them, have a filter installed inside them.
Related: 25 Wood Craft Projects You Should Have In Your Backyard
Birdbath
Making the Body: Create a lovely bird bath stand with leftover bricks for your garden or yard. This one is also a pretty simple and easy project. Simply lay the bricks on top of one another at any desired height or width.
Stacking up Bricks: Meanwhile, you are stacking the bricks up, don’t forget to glue them using mortar paste.
Finishing: You can place a bowl for a birdbath at the top of this brick stand. To give your garden a beautiful look, you can add a few tiny birdhouses along these brick stands.

Fire Pit
Decide the Space: Before starting out on making a fireplace made of bricks, you need to dig a space for the fire pit base. Make sure to mark the area using paint spray and dig approximately 18 inches of soil.
Prepare the Soil: When you are done with digging the ground, fill it up with gravel for better drainage. Proceed to fill this excavation with sand and top it up by leveling the soil. On top, line the bricks around the soil, sort of making out the boundaries for the fire pit.
Lining up Bricks: Line up the bricks to a height that is taller than the ground and about 8 inch. That’s it; your fit pit is ready. This is a simple model and now those cold nights can be warmed up sitting alongside this cozy fireplace.

Bottom Line
It’s undeserved for those old bricks to just sit around collecting dust.
In addition to being functional, you can also make them beautiful. No matter which decor theme you use, repurposed bricks make lovely decorations.
Make sure to follow each and every step mentioned here carefully to have the best results.
You may also like:
 How To Make A Simple Fire Pit In Your Backyard
What Our Forefathers Did and Built Around the House (Video)
Avoid Doing This On Your Property. It Can Get You Arrested
Security Mistakes You’re Probably Making On Your Property






Hi,
You charged my account. Now where do I get my digital downloads? Are you scamming me?
Chris Lynch
crlynch1@gmail.com
Hi Chris,
Thank you for your message.
You will receive an email from support@selfsufficientbackyard.com with details about your order.
Let us know if you need further assistance.
God bless,
The Self-Sufficient Projects Team