Whether you’re going on a long hike, in a situation that requires long-term food availability (not from the store), or you simply want to try your hand at living the way everyone’s ancestors did at some point in their history, there are several breads which can be of use to you. You’ll recognize most of these right off the bat, but I do have a quick warning about hardtack: it makes your stomach feel full. Very full. While this was a boon to those who were starving on trails or during long winters, it may be burdensome for those who are used to hiking with a lighter load in their tummy. Try it at home before you take it out with you.
Hardtack
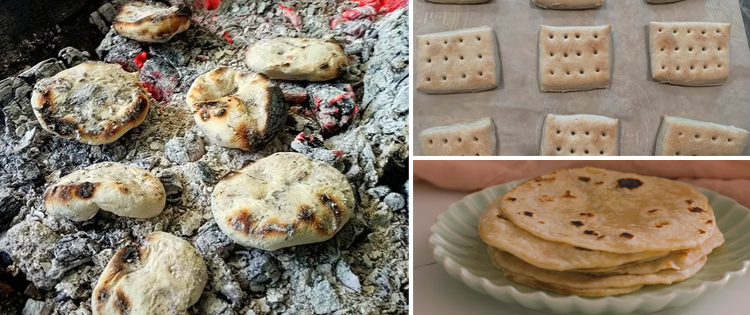
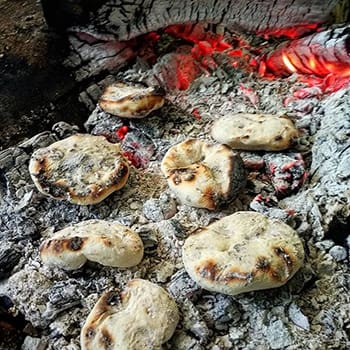
Hardtack is one of the most traditional, easy-to-make breads out there. A little flour, salt, and water, and that’s your dough. When cooked on a stone or in a pot over a campfire (or at home in your oven), you have an incredibly dense bread that will be good for years. It is, however, sometimes necessary to crumble or break the hardtack into a stew or soup for consumption once it goes past a few months on the shelf. That doesn’t mean it’s bad; it’s simply harder than may be a good idea to bite into.
Still, you’ll get all those wonderful calories that you need. Alternatives to crumbling it up like croutons or bread crumbs could also involve dipping it in honey and allowing it to soak into the hardtack or using maple syrup to do the same. This will make it sticky, of course, but it will certainly improve the flavor and not hurt your teeth in chewing it. Coffee, tea, and hot chocolate are also great dipping vessels to help soften your hardtack.
Let’s get to making it and then I’ll talk about possible additions and alterations.
Ingredients for Simple Hardtack

- 3 cups of flour (all-purpose)
- 1 and 1/4 cup water
- 1-2 tsp of salt- Why the variety? I generally recommend 2 tsp, but that does make salty hardtack. Ultimately, salt is not the important part here. You can make hardtack without it entirely, but it tastes terrible. Adjust this to your taste. Start with 2 tsp and work your way backward in the future.
If using an oven, preheat it to 375 F degrees. If using a campfire, use a thermometer to reach around the same temperature within your cooking container.
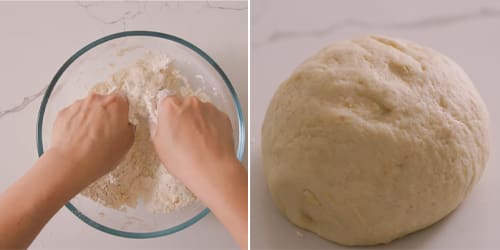
Mix your ingredients in a large bowl until fully incorporated. Go ahead and tip the mixture out onto a floured surface and roll it to around 1/2″ thick. Cut your hardtack into 12 separate pieces, prick each several times with a fork to prevent bubbles, and place either on a baking sheet (sprayed heavily with a non-stick cooking spray) or in your campfire cooking container.
Baking for 30 minutes. Turn and bake for another 30 minutes. Your hardtack should be ready. Allow cooling for at least one hour before eating, because this bread will easily remain very hot in the center and burn your tongue.
Now, to add variety, there are dozens of things we can add to hardtack to make it more interesting. Dried berries, bits of chocolate, and crushed nuts are probably all very obvious. However, adding some dried and finely chopped meat to this long-lasting bread is a wonderful idea and ends up being sort of a close cousin to pemmican.
Varieties I suggest:
- Add 1/2 crushed nuts or nut paste to the recipe above.
- Add dried cranberries, blueberries, or strawberries (a couple of handfuls) to the recipe above.
- Dice chocolate into tiny bits and add up to 3 oz to the recipe above with no change in baking protocol.
- Peanut butter makes an outstanding addition, too! Up to 1/4 cup can be added to the recipe without any changes otherwise.
- Use jerky and other forms of dried meat with caution, but finely sliced dried meat can be added within 2-3 oz levels.

Please note that varieties of hardtack may severely cut back on just how long it can sit out and remain good. The biggest problem is that moisture may wick into the hardtack and allow it to rot. If you are using dried ingredients, make sure they are as dry as you can make them be without losing nutritional value.
That said, you will probably see 2-5 months of safe hardtack even with the additions above. And without? I don’t think I’ve ever heard of hardtack going bad even years later. Dusty? Sure. Impossible to bite into without something softening it? Definitely. But bad? I’ve eaten 10-year-old hardtack and I’m still here. We’re not recommending anyone eat anything 10 years old, but you get the picture.

Tortillas
A simple flour tortilla can not only serve as easy-to-digest carbs, but it’s also a wonderful way to wrap up freshly hunted (and cooked) meat with some wild-picked vegetables and enjoy a little southwestern flavor no matter where you roam.
They also last for months on the shelf and are easy to prepare, even if all you have is a campfire and a rock.
PS: I recommend not getting stuck with just a campfire and a rock, but if you do you’re still in great shape!
What You’ll Need:
- 5 cups of all-purpose flour
- 2 tsp salt
- 2-ish cups of water
- 6 TSP of olive oil or melted butter (I prefer butter, I’ll explain why shortly!)

Mix the flour, salt, and butter together, adding the water slowly until you get a dough that is malleable with floured hands. You don’t want it to stick too much, but keep in mind that you’ll be kneading or rolling the dough out to make your tortillas flat. It should be in the area of 2 cups of water, but keep in mind that your exact flour and butter vs oil ratios will mean you may have to play with 1 and a half to 2 cups of water within the exact recipe.
Once the dough is ready, take a ball about as large as your hand and roll it out onto a floured surface. You’re looking for 1/8th to 1/4 inch in thickness, depending on how much you want to be able to roll these up or if you’re using them as a substitute for flatbreads.

Cook each tortilla by itself in a hot, non-stick pan over extremely high heat. Your pan needs to be scorching hot. Flip when you can slide a spatula all the way under the tortilla. Most cook in less than a minute.

Varieties:
Tortillas are well known for being rolled up and used as wraps, but they are often a substitute for yeast breads, too.
Feel free to make them a little thicker and spread butter on them as you would toast.
Try them with whipped cream and berry compote in place of yeast-based breads and cakes for breakfast.
Of course, you can roll them up like burritos with any number of fillings within them. Meat, vegetables, peanut butter, and jelly; the possibilities are endless.
Tear them up and use them to thicken a bowl of soup or stew. They work a good bit like flat dumplings.
Or, last but not least, use one to make a small pizza. When extra crispy, tortillas work great as pizza dough.
Tortillas will last in an air-tight container on the shelf for up to six months, though the edges may be crispy toward the end.
Roti, Naan, and Skillet-Fried Flatbreads
All of the skillet flatbreads are commonly along the same lines as the tortillas up above. The biggest difference is what their culture(s) use them for, which ones typically accompany certain dishes and the historical reasons as to why.
The thing is, if you need emergency bread, it’s very likely that all the decorum has gone out the window so feel free to eat these with whatever you want.
What You’ll Need:
- 4 cups of bread flour (not all-purpose, you won’t get the thick texture if you use all-purpose)
- 1 stick of butter
- 1 tsp salt
- 1 and 1/3rd cup water, room temperature or a little warmer
Mix 5 tablespoons of butter (melted) into 4 cups of bread flour. Add your salt (again, some personal preference will apply here) and slowly stir in your water.
Grab a small ball of dough and begin to slap it between your hands. When it is flat and thin (as thin as a crepe), lay it in a pan with the rest of the butter melted in it. Allow the flatbread to fry for 20-30 seconds on each side. You can stack them on a paper towel-lined plate when you’re finished, but I prefer to put a little paper towel in between each one to absorb excess grease.
This will make tons of flatbread similar to naan (a bit thinner), roti, and so on and so forth. In an air-tight container, you’ll likely see these breads last 2-4 months. However, you do need to be certain that the butter hasn’t gone rancid. To do this, give the box a sniff. If it smells cheesy, go ahead and toss the bread. It’s likely the butter is curdling.
Varieties:
Flatbread is a very flexible food. I suggest trying it with fried eggs and potato hash as sort of a “base plate” for it to help bulk up your emergency meals.
You can also crumble these and add them to trail mixes to give you a carb boost.
Another great thing to do with skillet flatbreads is to use them to help cover up the spicy kick from peppers rather than guzzling precious milk or water.
If you have an abundance of healthy seeds, adding those to the mix is completely permissible and they will cook just as quickly as the flatbread does.
Ash Cakes
Ash cakes require fire to cook them over. If this is impossible, I strongly suggest skipping this one. However, if you’re out in a primitive camp or you’re in a survival situation, make sure that you’re burning food-safe wood. No painted wood, no seasoned wood; you’re looking for dry stuff that is as natural as you can make it. Otherwise, you may get ill from fumes coming from the wood that permeates the ash cake.
What You’ll Need:
- A roaring campfire
- 3 cups of all-purpose flour
- 1 tsp of salt
- 3 tbsp of butter
- 3/4ths-1 cup of water
- 6 tsp baking powder
Mix all ingredients together. This should form a very thick dough. Separate this into 10-12 small cakes and pat flat until you have something about the thickness of your average IHOP pancake (½-ish inch). Allow your fire to burn down to embers, then place the ash cakes directly on the embers themselves. When they are charred around the edges, flip them over. The cakes are fully cooked when you can scoop them off the ashes with a spatula. Brush them off, and apply butter or honey to serve. Syrup and preserves are also excellent in this case.
If not using these immediately, let them cool completely before they are placed in an air-tight container. They stay good for up to two weeks even in warm weather.
Keeping Traditional Yeast Breads Longer
I’m adding this section for those of you, like me, who just love the taste and mouthfeel of yeast breads. If you want to keep them around longer and have access to a freezer or a refrigerator, even a root cellar, store your bread in the coldest area you can. Yeast does not take to mold easily in colder areas and you can extend your precious yeast bread for a very long time. The texture may be slightly different, but it’s still great for toast and sandwiches.
I hope you have a great time trying these recipes. Let us know below what varieties you come up with yourself! Happy baking!
You may also like:
Foods You’ve Been Storing Wrong Your Whole Life
An Insanely Effective Way to Build a 5 Year Food Stockpile (Video)
10 Recipes From “The Great Depression” To Survive The Next One
DIY Solar Oven From A Pizza Box
5 Recipes That You Can Make If You Live Fridge-Less


Great ideas!
However bringing your non stick pan up to extremely high heat to cook the tortillas is very bad advise. Commercial and residential light duty “non stick” – (excluding enamel which is not categorized as non stick technically) is only effectively “safe” at a high of medium heat. Otherwise you are either baking off terrible chemicals into the air or very certain to kill the non stick very quickly and have it start chipping off. “Non stick” is generally not as healthful as people presume. How about just get a tortilla press?
Thank you for this excellent straightforward guidance.