If you’re looking to bump up your food production during the winter months, why not consider learning how to grow mushrooms with sawdust blocks? This is a fun and easy means of putting some extra food on the table even when nothing is growing outside. Want to learn more? Read on.
Why Sawdust?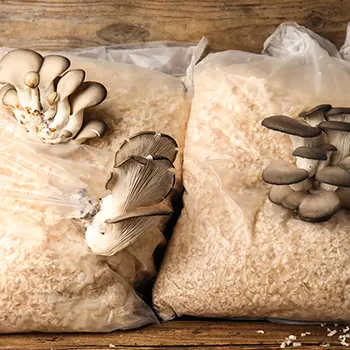
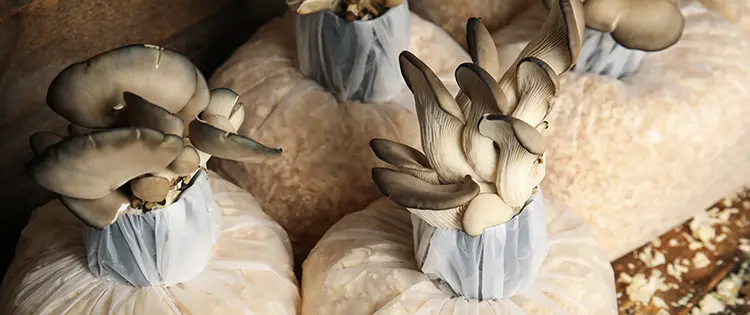
Mushrooms are commonly cultivated on a supplemented sawdust substrate that’s been made into blocks. Many, many species can be grown in this way, from oysters to lion’s mane to shiitake and more. Our mushroom course gives one recipe along with instructions for making these blocks, and I’ve learned a few finer points along the way. I’ll discuss those points in this article.
With respect to recipes, there are quite a few out there. Stamets adds gypsum to his; one teaspoon per 5-pound block. Gypsum is a metabolism enhancer, much analogous to humans drinking caffeine.
Another recipe tweak is using what’s called Master Mix, aka Fast Fruiting Mix. This is 50% oak pellets and 50% soy hulls, available in bulk from stores such as Mushroom Media Online. Having worked with both, I find the fast fruiting mix worthwhile. Remember, mushroom mycelia don’t compete well with contaminating organisms. Therefore, the more quickly the substrate is colonized, the less chance of mold settling in. Using a fast-fruiting recipe and some food-grade gypsum can give your species the edge. Heavy inoculation of your substrate can also help.
How We Make Our Bags Matters
In addition to having a good recipe, there’s a matter of technique. Plan ahead: do you intend to inoculate using grain spawn or liquid culture? If the latter, then you can try pre-sealing the bags before sterilizing them. Be aware that the bags can burst during this process, however!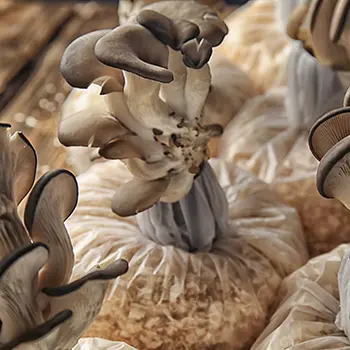
My research showed about half of the posters reported bursting, and half was fine. I use 6-micrometer thick bags and pack them tightly in my canner, so I’ve been fine. Fold your bag such that the filter is on the inside of the fold and won’t be submerged in water.
Those jar rings I use to keep my bags from direct contact with the bottom of my canner have been oxidizing and making an ugly mess! I don’t want any of that in contact with my substrate. Thankfully it scrubs well between uses.
Also, be sure to deflate your bag as much as possible while folding.
You’ll re-inflate at the point of inoculation so the mycelia will have the oxygen they need to grow and make mushrooms.
Related: 6 Ways To Make An Extra $1K A Month On A Small Homestead
A standard food sealer such as a Nesco or Food Saver will work well to seal bags, whether it’s done before sterilization or after. Wipe the inside of the bag so it’s clean of those sawdust crumbs that happen. I use a paper towel sprayed with alcohol. Also, dry plastic seals are better than wet ones. I have my sealer set to Extended Seal. While rubber bands can work to close your bag, I find this works better.
Self-healing ports can be anything from a piece of micropore tape to a fancy reusable rubber gizmo similar to what’s used in a specialized lid. I prefer the simple route myself. Be aware, however, that the humidity inside of your tent will likely dislodge a lesser glue, giving contamination a way in. Done this, been there. Use tape with good glue and cover your injection site with the same. Silicone will also work, but you’ll have to wait 24-36 hours for it to set before use. If you’re flush with cash and don’t mind the expense, bags with ports are available from several sources.
If you’re planning to inoculate from spawn, you’ll need to leave the bag open during sterilization. One thing you can try if you’re doing everything right but still having a problem is a Tyvek sleeve. These are available on eBay in several sizes and fairly cheaply. They look and feel like thick coated paper. Put them on top of your block inside the bag before sterilization. The rationale is that anything entering your bag when you open for inoculation will hit the sleeve, therefore not embedding into your substrate. Be sure to remove the sleeve within your still air box before inoculating your bag. And yes, they’re reusable. I rinse mine off and store them once dry with the rest of my small items.
Inoculation Is An Art Form
Ah, inoculation! The art of introducing the desired species to a substrate that’s also a major point where contamination can be introduced. It can happen even while using a still air box. This is why I wipe all of my surfaces with either alcohol or bleach repeatedly, including between bag inoculations. I also leave my bags in the canner until I’m ready to inoculate. Remember: hot substrate will kill your mycelia. I leave my bags to cool inside the sealed canner overnight. A thermogun is also helpful.
There are two ways to inoculate: liquid culture and grain spawn. If you followed my instructions and made your own master cultures, you’re in a great position to use liquid culture. This is one way to lower the odds of contamination: just inject via the self-healing port, tape it over, and watch the bag colonize. Be aware that it’s still possible for bags inoculated in this way to become contaminated, however. Too high humidity in your Martha tent or mold endemic to that area can and will do it.
Done this, been there. In fact, for a time, every one of the ten bags I made became contaminated. It happened so fast that I thought that spontaneous generation wasn’t so debunked after all! It turned out that both too-high humidity and endemic contamination were at fault. I now bleach out my tent regularly, about once per month, and adjust the humidity to 75%. Also, I have four species fruiting as of this writing, and they’re delicious! I tend to inoculate heavily, using 5-10 ml of culture. The culture won’t last forever anyway, so it might as well be used, especially if you can give your desired organism an edge.
Related: DIY Corner Vegetable Storage Bin
Inoculating from spawn most definitely needs to be done in a still air box. Stamets also shows this being done in his book. Basically, just shake the spawn into the bag, then seal the bag.
I find it helpful to use a sanitized butter knife to break up the spawn before shaking, as I find the spawn inside of the jar becomes a tight mass during colonization. Have an alcohol wipe or paper towel soaked with alcohol inside of your box. I wipe my blade between uses, even in the same jar, and wipe the spawn jar lid and upper jar area before closing if I haven’t used all of the spawn. Because still air boxes are small, I inoculate one bag at a time and sanitize everything between bags.
So That’s It!
A few practical tips for making and inoculating your own supplemented sawdust blocks. Who says gardening can’t happen during a subzero winter?
Do you grow mushrooms yourself? Have you learned a few things along the way? If you’re not growing mushrooms, what’s stopping you? Do you have questions? Please share your tips or ask in the comments below!
This article was written by Amy Allen and first appeared on The Organic Prepper.
You may also like:
20 Foods That Can Last 20 Years
The Only Food That Grows Almost Faster Than You Can Eat It (Video)
Foods You Should Never Buy And Always Make At Home
20 Grandma’s Depression Foods We Will Need Soon
The Forager’s Guide To Wild Foods: Book Review


