Cooking can be an energy-intensive and time-consuming activity. Whether homesteading, or living off the grid, you always look for ways to save time and money.
This article introduces a simple solution to that problem: haybox cooking. It is a cooking technique that is quick, easy, safe, and convenient and offers a great way to save energy and money.
Read on to find out more about this unique and helpful cooking method.
The Name Says It All
Haybox cooking is a technique that has been around for centuries. It was first developed by early homesteaders and mariners who needed to prepare meals while out at sea. It is comparable to today’s slow cooker but uses almost zero energy.
The haybox technique involves wrapping the cooking pot in hay or other insulating material, allowing the food to finish cooking using the residual heat stored in the grass. It is this stored heat that makes haybox cooking so energy efficient.
How Does It Work ?
The principle of haybox cooking is based on creating a closed system that does not lose heat, meaning that additional heat does not need to be added to the system for the food to cook. Instead, the heat in the system is used for cooking the food. The haybox technique involves wrapping the cooking pot in hay or other insulating material. This material traps the heat, creating a “closed system” where no heat is lost to the environment. The food is then left to cook in the already present heat.
Remember that a haybox doesn’t introduce any heat to the pot. Instead, it keeps the heat that is already there inside. Any dish you prepare will be made on a kitchen stove or campfire and transferred to the haybox.
Related: Soft Milk Bread Without An Oven
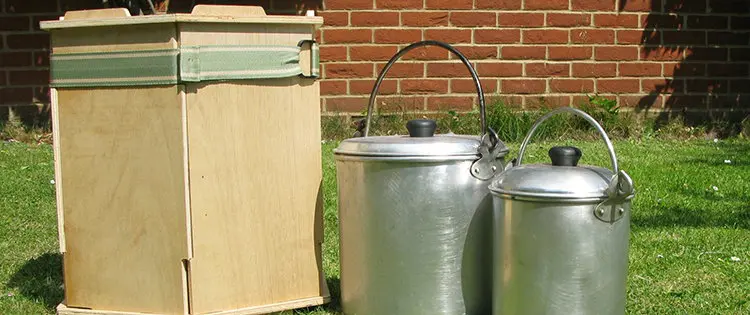
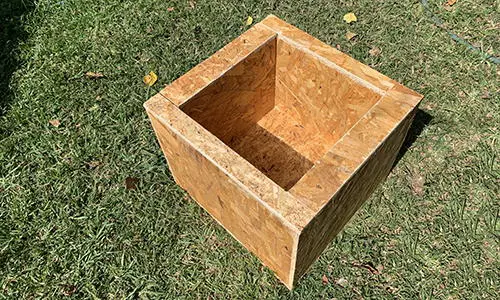
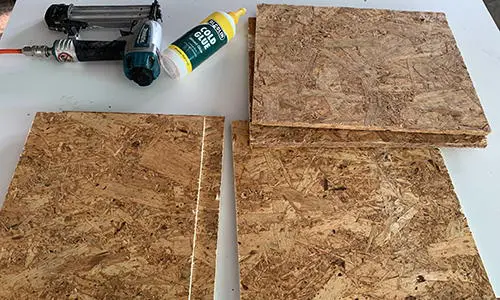
Building A Haybox
I built a new double-insulated haybox for this article. I used mainly 9mm OSB, 3mm MDF and wood shaving from my planer.
I opted for double insulation because I have been curious whether it would be significantly more effective than my old, single-layer haybox.
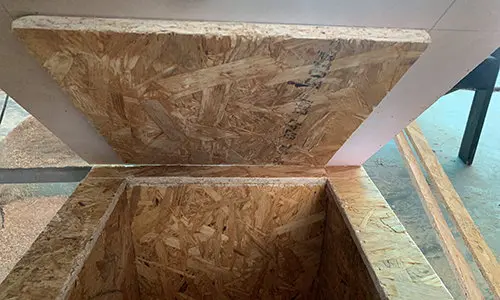
The double-insulated principle is to build a box within a box with space between the inside and outside panels. I filled this space with wood shavings that I compressed by hand. The woodshavings are excellent insulation and would otherwise have been worked into garden beds, used as mulch or bedding for livestock.
I opted for OSB because it’s popular home construction material, particularly in Scandinavia and other places that build wood frame houses in cold environments. In addition, it’s stable, cheap and easy to work with. Just beware, as it sheds a lot of splinters.

The images of the build are self-explanatory.
First, it involves cutting panels and nailing them together. Then, you will see how I used overreaching edges on the inside cube to attach the inside and outside cubes.
I also opted for a double insulated lid. The lid comprises an OSB frame, with a 3mm MDF bottom and top, with a piece of OSB nailed to the bottom. The bottom OSB ensures a snug and tight fit and is one of the most critical parts of the haybox. Heat rises, and you lose most of the heat through the lid. A double-insulated lid ensures that most of the heat is kept inside, making the box more effective.
You don’t need a double-insulated haybox. A simple wooden box full of hay will also work.
Related: 9 Little Tricks To Save Electricity At Home Big Time
Using A Haybox
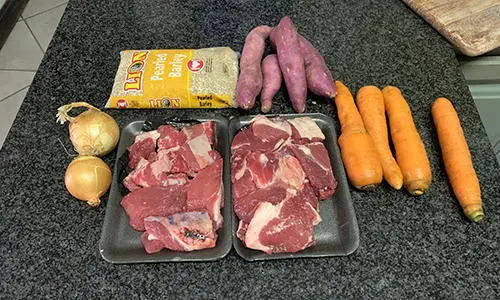
The dish I prepared is a simple stew. Beef, carrots, sweet potatoes and some pearl barley. Adding some beef stock, marmite and Worcestershire sauce for flavor.
I prepared the stew like I would if I were cooking on the stove. I only transferred the stew to the haybox once it reached the point where I would reduce the heat and simmer it so the vegetables cook through and the beef cooks soft.
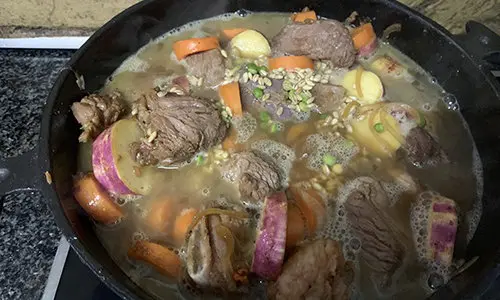
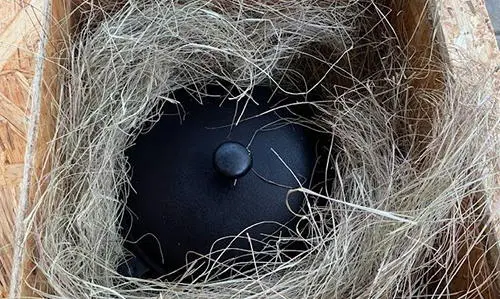
Using the haybox couldn’t be simpler: you fill the bottom of the box with straw, hay, or any excess grass. Make sure you don’t use vegetation that will transfer juices of funny tastes into your dish or even potentially poison you. Make sure the pot is snug with hay at the bottom and sides.
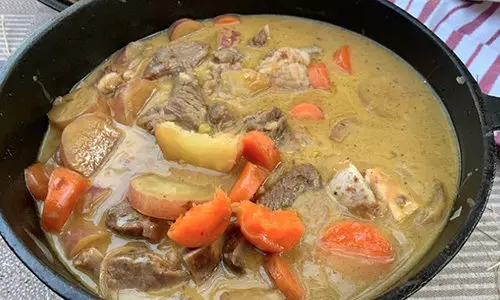
I cover the lid with a cloth, ensuring that dust and small grass particles are easily removed when I extract the pot from the haybox. You can see from the photos that the vegetables are soft and thoroughly cooked and that the meat is soft and juicy.
Four hours passed between the pot going into the haybox and coming out again. I took photos, put them back into the haybox and reheated the dish later on the stove before serving.
Since introducing no new heat, you can leave a dish in the haybox at any time without fear of your dish burning or cooking dry.
Ideal For The Following Situations:
- Saving Time: cooking dinner when you don’t have time to cook dinner. You can start your meal in the morning and transfer it into the haybox during the day, and it will cook soft while you are at work, or working on your homestead, and ensuring that a warm and sumptuous meal is ready when you return home.
- Camping: you can start the meal and then remove it from the fire into the haybox, circumventing the need to constantly monitor the temperature of your fire to ensure that your dish doesn’t burn or stall, leaving you free to do other chores or enjoy camping.
- Overnight: haybox cooking is also ideal for making porridge the night before for breakfast. Before bed, I boil water, add salt and my favorite porridge, stir thoroughly and transfer to the haybox. It will be thoroughly cooked by morning and ready to heat for breakfast, saving time!
So there you have it, folks. Haybox cooking is simple, effective, and saves time and money. Enjoy!
You may also like:
 What Happens When You Mix Fat With Ashes
The Long-Lasting Food That Amish Pioneers Turned To In Dark Times (Video)
Cheap Concrete For Your Projects: Papercrete
Ingenious Rain Catchment System For Your Homestead
How To Build a Solar Heater from BEER cans for FREE


