This project (like many) was devised in order to solve a problem.
I had begun to observe with my indoor plants – yellowing of the leaves. Researching the issue I discovered the proper term was chlorosis, and that the pH of my tap water was likely to blame. I learned a lot about what minerals are added to city tap water and how that can affect the health of my plants. I learned that pH values between 5.0 and 6.5 are ideal for the root environment of soil potted plants, and that adverse effects will be more likely with values lower than 4 and higher than 8. I purchased a pH test kit and compared the tap water to the rainwater from a recent rain storm. The results confirmed that my tap water was indeed elevated at around 8.5 while the rain water was a more idyllic 6.0.
With this information I began to draw up plans to build a rain harvesting system.
Related: How to Adjust the pH in Soil and Water for Abundant Harvests
Supplies Needed
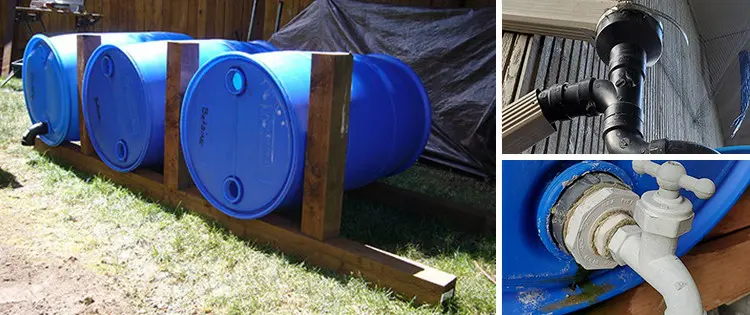
Using a local classifieds website I sourced three HDPE (High Density Poly Ethylene) 55 gallon barrels which would resist UV rays and slow the growth of algae. These ones had been used in the manufacturing of shampoo and were therefore free of any harsh chemicals that would cause further damage to my plants. Using the long extension of my pressure washer made quick and efficient work of cleaning out the barrels. These barrels have a buttress thread, and required a special adapter found online to connect it to the common ABS fittings I could purchase from my local hardware store. Here is a complete list of my supplies:
- 55gallon HDPE barrel (x3)
- Buttress Thread Adapter to 2″ NPT Male (x6)
- 2 in. ABS DWV male adapter (6x)
- 2” ABS long 90 degree elbow (x5) + 2” ABS short 90 degree elbow (x1)
- 2” ABS WYE or Tee fitting (x1) + 2” x 4” ABS Coupler (x1)
- 2” ABS pipe; ABS Cement
- Pipe Thread Sealant
- 4”x4” x 8ft Treated lumber (x6) + 2”x4” x 6ft Treated lumber (x2)
- 3.5” x 0.25” Aluminum Angle (x 16)
- ¼” Lag Bolts and Washers; Stainless for feet
- Flexible downspout (x2) + Extra downspout
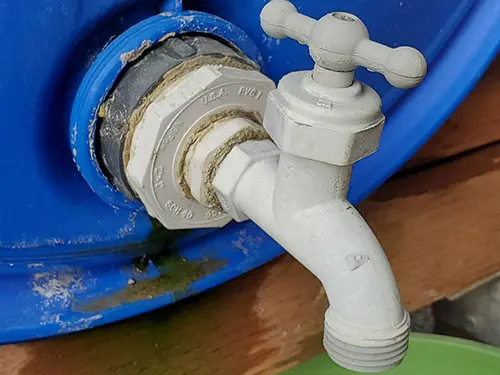
- PVC adapters and spigot
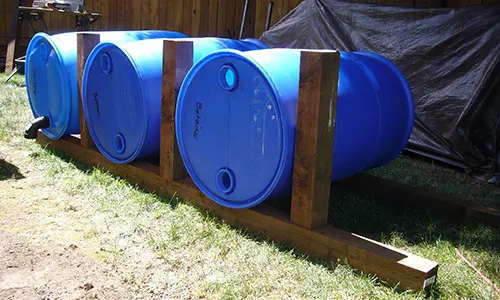
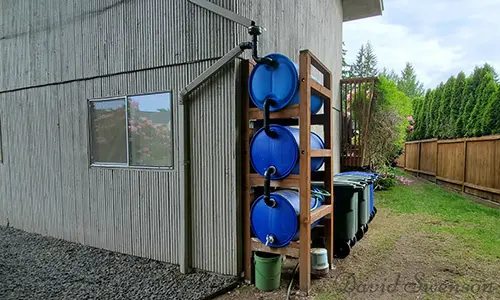
Construction Of The Rain Harvester
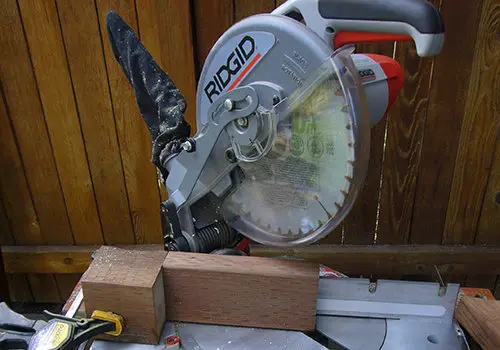
I laid out two lengths of the 4×4’s and figured my spacing so that I could still remove the barrels, and be able to place a bucket under the spigot. I cut my 4×4’s to 23” long and spaced them 24” apart with the bottom level measuring 16” above the ground, and the 4×4’s running parallel to the barrels were cut to 27.25” long.
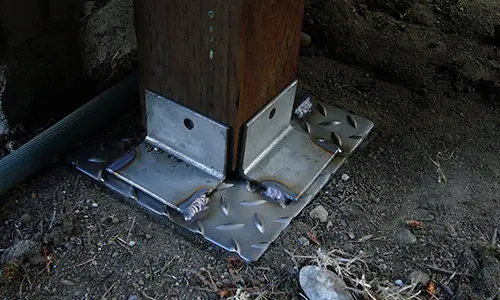
With the potential for each barrel to hold 450+lbs of water I had a local metal supplier cut 16 pieces of 3.5”x3.5”x 0.25” aluminum angle at 3.25” long to serve as my brackets. I then drilled six holes in each big enough to fit my ¼”lag bolts. While at the metal store I also got four pieces of 0.25” thick stainless steel tread plate measuring 8”x8” and 16 pieces of 2”x2” x 0.125” angle to weld up my own feet.

This would keep the four posts from sitting in the mud on wet days and provide a better footing for the nearly 1500lbs of maximum water storage. I drilled holes in the feet thinking I would screw it in, but after setting it upright I was not worried about them going anywhere.
To prevent the barrels from rolling and putting extra stress on my ABS fittings I cut 12 pieces of 2×4’s with a 45 degree bevel on one end at 7.5” long. Finally I added two 2×4’s measuring 34” across the top for added rigidity.
Next came the plumbing.
I started by adding pipe thread sealant to the DWV and mating it with the buttress adapter. I chose thread sealant because it was less permanent and would allow me to tighten the fittings if any leaks formed, or if/when I needed to replace a cracked fitting. Mating these adapters before I installed them on the barrels ensures I didn’t over tighten or strip any of the threads.
I then dry fit all of my ABS fittings allowing me to measure and cut my ABS pipe to length. Once I was happy with how it was all fitting and that none of the adapters were under any stress, I cleaned all the fittings and pipes and glued them together with ABS cement following the manufacturers installation guidelines.
The top fill spout combined with the wye (or tee) fitting allows the barrels to fill up and then drain any excess back down the drain spout. I added a piece of window screen material over the spout to keep out large debris and secured it with a hose clamp. Putting this screen on the very top allows the debris to continually be washed away without fear of any filters getting clogged or needing replacement.
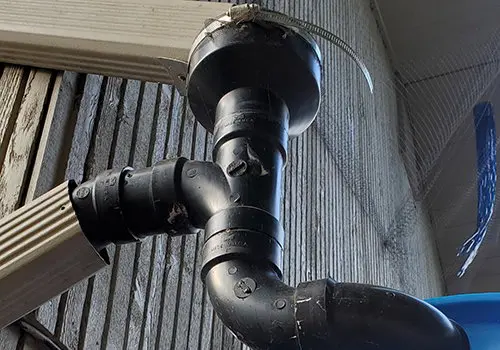
I then cut my aluminum downspout and added the flexible downspout to divert it to my harvesting system. I then attached a short piece of downspout with a screw to the overflow of the fill spout to feed it back into the original downspout.
Related: 7 Mistakes To Avoid When Harvesting Rain Water
I live in Seattle and experience freezing temperatures in the winter. Keeping a full system during my first winter with the system cracked a few fittings so I learned to drain all but the bottom barrel to keep from replacing fittings every year. The flexible downspouts make it easy to reconnect the downspout to the drain and bypass the barrels in the winter.
They are also useful to bypass the barrels before the first rain after a long stretch of no rain since over that time pollen, dust, animal droppings and other debris has been collecting on your roof, and it’s better to allow it to wash off before storing it in your barrels.
Over the last eight years of use I have added extra 4×4’s to increase rigidity and a 45 degree elbow to the drain spout to keep the water from dripping back out of the spout.

And you might be wondering about my plants? Well, they couldn’t be happier with their natural water and having the spigot located so high above the ground allows me to attach a hose and water other plants in my backyard.
About The Author
David is a lifelong outdoor enthusiast, and an indoor/outdoor gardener. He is a fabricator, mechanic, and all around handy man currently living in Seattle, Washington and working for Pure Watercraft developing the future of electric boating.
This project was an original idea, designed and made by David himself. All of the photos in this article were taken by the author as well.
You may also like:
 Is It Legal To Harvest Rainwater In Your State?
This Homemade Device Can Power Up Your Entire House 7 Days in a Row (Video)
8 Easy Projects You Shouldn’t Miss From Your Backyard
21 Gardening Items You Should Get From the Dollar Store


You’re so smart! Thank you for sharing this idea!!
Love this idea, thank you so much for sharing details, not selling them!!!!
This is brilliant. Thank you so much for sharing your knowledge.
Is there anyone that builds these custom collection systems? It’s a great idea!