
If you think that your water is not clean enough and don’t employ any water filtration system due to whatever reasons, then it’s time for you to learn how to make one yourself.
The purpose of this DIY Water Filter is to purify tap water and even rainwater, so you can use it for other kind of things. This includes water for your fishpond, gardening, and washing.
Why I Made My Water Filter
As a bit of a background, I made my first water filter a few years back, to make sure that my Kois enjoy clean and healthy water.
In the past, I used to own a fishpond without any water filtration system. It was a small concrete pool that my dad and I made. There, we kept plenty of small tropical fishes like Guppies, Zebra Fish, various types of Gold Fishes, and some cheap aquarium Kois.
I had that pond for a few years and my fish flourished, especially the Guppies, which were able to reproduce in large numbers.
The problem with it, was that it was too high maintenance. We had to clean the pond weekly lest the water would turn murky, and we couldn’t see the fishes swimming underneath.
It was only a few years later when we found out that it was that way, because we haven’t got a filter in place. So, when we built a bigger pond, we made sure not to make the same mistake again.
The result was crystal clear water.

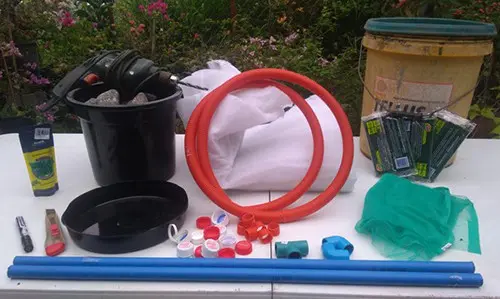
Tools Needed For The Water Filter
- Drill
- Cutter or Knife
- Steel Saw or PVC Pipe Cutters
Materials For This DIY Filter
- 1/2“ PVC Pipe
- 1 x 1/2” T-piece push-fit connector
- 2 x 1/2” 90° elbow push-fit connector
- 5 gallon bucket with lid or cover
- Bowl or basin that can fit inside the bucket
- 6-6.5 feet of Flexible ENT Electrical Tubing (cut into 1” or smaller pieces)
- A larger PVC Pipe or any length of tube
- Fine Mesh Net; Scotch Brite; Fiber fill
The Importance Of A Water Filter
To illustrate, the air we breathe passes through many stages of filtration before it reaches our lungs.
The hairs in your nose help clear out large particles. Smaller, microscopic hairs are found along your air passages and move in a sweeping motion to keep the air passages clean. Finally, the mucus, makes sure to trap any dust, bacteria and other foreign substances from entering the lungs.
Just imagine any collection of water as one giant human body. Without any filtration system, toxins and other waste would quickly build-up, and its uses would be severely limited in some way or another if given enough time.
Related: Is It Legal To Harvest Rainwater In Your State?
What Is A Biofilter?
A biofilter is what you will be creating if you follow this guide. In essence, there are technically two kinds of filters: mechanical and biological.
Mechanical filters remove any physical objects or solid waste within the water. Some of these include leftover food or dirt. Mechanical filters make sure that your water remains crystal clear.
However, making it look “clean” doesn’t necessarily make it “cleaner”. Meaning, there might still be toxic substances that remain in the water.
This is where the Biological filters step in. These filters employ the help of nitrifying bacteria to help detoxify and purify the water by dissolving, or in a sense, “decomposing” any unseen substances.
By combining the two, you’ll get freshwater that is crystal clear and safe for using.
Step 1: Form The Internal Vortex Pipes
The first thing you want to do is to form the Vortex. It is where the water from the pond will enter. It is shaped that way to swirl the water as it begins to fill the bucket. This way, bigger bits of dirt and debris will separate from the water through centrifugal force.

Using a saw or a pipe cutter, cut off a section of pipe that is shorter than the diameter of the bucket’s bottom. Remember not to measure using the mouth as most buckets are tapered and get smaller as you go down from its mouth.
Next, cut the small piece of pipe in half and connect them using the T-piece push-fit connector.
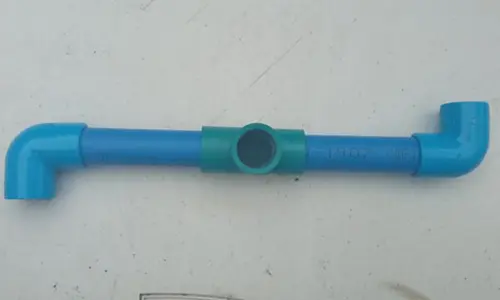
Afterward, connect the elbow push-fit connector to both ends of the newly created section. Make sure that each elbow is facing the opposite direction from the other.
Lastly, connect the longer remaining length of pipe to the last available slot of the T-piece. To make sure everything stays in place, reinforce the fittings using silicone sealant.
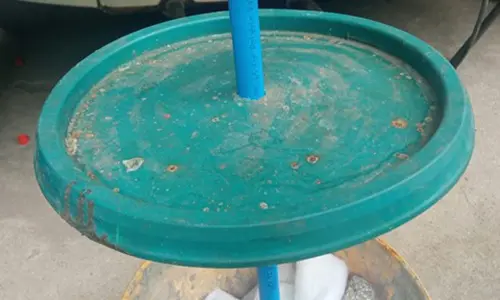
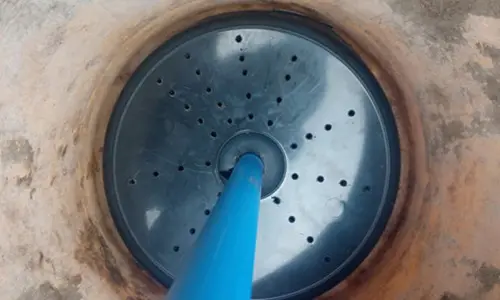
Step 2: Vortex Guard And Stone Holder
The next step is to create a shield that will protect the vortex from the weight of the pebbles that you will put afterward. This will also help trap bigger particles from the water.

To create the guard, drill a hole in the center of the bowl or basin. Make sure that it is big enough for the pipe to snugly fit through.
Next, drill plenty of holes around the center so that water can pass through efficiently.

Step 3: Preparing The Bucket
Generally, you need to drill a hole near the top of the bucket as it will serve as the water’s outlet back to the pond.

To create the outlet, you’d first want to find a tube to facilitate the flow of water towards the source. For this project, I just cut off an empty plastic bottle to serve as my outlet. I fixed it in place using a generous amount of silicone sealant.

The other thing you need to do is to drill another hole in the middle of the bucket’s lid. This will hold the inflow pipe in place and keep it from wobbling around.
Step 4: Putting Everything Together
After doing all the preparation above, it is now time to put everything together.
The first thing you want is to assemble the vortex shield and the vortex pipes. And here you go! You’ve your inflow assembly already! This goes in the bucket first.
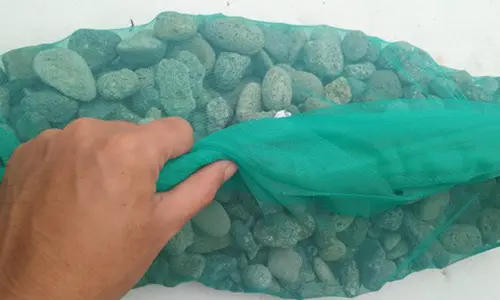
What follows next are the pebbles. The small stones will help filter out any sizable debris that got through the vortex shield.
However, to make them more manageable and to add another stage to the filtration process, it is best to wrap the stones in a fine mesh net.
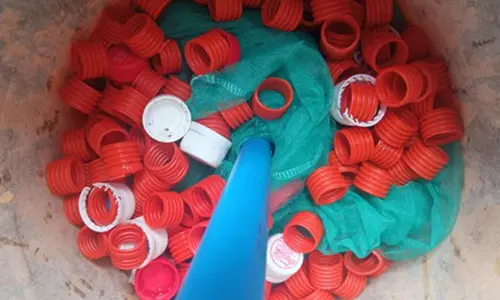
The stones are to be followed by the ENT or plastic bottle caps. You may also opt to put in a combination of the two. These will be your makeshift Bio-balls where the Nitrifying bacteria will grow and proliferate.
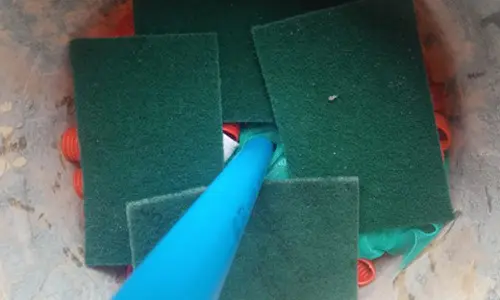
Afterward, add in a layer of Scotch Brites.
And to top it all off, the rest of the fiberfill and some large stones to keep everything down.

Put the lid back on and you’re good to go!
If everything goes well, you need not do any maintenance work on your water filter. However, if the water outflow starts to get mucky, you should clean your filter out.
Another thing to watch out for is that the Nitrifying bacteria will die off if not given enough oxygen. Hence, you need to make sure that your water filter isn’t clogged at all.
The Last Step
Now that you have finished assembling your water filter, it is now time to hook it to your water source. How? Well, you just need to connect a pump to the tube that protrudes from the top of your filter.

By adding a DIY Water Filter, you can expect cleaner water all year long.
This design is meant to filter huge amounts of water and it can also be used to procure drinkable water. However, for that you need to remove the electrical conduits and replace it with a layer of activated charcoal. Take note that even if it passes through the filter, as a safety measure, you still need to purify the water further by boiling it or using purifying tablets before drinking it.
If you make one let us know how it went and if you like it.
You may also like:
Easy to Build Root Cellar in Your Own Back Yard (Video)
The Ultimate Guide To Composting
6 Small Animals You Can Raise On Your Property


OK, this looks easy. I’ll try it for my small aquaponics.
If there is no moisture in the air…………..you cannot make water.
Where do you think clouds come from? They come from moisture in the air as it condenses.