Last year, I had over 200 square feet that I cultivated intensely. My vision was abundance, and it worked, mostly. But then, mid-season, I had to move across the country. While my current rental has many things going for it, it lacks an in-ground garden. As community gardens are scarce and extremely in demand in my city, I’m going with the next best option — building an elevated garden bed for my 2mx2m patio.
After scouring the internet for plans and ideas, I settled on this design because:
- The 4ft x 2ft size is perfect for square-foot gardening, and the 10 inches is a good depth for growing lettuces and other greens.
- I can garden standing up, instead of having to kneel.
- It fits nicely inside my patio, and I’m able to reach over to the other side without straining.
- It requires only basic hand tools (but power tools will make everything faster).
This Elevated Planter Design Is Perfect For Beginners!
You only need basic tools and basic woodworking skills. My husband helped me build this, and he has little experience building things.
More advanced woodworkers can build upon this basic elevated planter design to make it pretty.
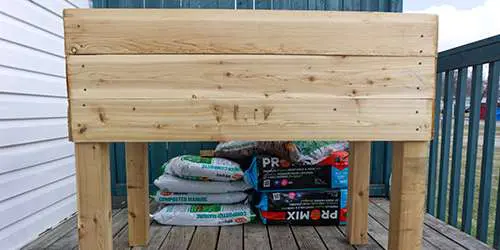
The measurements for my elevated planter design come to 4 feet x 2 feet on the inside (an inch and a half wider on all sides on the outside), with a box depth of 11-inches, and a comfortable 40 inches tall. It fits approx 42 gallons of potting mix.
You can change these measurements to whatever you need. Taller or shorter depending on your height if you want to stand, or lower it so that you can garden from a chair or wheelchair.
If you make it longer than 4 feet, though, you need to add more legs to support the middle. Use the Sagulator to find out the length you can go before adding more supports.
Estimated Time: 5 hours
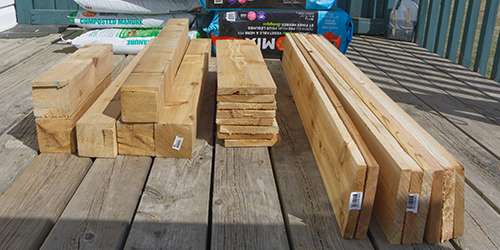
Tools & Supplies
- 10 – 1x6x4’ cedar boards
- 4 – 2x4x4’ cedar boards*
- 2 – 4x4x8 cedar posts**
- 4 ft of chicken wire
- Landscape fabric
- 3-inch external wood screws for the panels and crossbars supported by crossbars
- 5-inch external wood screws for the crossbars supported by the posts
- Linseed oil for a natural sealant to extend the life
- Hand saw and miter box (you can use a miter or chop saw if you have one)
- Drill with drill and screwdriver bits
- Tape measure and square
- Staple gun and staples
- Potting mix: I’m using a homemade mix of organic potting mix, composted manure, coconut coir, and glacier dust.
*Saving money by replacing 2×4 with 1×6 can seem like a great idea, but don’t. The bottom has to hold up to 400lbs of wet soil. 0.75 inch (which is what the 1 actually means) just isn’t strong enough, not over 4-feet.
**If you’re using a handsaw, replace the 4x4s with 2 – 2x4s screwed together. You’ll save yourself a lot of effort.
Instructions
Cut the lumber to size
You can cut all the lumber at once, or cut as you go along.
Legs: 4 – 4×4 pieces at 40-inches long
Short Cross Bars: 2 – 4×4 pieces at 17-inches long
Middle Long Cross Bars: 2 – 2×4 pieces at 4-feet long
Edge Long Cross Bars: 2 – 2×4 pieces at 41.5-inches long
Long Panels: 6 panels at 4-feet long (1x6x4).
Side Panels: 6 pieces at 2-feet long (1x6x2).
Attach the short siding to the posts
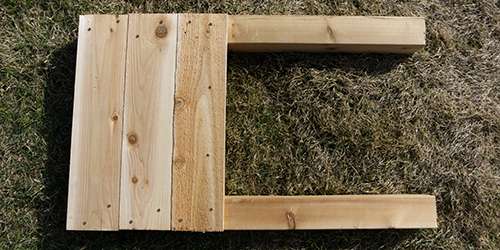
Lay out your posts, with the crossbar in place and the post feet pressed up against something flat to make sure they’re even. Lay your 2-foot long pieces (3 total) starting from the cross-bar. Pre-drill, then use the drill with the 3-inch screws.
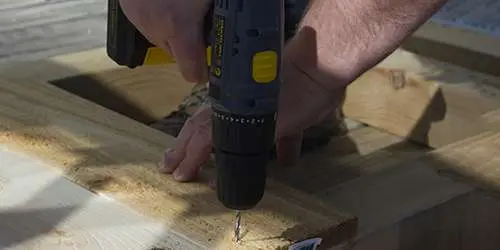
Important: pre-drill all the holes in this project! Cedar is pretty dry, and if you don’t pre-drill, it will split.
To get a deeper pilot hole, drill through both layers, then lift the top piece of wood and continue to drill through the second. You can get a lot deeper to make it easier for these longer screws.
Affix short crossbars to posts and sideboards

Since we had enough 4×4 leftover from the cuts, we used that for the short crossbars. You can swap this for a 2×4 and end up with a deeper bed.
We started with a couple of 3-inch screws drilled in at quarters, before deciding to use longer 5-inch screws to drill through the post into the crossbar.
We then added screws through the sideboards into the post for extra support.
Repeat these two steps so that you have two short sides.
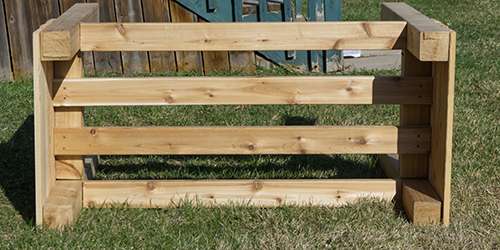
Attach the long crossbars
With the two short sides completed, we then attached the long crossbars. These crossbars are the most crucial part! They’re responsible for holding up 400lbs of wet soil. That’s why you need to use at least a 2×4. A 1×6 is not thick enough to carry enough weight, especially as moisture seeps into the wood.
We set up the two short sides, with one next to the wall to make sure it was straight, then placed all four crossbars on top of the short crossbars. The two outer crossbars work as spacers. There’s a 3.5-inch gap between the crossbars on the outside and a 3-inch gap in the middle. After drilling pilot holes, we screwed the two middle crossbars in place.
Then, we cut the second pair of crossbars to fit between the two posts. After setting the elevated planter on its side, and using the extra 2×4 pieces as spacers to hold the 2×4 in position against the inner crossbars, we pre-drilled and screwed in the second pair using the 5-inch screws.
The elevated planter looks a lot more sturdy now!
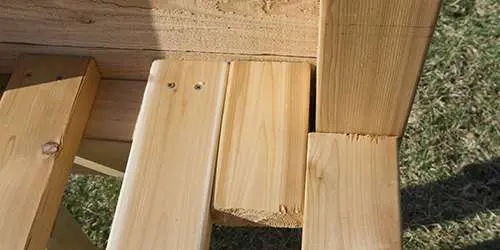
Add the 4’ side panels to the long side
Then, with the elevated planter still on its side, we attached the 4ft side panels to the posts. We added a few screws through the bottom side panel into the crossbar for extra support and to keep the panel from gaping.
We also put a couple of 1x6x4 pieces on top of the long crossbars, just to help support the weight a bit more.
Rub in purified linseed oil
We ended up skipping this step, as we’re in a really dry climate and don’t need to deal with a lot of rain, just the moisture of the soil. I also only need it to last a few years.
But if I lived in a rainier climate, I’d rub in purified linseed oil as a sealant to protect the wood and extend the planter’s life, and still be able to compost the wood when I replaced it.
You could use a chemical sealant, but a) you don’t really want that stuff near your food, b) the off-gassing is not good for the environment, and c) you can’t compost the wood.
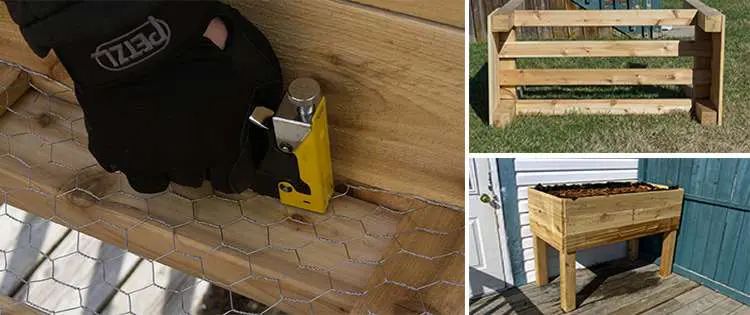
Staple in the chicken wire
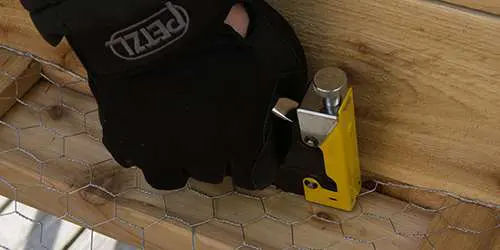
Instead of fully paneling the bottom, we added chicken wire to spread out the weight, add more drainage, and air prune the roots.
We rolled out the length of chicken wire lengthwise along the bottom before cutting at one end and rolling the corners down to fit around the posts. We then stapled it with U-shaped staples along with the crossbars.

Wear gloves! The cut edges of the chicken wire are sharp and will draw blood.
Staple in the landscape fabric and trim the excess

Then we added a layer of landscape fabric. The landscape fabric will help protect the wood from moisture a bit while allowing good drainage. Oh, and it keeps the soil from falling out through the chicken wire!
Instead of laying it lengthwise like the chicken wire, we rolled two sheets width-wise, leaving excess around all three sides. The two sheets overlapped in the middle.
I found it easiest to staple down the short sides around the posts, then adjust the landscape fabric along the sides before stapling it. (We may have gotten staple-happy and added way more staples than strictly necessary.)

Finally, trim the landscape fabric to the rim or just below the rim.
Mix the potting soil and add to the planter
Then we mixed up the potting soil. I went with a homemade mix, with 2 parts organic potting mix, 1 part cow manure compost, and 1 part coconut coir.
Because I’m in an arid, sun-having climate, the coconut coir (and compost) will absorb water and keep my planters watered for longer. I also bought mulch to help with water retention, going with bark nuggets because my patio is too windy for something lighter weight. (Wear gloves when handling bark mulch, or you’ll end up with microscopic slivers over your palms, like me.)
I also added glacier rock dust for added minerals, as a rooftop garden designer assured me this is her secret sauce for being able to grow the Three Sisters in a pot, and I’ll topdress with vermicompost later in the season.
As this requires a lot of handling of dry materials, wear a mask and keep all those particles out of your lungs.

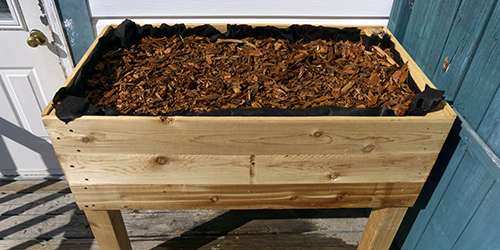
(As you can see, the drainage works excellently!)
And that’s it! The only thing I need to do is wait for my seedlings to mature and set up the insect netting.
This project took us about 5 hours to build, and 2 hours filling it up with soil. (It always takes double the time I think it will.) It fits my space perfectly, smells fantastic, and I can’t wait to grow fresh salad all summer long in this amazing elevated raised bed!
You may also like:
How To Make A Water Pump In Your Backyard
How to Make Bark Bread from a Tree that Grows on Almost Every Street in America (Video)
15 Gardening Mistakes You’re Making Right Now
10 Common Mistakes You Should Avoid If You Want To Raise Chickens
How to Prepare Your Homestead In Case Of a Natural Disaster


You answered all my questions about a raised garden. Thank you.
Thanks for your article! I made similar beds for my father-in-law last year that have a sloped front to get his wheelchair and legs under the front. If you would like the plan for it, let me know at [email protected]. I also made mine with cedar fence slats to save money – they were inexpensive . Also, they don’t rot as easily as some other woods. However, they weren’t as strong as I wanted. So, I added another brace and tied them together. I also added a layer of weed barrier under my soil to keep it from leaking from the cracks between the cedar slats.
Hi Don!
Thank you so much for sharing this with us.
It sounds really great!
We would like to know more details bout your project and we have sent you an email. You will receive it from [email protected].
God bless,
The Self-Sufficient Projects Team