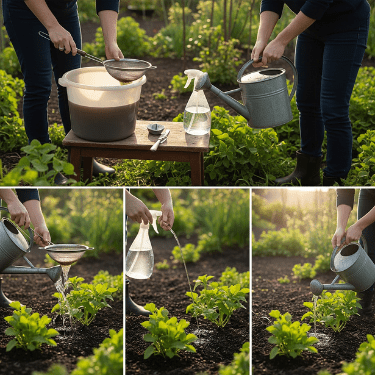
When I started living off-grid, I remembered this rule: your land will give you back what you sow into it. So, when it came to feeding my crops, I always ensured I used sustainable, natural and budget-friendly options. And when I wanted to boost the yield, I resorted to my grandma’s old-school tonic. Since then, my plants have been thriving way more than usual.
Today, in this guide, I’ll share this secret recipe with you so you can also boost your harvest. Whether it’s fruits, vegetables, or even herbs, you can speed up the yield of any crop using this DIY all-organic fertiliser.
Grandma’s Harvest Boosting Tonic Recipe
The DIY harvest booster doesn’t improve yield overnight. It does so by:
- Eliminating Waste: Because no harmful chemicals are used, you get to have a clean and thriving harvest that is all organic.
- Strengthening Plant Immunity: When your crops are receiving the best feed, their immunity improves as well. They are less prone to pest invasions and other plant-borne diseases.
- Improving Soil Health: Packed with innumerable nutrients, it enriches the soil with all organic matter, providing the best environment for roots to thrive.
Essentials Required
To get started, all you need are a few ingredients that you already have at home:
Coffee Grounds: Adds nitrogen to promote lush greenery.
Banana Peel: Provides potassium and phosphorus for thriving fruits.
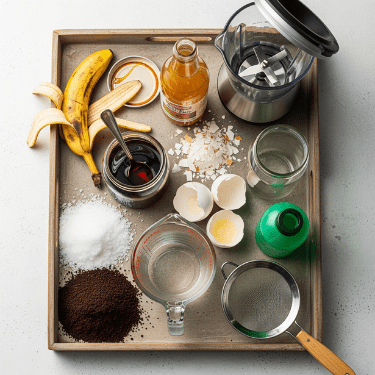
Epsom Salt: Introduces magnesium to the soil to initiate healthy chlorophyll production.
Honey or Molasses: Promotes the growth of healthy soil microbes to help plants absorb nutrients faster.
Liquid Base: Water to blend all the nutrients.
Apple Cider Vinegar: Aids in maintaining the soil pH level to maintain leaf greenery.
Crushed Eggshells: Infuses calcium into the soil surrounding to strengthen plant cells and prevent rotting.
➡️ Learn How to Make an Ingenious Eggshell Remedy and 25 Others Made from Things People Usually Throw Away
Blender: For grinding all the ingredients into a homogenous mixture.
Glass Jar: To store the mix safely for later use.
Spare Watering Bottle: To spray the mixture when in dilute form.
Sieve: To strain the mix.
With just these simple ingredients and tools, you can already start giving your plants a real boost right from your kitchen. And while you’re harnessing everyday items to nourish your garden, there’s an entire world of natural solutions waiting for you around your homestead. This book shows how to turn common herbs and ingredients into powerful remedies, salves, and tonics, helping you care for your family, your animals, and your land, all without even heading to the store.
Step-By-Step Guide to Preparing the Harvest Booster Tonic
Once you have gathered all the things to make this DIY boosting tonic, here’s what you need to do:
Step 1: Base Preparation
The first and foremost step is to prepare the base in which all the ingredients will be submerged. You can take 2-3 litres of normal tap water in a large container. Let it sit for at least an hour or two so it reaches room temperature.
To make a stronger tonic, you can consider using rainwater to prepare this base. You can actually make your own pressurized rainwater collecting system using nothing but some blue barrels and the instructions from this guide. Regardless of the liquid you choose, make sure you have a spacious container that can accommodate other ingredients later on.
Step 2: Grind, Add and Mix Ingredients
In a blender, add eggshells, banana peels, coffee grounds, Epsom salt and a bit of honey or molasses. Once the mixture is combined well add it into the water that you stored in a container previously. Now, add apple cider vinegar into this solution and stir it until the whole mixture is combined.
Once your mixture is blended, you can start feeding your plants immediately or store it for later. If you want to make the most of the plants you’re growing, you can learn here how to turn common garden herbs into teas, salves, and tinctures that treat everyday ailments and boost your family’s health. When supplies run low or emergencies hit, trust me, you’ll be glad you learned this.
If you don’t want to prepare a large batch at once, you can also store the dry ingredients in an airtight jar. Keep it in a cool and dry place and add tap water whenever you want to feed your crops.
Step 3: Let the Solution Rest
After the solution is prepared, cover the container and let it rest for 24 hours at least. This will give enough time for the ingredients to release their nutrients into the water. If you want a more concentrated solution, you can also let the solution rest for about 2 to 3 days. Nevertheless, ensure to stir the solution regularly so as not to let it spoil.
Step 4: Application
Strain the solution using a sieve if you are planning to spray it all over your plants. However, remember not to directly pour this concentrated solution onto the soil, as it can damage the harvest. Instead, dissolve it in equal parts of water and then pour it around the base of the plants.
For flowers, you can spray this solution every 2 weeks, while for fruiting, use it weekly for maximum yield. And please don’t discard the solids. You can use them as a slow-release fertilizer by dumping or burying them near plants.
Precautions to Take
Plants are extremely fragile by nature, and even one small mistake can harm them. It doesn’t matter whether you’re using a DIY fertilizer or a pricey one; if used carelessly, you cannot expect your crops to thrive. To keep your green friends healthy, take care of the things below as you apply the harvest booster mentioned here.
- Monitor the Aftereffects Closely: As soon as you apply the tonic, inspect the plants regularly for an hour or two. Look for any leaf burns, wilt or unusual discolouration so you can act rightly on time. Moreover, track the progress weekly so you know whether the solution is benefiting the crops or not.
- Avoid Overuse: Don’t fall into the trap of more is always better. Fertiliser, no matter how organic it is, used too much can stunt the growth of your plants. It can overload the topsoil with too many nutrients, preventing roots from absorbing what they actually need. Always apply an ample amount of the tonic that is enough for your plants to thrive.
- Set Consistent Application Timings: Fix a specific time for applying the tonic on your plants. You can consider early morning or late afternoon. This is the time plants are under less stress and able to absorb nutrients more efficiently.
DIY Microbial Compost Tea for Healthier Plants
When I first experimented with this, I noticed my plants weren’t just bigger. They were tougher and more resistant to pests. The secret: healthy microbes. Just like our gut, soil thrives when it’s alive with the right bacteria and fungi. This DIY compost tea brings those beneficial microbes straight to your garden.
Why This Compost Tea Works
- Feeds Soil Microbes: Beneficial bacteria and fungi multiply, helping your plants absorb nutrients more efficiently.
- Boosts Plant Immunity: Strong microbial life can naturally protect your crops from diseases and pests.
- Enriches Soil Structure: Over time, your soil becomes more crumbly, aerated, and better at retaining moisture, perfect for healthy root growth.
What You’ll Need
Compost: Use homemade or high-quality organic compost. This is the star ingredient, full of nutrients and microbes.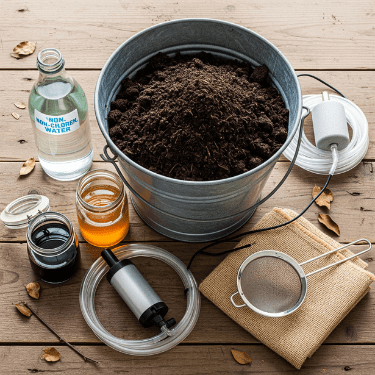
Molasses or Honey: Feeds the microbes so they multiply rapidly.
Water: Non-chlorinated water like rainwater is ideal, as chlorine can kill beneficial microbes.
A Large Bucket or Container: Something big enough to hold the water and compost mixture.
Aeration Pump (Optional): Helps oxygenate the mixture for faster microbial growth.
Strainer: For applying the liquid without solids clogging your watering can or sprayer.
Step-By-Step Guide
Step 1: Mix Your Base
Fill a bucket with 2-3 liters of water and add 1-2 cups of your compost. Stir thoroughly to make sure the solids are saturated.
Step 2: Feed the Microbes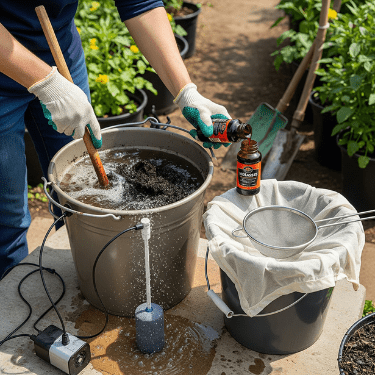
Add 1-2 tablespoons of molasses or honey. This gives the microbes a sugar boost to multiply quickly. Stir again until it’s evenly mixed.
Step 3: Aerate (Optional but Recommended)
If you have an aquarium pump, run it in your bucket for 12-24 hours. Oxygen-rich water encourages faster microbial growth. If not, stir the mixture a few times a day.
Step 4: Let it Brew
Cover loosely and let the tea steep for 24-48 hours. You’ll know it’s ready when it smells earthy but not sour or rotten.
Step 5: Apply to Plants
Strain the liquid and water your plants directly at the base. You can also spray the leaves lightly for a foliar boost. Apply once a week for best results. Don’t worry about the solids left in the strainer. They make excellent mulch or slow-release fertilizer when returned to your soil.
Precautions
Avoid letting the tea sit too long. After 48 hours, beneficial microbes can die off.
Use fresh water each time to prevent contamination.
Apply in the early morning or late afternoon to maximize absorption and prevent leaf burn.
Final Thoughts
This DIY booster tonic proves you don’t need to spend too much when it comes to nourishing your crops. With just a few scraps from the kitchen, a bit of care, and of course, lots of patience, your plants will be living a happy life. And as a result, you will be able to enjoy fresh and nutritious yields all year round.
Eat them, store them, and don’t forget to share them with your loved ones around.
This 10-Minute Soil Trick Can Double Your Harvest
Why You Should Can Dandelions Growing in Your Backyard (Video)
Vegetables You Can Harvest In Less Than A Month

