Are you familiar with the term “starving spring”? How about “the hungry gap”? Well, these were two terms that represented the struggles of the average person, pre-convenience foods, to store enough food to sustain themselves and their families.
Winter would come to an end, but there would not be a crop to harvest for months yet. Animals would be sparse, and it would be a few weeks or more before anything would be ready to hunt or eat. This issue was exacerbated by the fact that spring is a time of hard work for those who settle on the land.
Spring is a time for tilling and planting. This means there is an increase in caloric needs. Without an increased calorie consumption, we are quickly faced with an issue. Thus, the above-mentioned names.
Without having adequate provisions stored you would starve to death. Such was the case in Jamestown in the winter of 1609 to 1610, where 500 settlers dwindled to a mere 60 through starvation. These survivors jumped on a ship and headed for the Chesapeake Bay where another supply ship was set to arrive.
So, what did people bury underground to try and stave off the starving spring.
Burying Grains And Vegetables
To make fresh grains and vegetables last as long as possible you will need to either bury the food and insulate it, or leave it in the ground. While the root cellar is one of the best options, it’s not something most Americans are willing to invest in anymore.
Underground Silo
A much more affordable option is the underground silo. A large enough hole is dug about three feet into the ground, and lined with bricks. The brick lining should cover the bottom and walls.
The underground silo is scaleable, so you can really make them as big or as small as you like. You can also make multiple silos that are used for different foods.
The underground silo should be topped with a sturdy lid made of stone, metal or thick wood and rope. In extreme climates you could bury the lid, as well.
When storing food in these silos you want to layer the food between dry leaves. So, you will start with a thick layer of dry leaves on the bottom, then a layer of potatoes, followed by a layer of dry leaves and another layer of potatoes.
The insulation from the lid and the leaves will protect your food through the winter.
Leave ‘Em In The Ground
 There are some foods that can benefit from being left in the ground all winter long. This is an equally old method of burying food for the winter – only you are going to leave the food buried! Forget about the shovel on this one. The only other material you will need is straw to keep some above ground plants insulated.
Things like carrots and garlic will over-winter in the ground no problem. In moderate to cold climates kale, Brussels and some of the hardier greens will also make it through most of the frost. If you get concerned, you can use the straw to cover them completely.
Straw should be used on the coldest nights or, if you live in a very cold area, all the time. This method will not work for things like tomatoes and peppers, but it will do fine on hardier lettuces, greens and root vegetables.
Burying Meats
Burying meat is a tricky business, but it is possible. You must be very careful about oxygen and moisture. The very best way to bury meat successfully is to utilize the animal’s fat as protection from external moisture and oxidation.
The Iroquois Method
This method of burying meat is very interesting and allows the survivor to take advantage of several parts of an animal. When you kill a deer and remove the innards, keep some of the intestines and wash them out thoroughly.
Using multiple lengths of intestine, you can cut the intestines and tie knots in one end of each. Fill the open end with raw meat, shape it into a ball and tie the end to seal it.
Next, scrape the hide for as much fat as you can get. Render it down and pour the fat over your intestine balls. Be sure you do this in a container, so you don’t lose that precious rendered fat.
Allow the fat to cool and bury the meat three feet underground. The Iroquois claimed this meat would last 100 years!
The Confit Method
Cooking food in its own fat or “confit” is a great way to create meltingly tender cuts of meat. This method is most commonly used on duck legs. The confit method was created by the French and you still find it on swanky menus today.
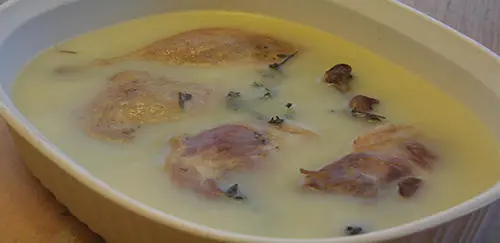
What most people don’t realize is that, after cooking meat this way, it can be cooled and the fat that surrounds the meat will harden and protect it from the outside world. Earthenware containers, or even a good cast iron with a lid, could be buried during the winter. The fat cap or shield that protects the meat would keep it safe until temperatures rose high enough to melt it.
Salt your meat overnight and render the fat out of your duck skin – or you can use chicken, and add something like lard to cover the meat. Cook low around 270 degrees for a few hours. Let the legs cool, and in the cold weather that fat cap will harden. Cover and bury at least three feet deep to discourage animals.
Burying Long Term Food Storage
Of course, there is also the proposition of the long-term food storage cache. While this would serve a different purpose, it could be beneficial. You would not bury your long-term food storage for preservation from the harsh cold of winter. However, you might consider burying your food storage to protect it from the other starving people around you.
You cannot give away the food you don’t have in your pantry.
Sturdy 5-gallon buckets will do just fine, and if they are outfitted with a mylar lining and an oxygen absorber you will really have something. If you decided to bury a few pails of food for reserve, or bury them at a bugout location, just be sure you do so in secret. This method is about preservation through hiding.
Fermenting In The Ground
Another angle you can take when burying food through the winter is to employ fermentation. Fermentation is the magic process of food breaking down over time and becoming something new and delicious. You can check out this Fermentation 101 guide for more information.
The most common fermented foods are things like pickles, chocolate and tea.
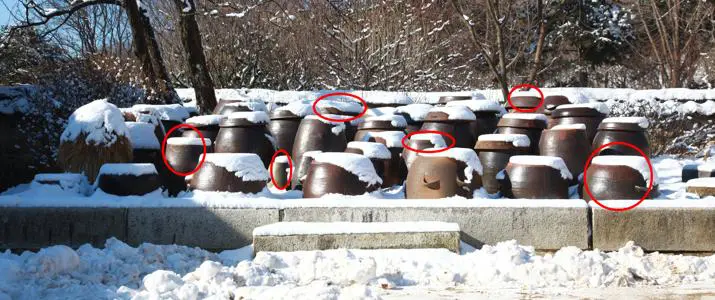
In Korea it’s very common to take Napa cabbage and smother it with red chili powder, fish sauce, garlic and ginger, then bury it in earthenware containers. In the ground this mixture will ferment over time and become what is known as Kimchi.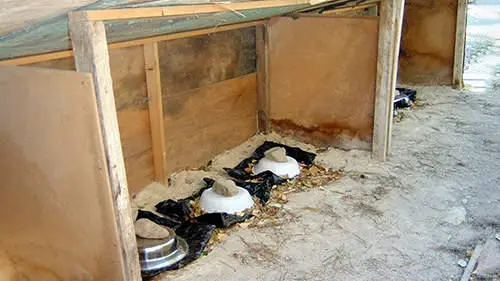 Now, the interesting thing about burying kimchi is that a 6-month-old kimchi is considered young in its fermentation. I cannot think of a better food to bury and have ready for spring.
If you are looking for something more familiar, you might consider burying sauerkraut. It is another one of those great fermenting foods that gets better with time. The beneficial bacteria will also proliferate in these foods over time.
If you are looking to bury food and preserve it through the winter, there are many methods. Deciding which route to take depends what you have grown this year and what you plan on having when the cold comes to an end.
All the methods mentioned are cheap to execute. Why not try a few different methods to see which work best for you? Now is a time of peace and excess. Now is a time for testing.
We have learned so much from the failures of the past. Let us not fall victim to the “starving time” that affected those poor settlers in Jamestown. Instead, we have the resources and the smarts to store plenty of food through the bitter winter and unearth it before our first sprouts of spring.
You may also like:
 26 Necessary Tools For Off-Grid Living
Cheap and Easy to Build Root Cellar in Your Own Back Yard (Video)
How to Build Your Own Wall Hanging Can Rotator
Five Ways Our Life Is Better Living Off The Grid


Video Way too long I couldn’t even get to the end without shutting it off
I agree!