
Straw bale gardening is a wonderful way to grow a few plants in a tiny space and have a fully-compostable garden at your disposal. While easy, there are a few common mistakes that happen in straw bale gardening. Let’s take a look at some of them here.
Starting Too Soon or Too Late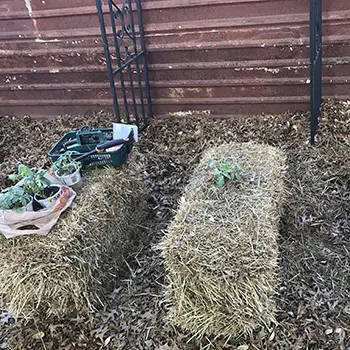
Remember that your bale is going to need at least six months to mature (on average). This means that if you’re going to have a straw bale garden in the fall, you need to start it no later than the previous January or December. If you try to start it in April for a September planting, your bale is still going to be far too hot and you’ll likely end up with scorched plants.
The flipside of this is true, too. Straw bales hold nutrients well, but they do tend to slide through the bale faster than say, your average raised garden. This is simply due to the fact that straw bales do eventually break down and, as with all things green and breaking down, return to the ground from where they came.
Beginning a straw bale more than a year before your intended planting is strongly not recommended due to the internal structure of the bale falling to pieces long before that.
Not Giving The Bale Enough Time
This sort of wraps into the above section, but it also needs a place by itself. Every single bale will mature and break down at a different rate. This means that there is a learning curve to straw bale gardening, but not one so hard that it’s impossible to perfect.
In an ideal world, you begin your straw bales in the fall. This should see most of them ready to plant by the following spring. For instance, a straw bale started in September should be mature and ripe for planting by April or May, but some that are very tightly packed or others that are late-cutting bales may not be. Early cutting bales that have been rained on before you get them may even be ready to go sooner.
So, what do you do? When you get your bale, take a moment to chart the specifics of it. Is it tight? Has it already been rained on? Is it growing a fresh stand of greens or is it so fresh that it’s still a little damp from being baled? Take the next few years and build yourself a database around these notes. That way, you’ll be able to better predict how a straw bale will act on your property under specific conditions. Always give them more time than you think you will, but build this information so you know how long the “average” bale takes.
Overwatering
Signs of overwatering include extensive mold, a “soaked” bale that is so saturated that it doesn’t have a chance to dry out at all, and a visible sagging when watered. It may even be leaning against the bale twine so hard that it snaps it. The way to fix this isn’t to stop all watering, it’s to slow down on how and when you’re watering. Water during the heat of the day so the water can evaporate faster.
Underwatering
Underwatering is as easily seen as overwatering. Bales will start to die and be so dry that they may become a fire hazard. A bale being prepared should be soft and damp but not so wet that it feels like wringing out a dishwashing sponge. It should spring back a little bit, too, when pushed on. If you are underwatering, do not go out and douse your bale. Simply step up the watering slowly but surely. Overwatering and underwatering are even more apparent once you have your plants in the bale: because then your plants can show you what’s going on inside.
The Wrong Kind of Bale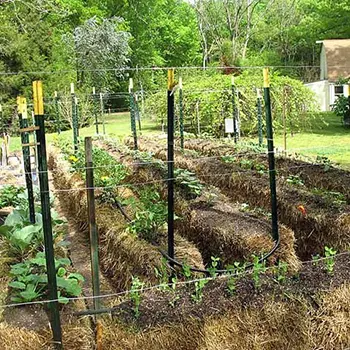
It is very easy to get straw mulch rather than straw bedding. If you go to a hardware store, it is very likely that you are getting the wrong kind of straw. Ideally, you want straw bedding that is viable for livestock animals to nest in. If people would not use the bale you want to buy for livestock uses, it is not the type of straw you are after. Mulch straw has been chopped into tiny bits and won’t hold up to the stresses of straw bale gardening.
Bale Too Tight
A bale that is baled so tightly that the ends are sunk into the bale is probably not going to make the best straw bale garden. There is no way for oxygen to flow into the bale (and that’s intentional: remember, people using them for livestock bedding don’t want them to be able to get wet or get moldy!) or to get the necessary space for roots to grow easily.
If you see this, try tying your own bale strings around the bale more loosely than cutting the original bale twine.
Lack of Nutrients
Though a properly cultured straw bale should not be lacking in nutrients, this strongly depends on where the straw was grown. Straw is a common crop to run over areas that have had nutrient-suckers like corn or cotton planted in the area for a few years. Though this is often used as a “green cover crop” (meaning that the straw is tilled under to provide nutrients for the crops for the next year), some may decide to harvest the first cutting for extra profits. And we don’t see anything wrong with that.
If possible, ask for a soil test sample so you can look at the nutrient profiles in the ground growing your straw bales. If they are severely lacking, you’ll need to add additional fertilizer to your straw bale to make up for that lack. Or, you can always plant a nitrogen-adding plant such as beans or peas to the straw bale the first year, compost it over the winter, and use it as fertilizer for a straw bale two years down the road. After all, homegrown fertilizer is king.
You may also like:

How To Build The Invisible Root Cellar (Video)
5 Solar-Powered Items That Actually Make Sense To Keep Handy
22 Ways to Boost Food Production in 2022
Raised Bed VS In-Ground Gardens
Livestock Animals You Should Start Raising For The Upcoming Economic Crisis


